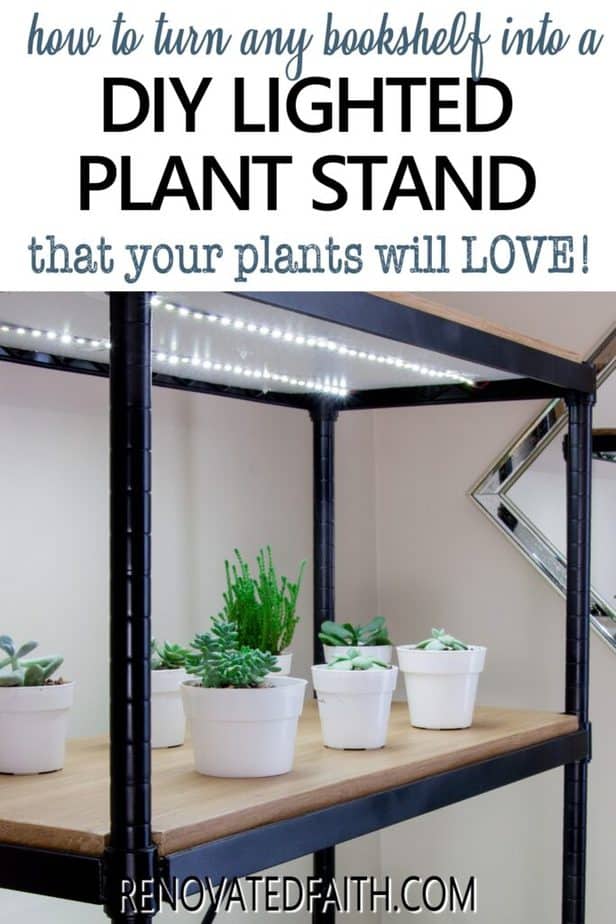
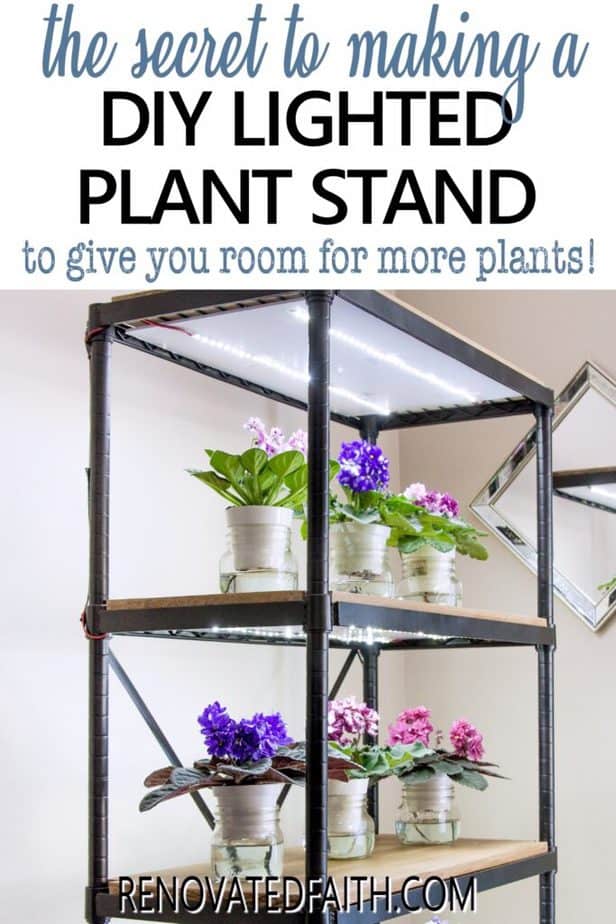
EASIEST DIY Grow Light Shelves (for Indoor Plants & Seedlings)
The Cheapest DIY LED Grow Lights for Houseplants
Running out of window space for your plants? Let me show you how to make a budget-friendly DIY grow light shelves with LEDs that your plants will love!
Any plant lover knows the internal struggle of wanting more plants but not having enough well-lit space to keep them. Whether it’s succulents, African violets orchids, or starting seedlings, there is something about houseplants that is truly addictive. It is impossible to have just one!
My addiction to plants started about 10 ago as I was in awe of how easy they were to grow indoors. But inevitably, the thrill of getting more plants was brought to an abrupt halt when I ran out of window space.
Fortunately, I found the best way to give my plants more well-lit space that also compliments the look of my home décor.
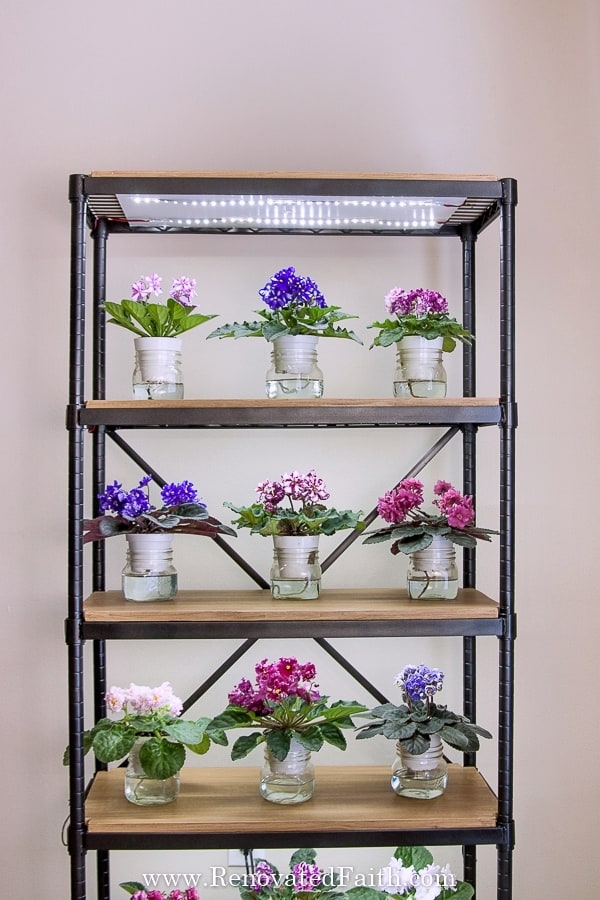
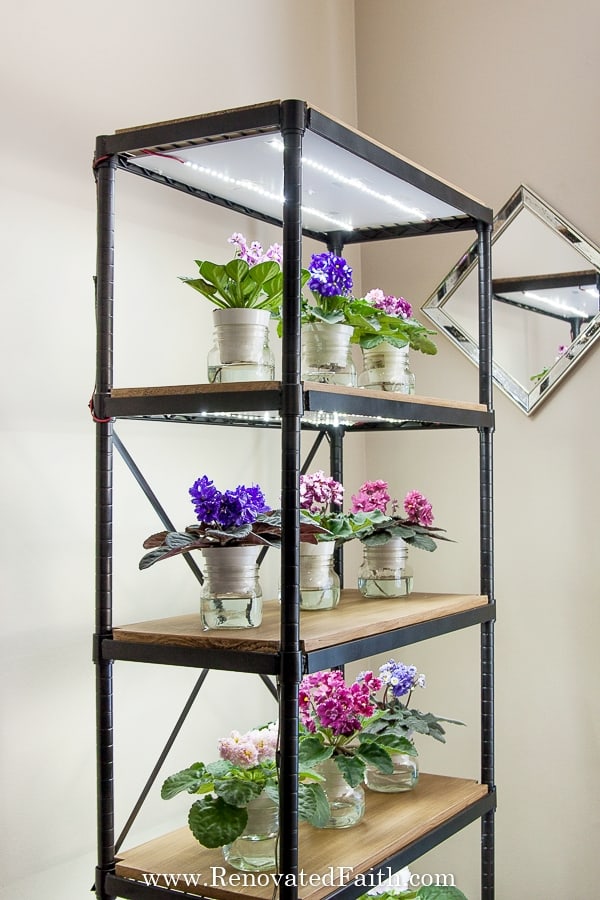
I’ve used this same LED system for years with African Violets and succulents and have had great success as I can customize the dimmable lights on a timer to meet the needs of different plant varieties all on one shelf.
With this step-by-step guide and video, I’ll show you how to turn any open bookshelf into an LED lighted-plant stand at a low price!
LET ME SHOW YOU:
- How to build your own custom LED grow light stand for indoor plants or seedlings
- Why LED lights are great for house plants and what kind to buy
- How EASY it is to add LED lights to any bookshelf that compliments your home’s decor
- A video tutorial and printable pdf of the simple step-by-step instructions
- Encouragement in how to have more faith in this week’s Renovate Your Faith Devotional a the end of this post
(As an Amazon affiliate I earn from qualifying purchases. Please see my full disclosure HERE) I only use affiliate links for products I use and love.
The Best Led Grow Light Strips
☑️ If you are curious or in a hurry, here is a quick link to the best LED grow lights. I have used them for years with great success: The Best Led Lights for Plants Also, if you want lights you don’t have to solder, check out these and the 2 year update below: Solder-Free LED Lights
Quick Links to Information in this Post
- 1 The Cheapest DIY LED Grow Lights for Houseplants
- 2 The Best Led Grow Light Strips
- 3 UPDATE ON My DIY Grow Light SHelves – A Solder-Free Option
- 4 The Best LED Grow Light Strips
- 5 DIY Grow Light Stand With Dimmable Remote
- 6
- 7 Supplies Needed For Your DIY LED Grow Light Kit
- 8 How to Build a DIY Grow Light Shelf With LED’s (Video Tutorial)
- 9 RENOVATE YOUR FAITH: How To Better Trust God
- 10 FREE DIY LED Grow Light Strips Printable Instructions
- 11 FAQ’s: Easy DIY Grow Light Shelf with LED’s
- 12 More Posts Related to The Best DIY LED Grow Light Strips
- 13 How To Build A LED Grow Light Stand, YouTube Video
- 14 Final Thoughts on The Best Grow Light Strips for Plants
- 15 Best LED Grow Light Strips
Why Can’t You Just Grow Plants in a Window?
Growing plants in a window can be frustrating! For one thing, you don’t have a lot of room in a window ledge and it can be hard to control if plants are getting the right amount of light.
When trying to grow garden seedlings in a window, they will often suffer from not enough light which makes them long, leggy and fragile. Instead, you want sturdy, shorter plants that are strong enough for the elements outdoors. Vegatable seedlings and indoor plants love overhead light that is strong enough that they don’t have to ‘reach’ to get more.
Is Artificial Light Bad For Plants?
Plants like natural light because if has all of the different colors or wavelengths of light. In the past, artificial bulbs have not had the full spectrum but usually just the warm end of the wavelengths. Then, grow bulbs were invented to supply plants with full-spectrum light.
The term ‘grow light’ can be deceptive because houseplants do not have to be grown under dedicated ‘grow light bulbs’ in order to thrive. Indoor plants also need the correct color intensity or brightness from bulbs that don’t get too hot as to cause leaf burn.
Fortunately, most basic white LEDs contain the full spectrum of blue and red lights that plants love without producing much heat.
Some specialized indoor grow lights systems actually have artificial lights with purple bulbs to include the red and blue spectrums but I much prefer the white light of LED strip lights.

What Are The Cheapest ‘Grow Lights’?
Grow lights are expensive! But, if you are wondering what you can use, instead, you’ve come to the right place! LED lights are cheaper than grow bulbs and although the initial cost of LEDs can be more than fluorescent bulbs, LEDs are much cheaper long-term because the bulbs never need to be replaced.
Also, grow bulbs and fluorescent bulbs need to be replaced before they go out because their intensity lessens over time. This is usually every 6 months for plants on a stand.
LEDs stay the same intensity for years and the bulbs never need replacing. LED light tape or strips are the cheapest LED grow light because they are inexpensive to make and there are no bulbs to change out.
Do Indoor Plants Grow Under LED Lights?
I know of several succulent and African violet sellers that propagate and grow all of their plants under LED lights.
I have grown African violets and succulents under the same LED light tape for years and have consistently had great results.
After propagating hundreds of baby plants under these lights, I have found that young plants love the cool light source while the LED lights still give them the intensity they need to grow into sturdy plants. I have no doubt that LEDs are the best grow lights for succulents, African violets, and other houseplants.
LED Strip Lights for Growing Seedlings
Garden seedlings absolutely LOVE LED lights! The cool, full-spectrum light is exactly what is needed for healthy seed germination. This way young plants get a jump start before the growing season where they have to brave the elements outdoors.
As a result, healthy seedlings lead to faster plant growth and better production later on. And because LED lights are flush to the shelf, you will also have a lot more room for more seedling trays even if you are growing in a small area!
Starting plants from seed means you have much more of a variety to pick from as there are more options for seeds than young garden plants. In addition, seeds are also much cheaper than buying small vegetable plants! And if you’re like me, you can enjoy a little indoor gardening therapy during the winter because of your LED growing system.
How Difficult Are LED Grow Light Strips to Set Up?
This tutorial shows you step-by-step exactly how to install your LED grow lights on your stand. The tutorial below involves soldering which intimidated me at first. (See the update below). But I promise, it is so easy and if I can do it, you can do it. If you don’t want to solder, there are some opportunities with quick connectors.
This process is so much easier compared to some LED light kits that have multiple LED drivers, heat sinks for heat dissipation, and other electrical components to deal with. This grow light system is incredibly simple and dependable!
UPDATE ON My DIY Grow Light SHelves – A Solder-Free Option
I started a second light stand for my orchids and because I didn’t want to get out the soldering iron, I just simply left the tape in one super-long strip. I started on one row of lights on the first shelf and when I got to the end of it, I just curved the tape around and started a new row on the first shelf and kept doing this.
When it was time to move to a new shelf, I just ran the tape down the back of one of the vertical supports on the shelf where no one could see. The arrangement of the light tape can look messy but no one is going to see it from behind the shelf and it saves so much time! For this solder-free setup, I used these brighter lights that can’t be soldered anyway: Solder Free LED Lights
LED vs. Fluorescent Grow Lights
LED strip lights have been the best option with growing African violets and succulents. Last year I still had a 4 ft grow light stand with T-12 lights and I also experimented with T-5’s. Fluorescent lights put out a LOT of heat, which can cause leaf burn to plants if water droplets are left on the leaves. Indoor LED light strips give off very little heat which leads to faster plant growth.
In fact, I’m never concerned if I accidentally get water on the leaves of African violets. It never harms them since the LED lights aren’t hot enough to cause a burn. Also, LEDs are a safer option as opposed to having hot fluorescent bulbs burning for long hours in your home. Unfortunately, fluorescent lighting can be a fire hazard if they overheat.
In addition, the only way to change the intensity of fluorescent lights is by changing their distance from the plants. That means that you either have to take that into consideration when building your own grow light stand or make the height of your lights adjustable. Those old shop light fixtures (fluorescent light bars) hung on a piece of chain waste a lot of vertical space that could be better used for more plants!
The Best LED Grow Light Strips
After trying several different led strip lights I have found that the Junwen Waterproof LED Light Strips work the best by far. Click here for the current price of these LED strip lights. These high-efficiency LED strips use less power while providing plenty of light output for plants. Because LED lights use less energy, they have a lower heat output which means they are safer and have a much longer life span. Again, I used these for the light stands I did not solder: Solder-free LED strip lights.
Fortunately, these LED strip lights don’t cost much money, include a 12-month warranty and you can get free shipping with the link above. You might also find LED strip lights in your local big box store but some are better than others and I’ve had a great experience with these.
DIY Grow Light Stand With Dimmable Remote
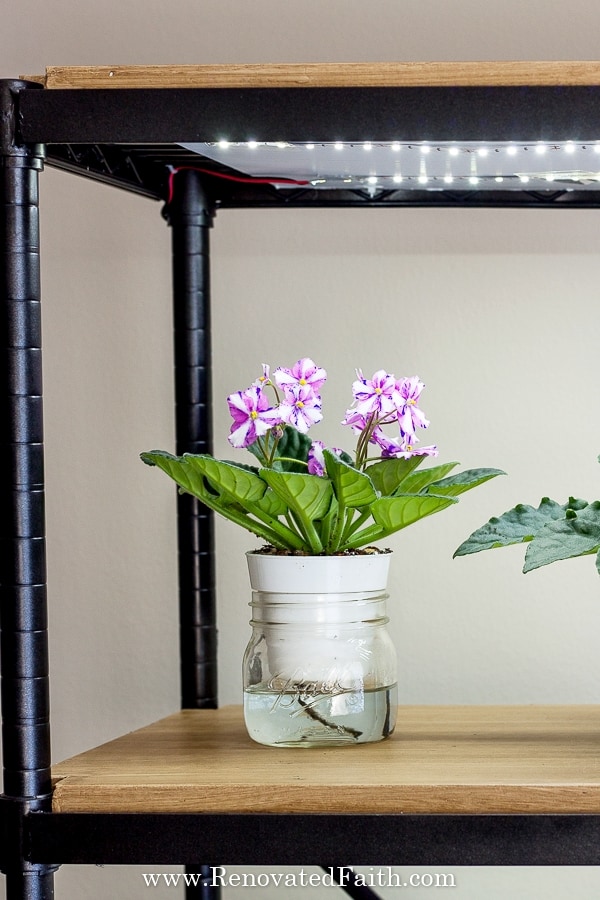
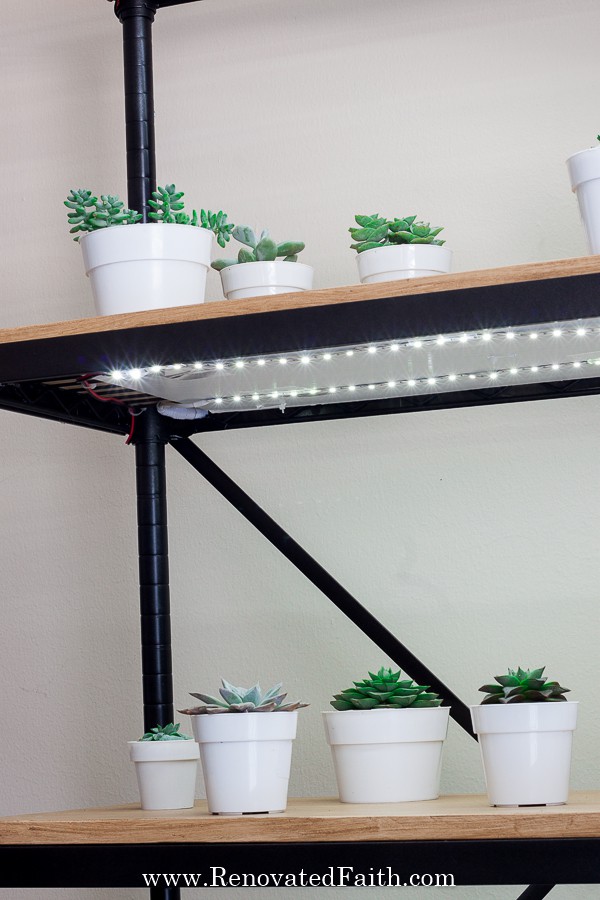
An important consideration for healthy plant growth is the amount of light they need. I love that these LED lights are dimmable so I can easily change the brightness levels on each shelf with a remote control. With fluorescent bulbs, your only means to adjust light intensity is by changing the distance the plants are from the lights. But you can save so much space with these adjustable LED lights because your plants can get the right brightness levels at any shelf height.
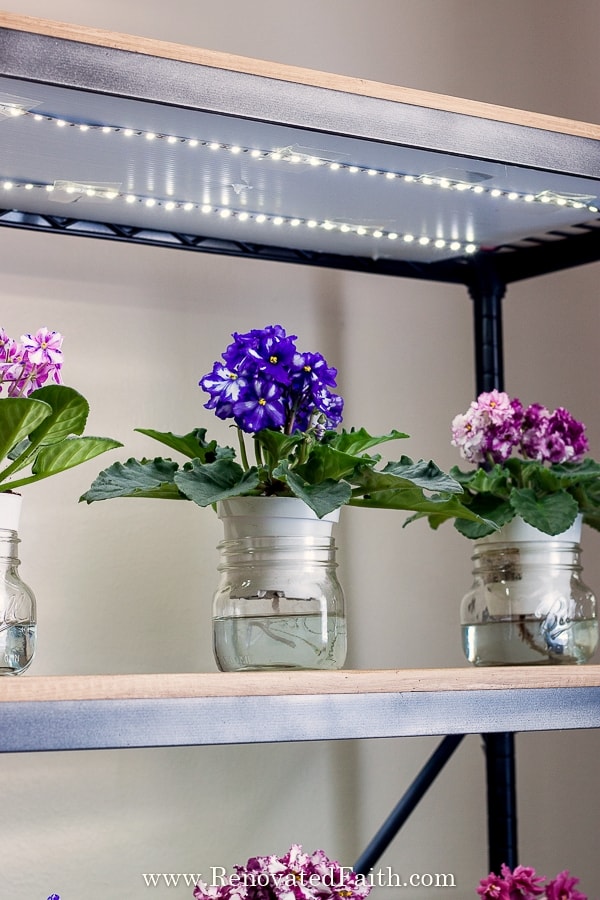
Since the LED light tape is flush against the underside of each shelf, it doesn’t take up any extra vertical space. The small size of LED light tape allows it to be almost hidden which is so much more attractive than the metal housing of traditional fluorescent lights or incandescent bulbs.
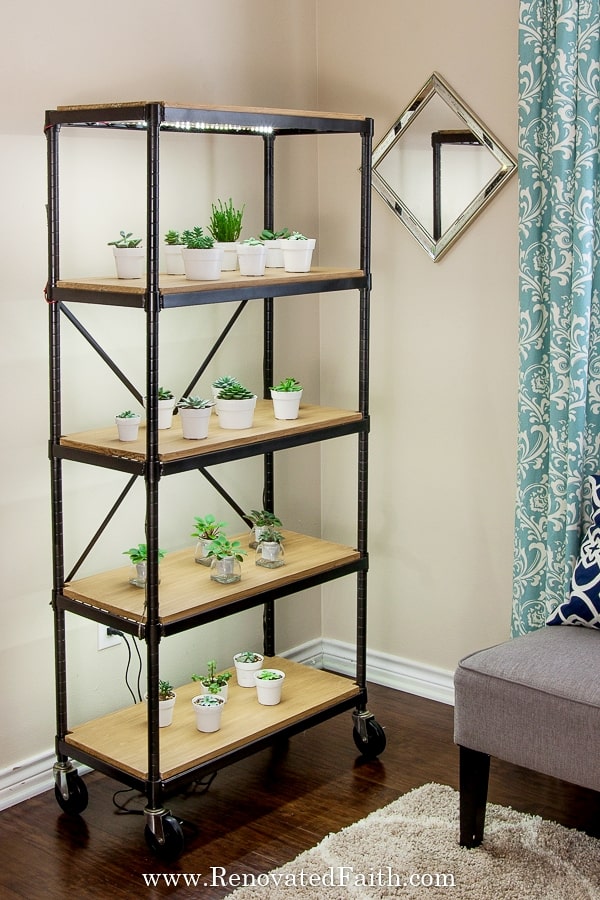
On my DIY grow light shelves, I’ll show you how to set different shelves to varying light strengths to fit the light needs of various houseplants or plant babies. You can build your own light stand set-up with as many shelves of plants as you’d like.
What Is The Best Color for Grow Lights?
One question that plant growers often have is regarding the best color spectrum for their houseplants. Research has been done to see how the color of light affects plants. Researchers found that red and blue light were most important for plants and that they need them in combination.
In fact, red light was more critical for flowering and blue light was needed for leaf growth. While the combination of red and blue bulbs was vital to plant growth, green and yellow light were less important.
Fortunately, all basic LEDs (like the light tape I use here) have the red and blue spectrums and more advanced bulbs have more green and yellow.
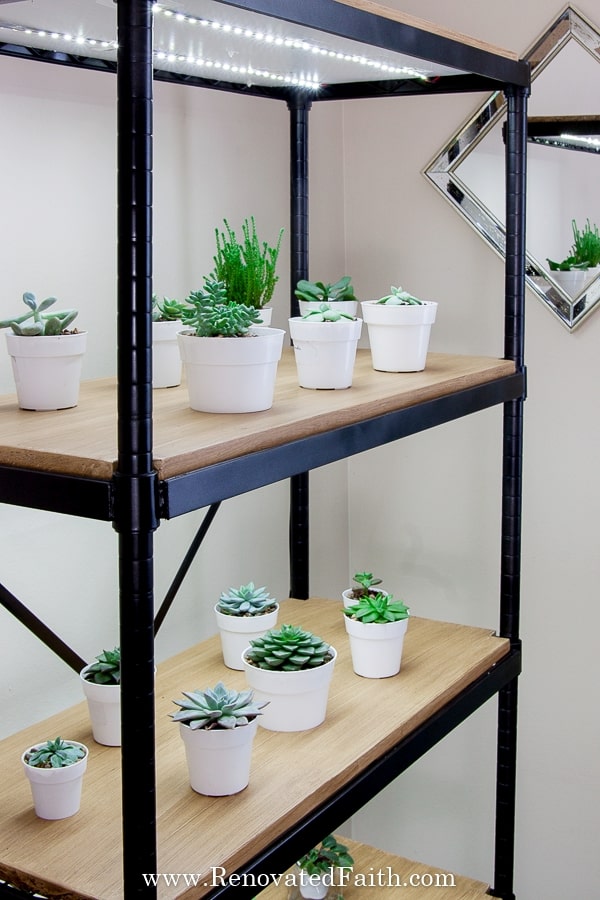
I‘ve grown succulents, African violets, and orchids under this daylight LED light tape (5000-6000K) for years and they have all thrived. You could also use this setup for seed starting or indoor growing of garden plants.
What Are The Best Shelves for Growing Plants?
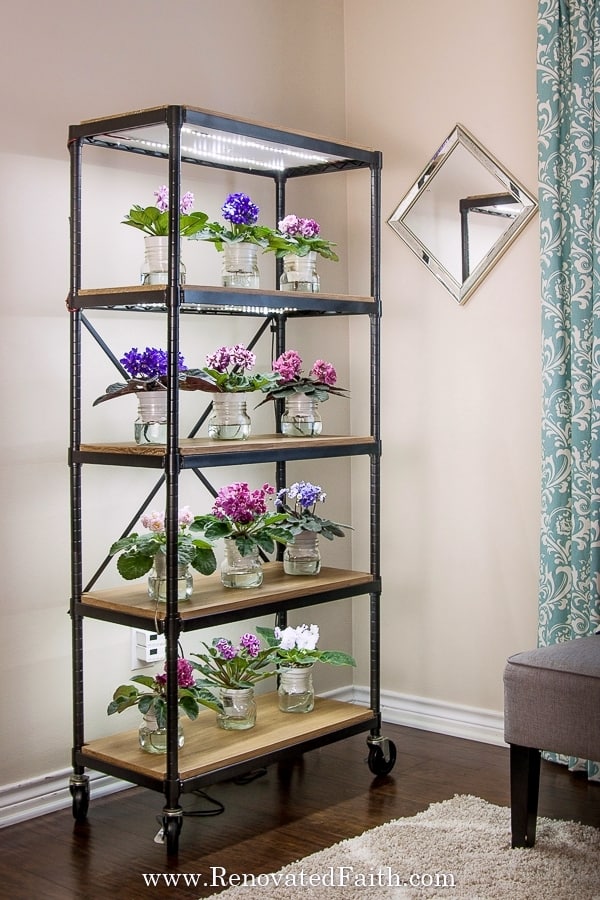
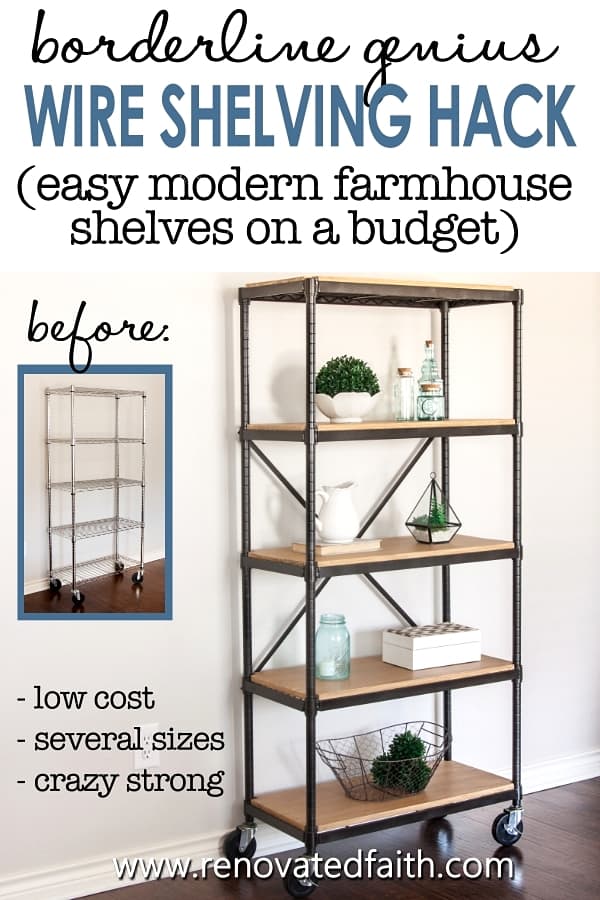
Any shelves can work for growing plants but I especially like open shelves to increase airflow. Also, for plants that like humidity, mold isn’t a concern with open shelves as it would be with closed shelves. Fortunately, industrial shelves work so well for any decor style including modern farmhouse, coastal decor or traditional styles. Here are some stunning, low-cost options here: Industrial Pipe Shelves
My industrial shelves are actually a wire shelving rack that I customized to have the style of industrial pipe shelves but still have the strength of a wire rack. You can also use this budget-friendly option to turn any wire rack into a stunning industrial shelving unit here: DIY Industrial Shelves (Wire Shelving Hack)
Supplies Needed For Your DIY LED Grow Light Kit
Printable Step-by-Step Instructions – If you want a printable version of the instructions below (with no ads), you can subscribe to my weekly email where you will get access to this printable and the rest of my free library. See the form at the end of this post or click here.
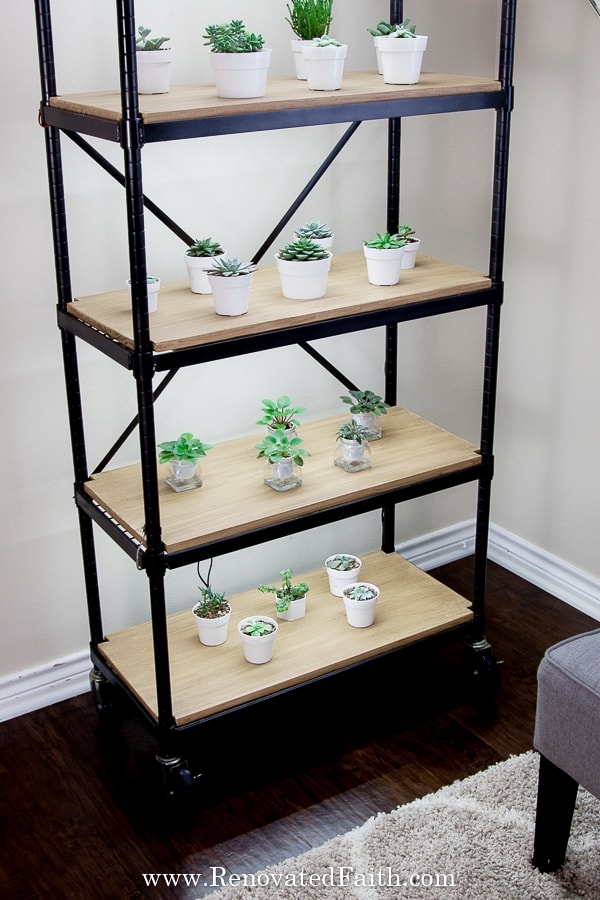
Plant Stand – You can use any open shelf to make your LED-lighted plant stand. For my 5-shelf plant stand (64″x14″x30″), I gave a wire shelf unit an industrial pipe look on a budget here: DIY Industrial Shelves(Wire Shelving Hack) You can also find lots of low-cost open shelf options here: Industrial Pipe Shelves
LED Light Tape with Included Dimmer and Power Strip – I have used this LED light tape for years and my plants love them!
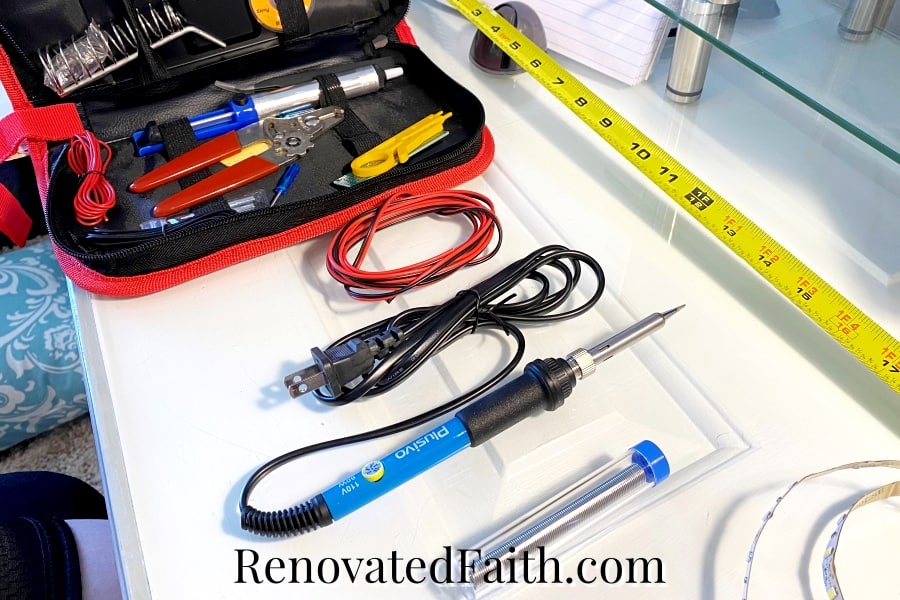
Soldering Iron, Solder and Wire Strippers – I like using this kit as everything is included and it’s low-cost: Soldering Kit (I was really intimidated about soldering at first, but it is SO easy and I’m glad I went this route. If you don’t want to solder there are quick connectors online, but I don’t have experience with them: 8mm LED Quick Connectors
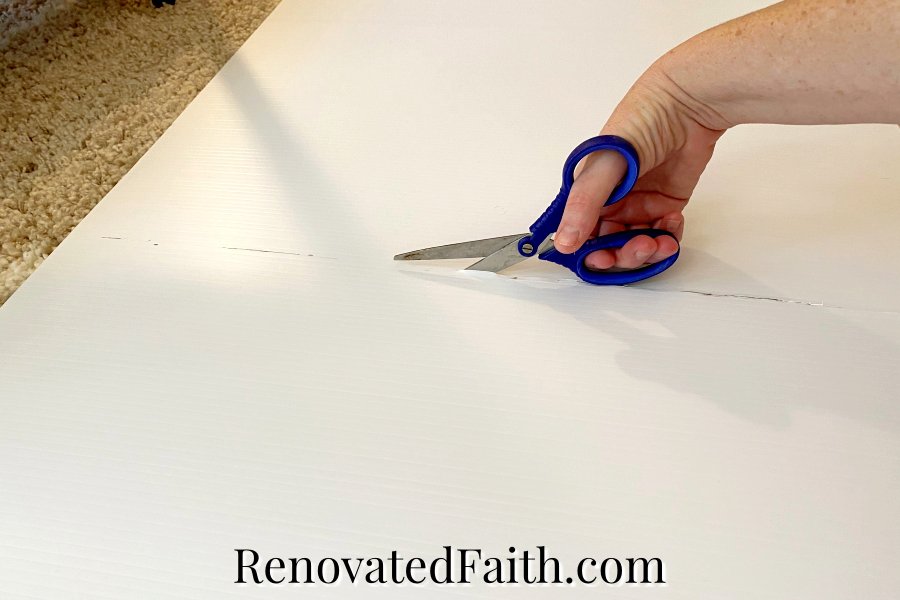
Coroplast – Check your local home improvement or local hardware store for the best prices
Scissors – I love these for everything! I have three pairs of them.
White Zip Ties OR Hot Glue – If you are using a stand with wire shelves, get the cable ties. If you are using a stand with solid shelves, use hot glue.
1 Power Strip (Depending on your setup you might need one or two extension cords which you can find at big box stores)
Light Meter (Optional) or use one on your iPhone.
LED Dimmer (If you need extras)
Power Supply (If you need extras) – These are the same as the computer power boxes
Tape Measure
How to Build a DIY Grow Light Shelf With LED’s (Video Tutorial)
Don’t forget to check out the video that goes with this post! It should pop up on your screen but if it doesn’t, you can access the YouTube version at the bottom of this post. In the details below are lots of easy ways to get the best results for the specific type of plants you are growing.
Step 1: Make a Plan for Your LED DIY Grow Light Shelves
Don’t forget to download and print your free pdf instructions for your led plant light stand by filling out the short form at the end of this post.
The first step is to pick out the open bookshelf or wire rack for your DIY grow light shelf. Check the supply list above for some low-cost wood and metal shelf options. You can also convert a wire shelf to an industrial shelf by clicking here: DIY Wire Shelf Hack
How Many Grow Lights Per Shelf?
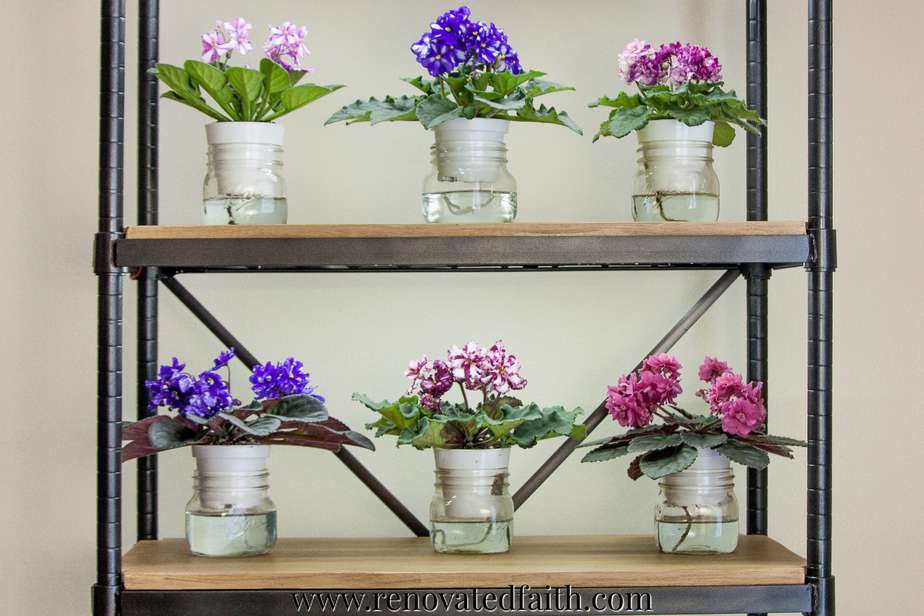
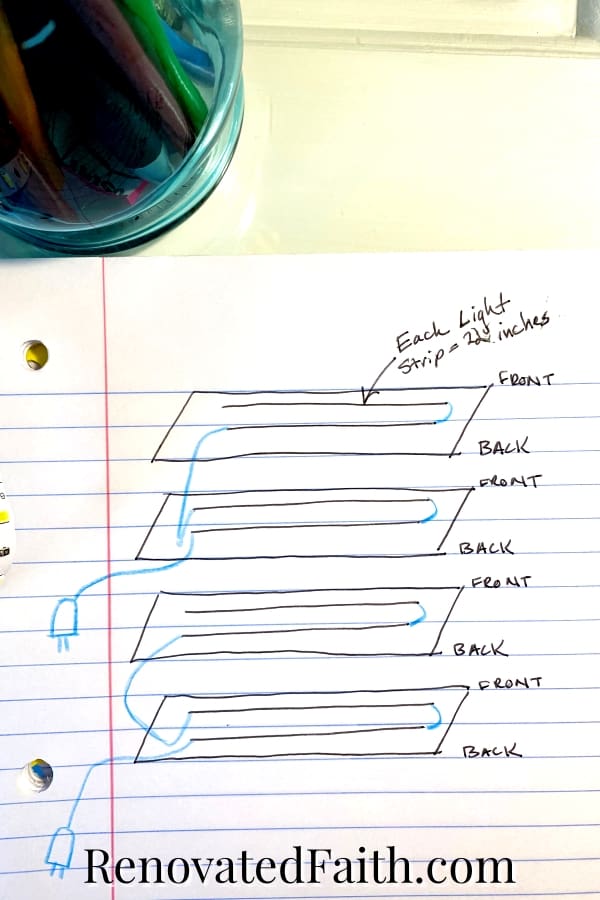
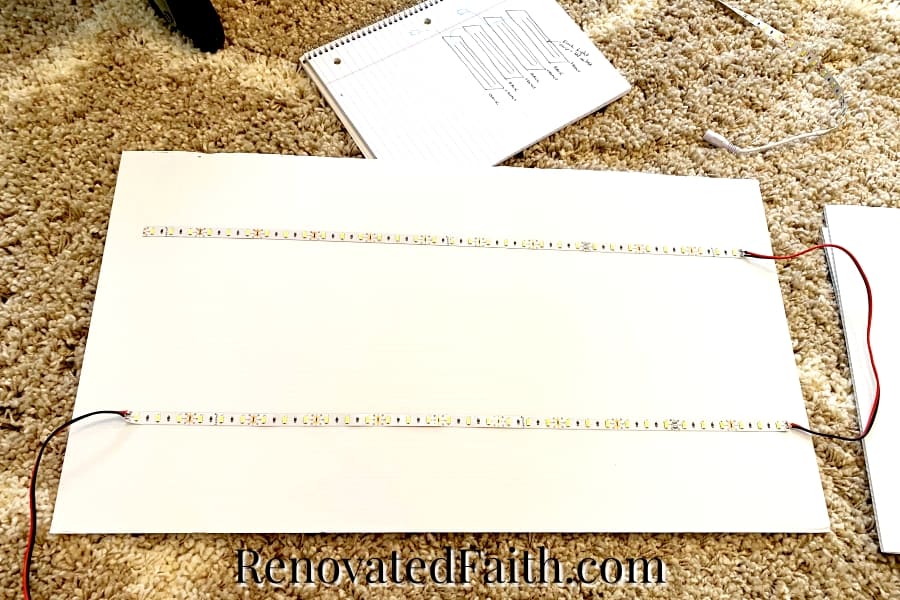
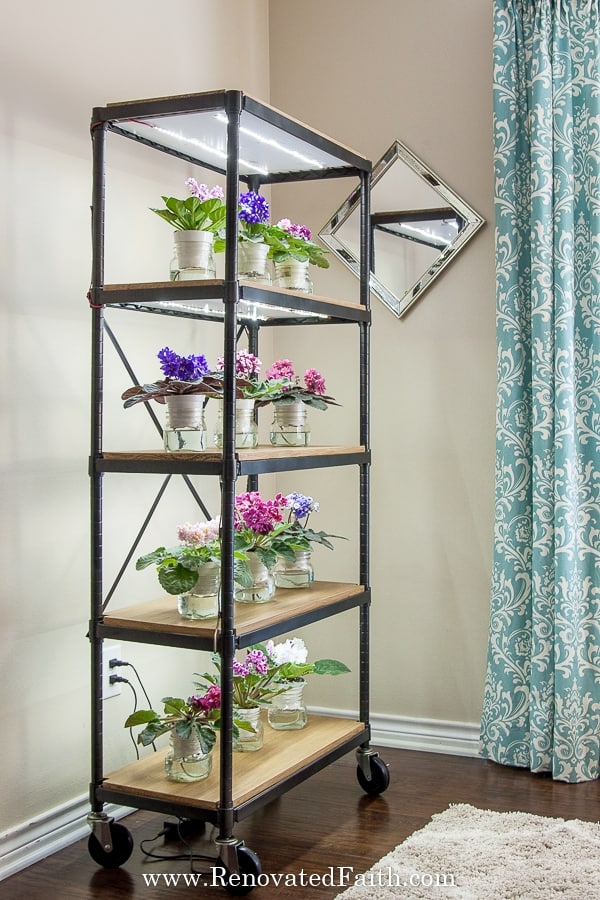
My plant stand has 5 shelves and measures 30” x 14” x 64”. This shelf unit has two rows of light tape per shelf but you could also have three rows like I did on my old 4ft grow light stand for African Violets.
Spend some time planning out your grow light stand setup. Be sure to configure your layout so the power adaptor wire and the wire connecting one shelf to another are on the backside of your shelf. That way they will be easier to hide.
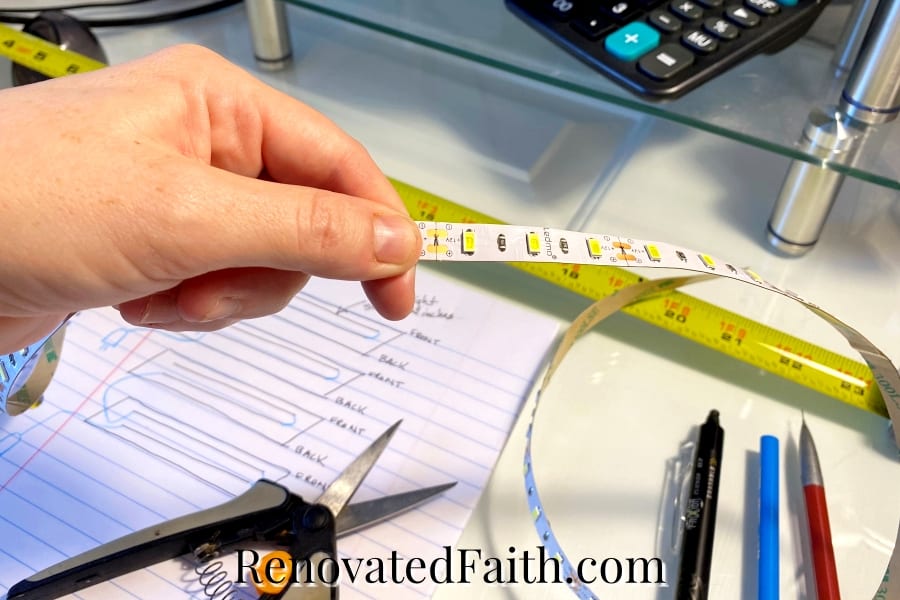
Each roll of light tape comes with 16.4 feet of LED light strips, 1 dimmer, and one power adaptor.
The great thing about these light strips is that they are dimmable and can be easily adjusted for your plants’ light needs. For my light stand, I wanted two options of light strength so plants that needed more light could be on the top two shelves, and lower-light plants could be on the lower two shelves.
To do this, you need two power strips and two dimmers. Since one power strip and dimmer is included with each roll of light tape, I got two rolls of light tape (click here for the current price).
Plan out your diagram on paper because it is so much easier to make corrections when they are written down versus when the lights are already on your stand.
IMPORTANT TIP: Make sure to run enough rows of lights per shelf so your plants get enough light. Two rows of lights per shelf were enough light for African violets but they might not be for another plant. To find out how much light you need per shelf, use the light meter I mention in the supply list.
Here’s the diagram I made:
So many of my DIY projects remind me of God’s capacity to transform our brokenness and renew our hearts. If you are a work-in-progress, just like I am, check out the Renovate Your Faith Devotional at the bottom of each DIY and home décor post. Click here to get a weekly reminder of new posts by adding your email address.
Step 2: Prep Your Grow Light Setup
My initial African violet light stand didn’t have the addition of the coroplast, which not only covers the wires but helps to direct the light downwards to the plants. This was an idea I got from Bill Gauthier who is an excellent resource on indoor plant lighting setups for houseplants. If you have any questions I can’t answer, I’ll be sure to get you in touch with him.
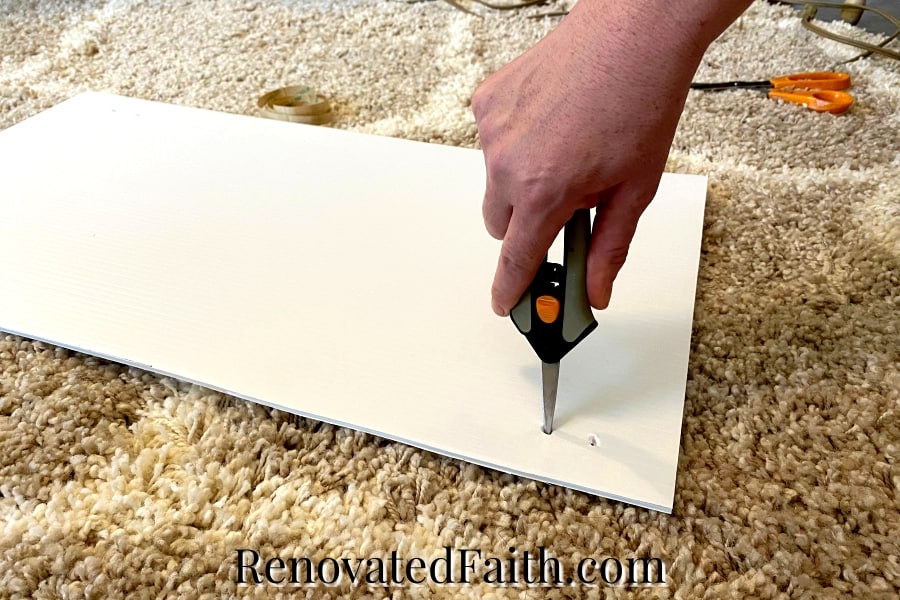
As shown in the video, cut the Coroplast to size so it is large enough to cover the underside of each shelf. The coroplast gives you a surface to attach the lights and also helps to reflect the light downward toward your plants.
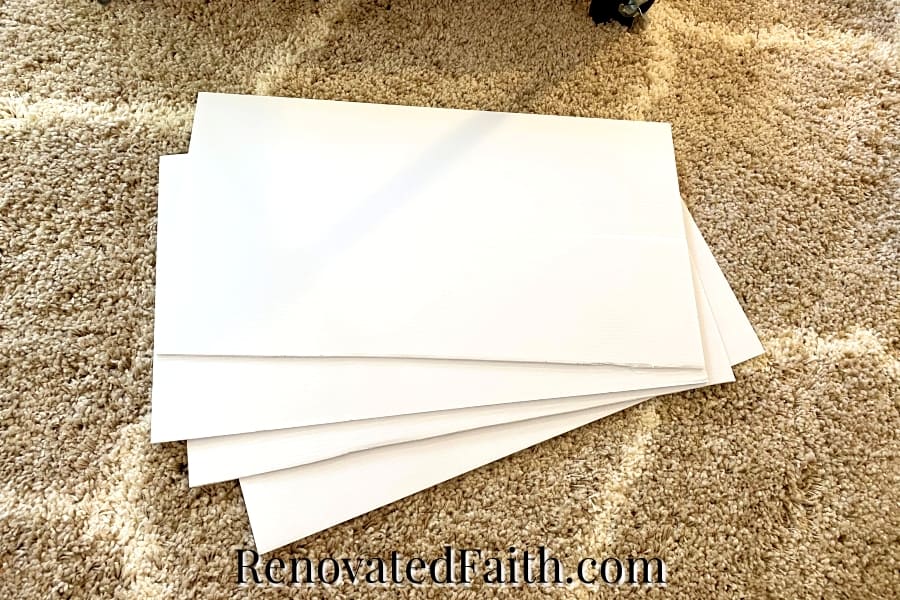
If you are on a tight budget, you can skip the coroplast by attaching the lights directly to be bottom of the shelves or use thick white poster board.
Step 3: Wiring Grow Lights
Start with the power adapter end of the roll of LED light tape. Cut the lengths of light tape to the desired length with scissors. Be sure to cut only along one of the dotted lines.
I soldered my wires together and was so intimidated at first. But with the soldering kit and this video (How to Solder), it was so easy! There are also some quick connectors that could work instead, but honestly, I’m glad I soldered the wire to the light strips.
Here are the quick connectors that should work for the 8mm light strips but I don’t have any experience with them: 8mm Quick Connectors
Below is the cut list for my 5-shelf DIY grow light stand:
5-Shelf Lighted Plant Stand Cut List:
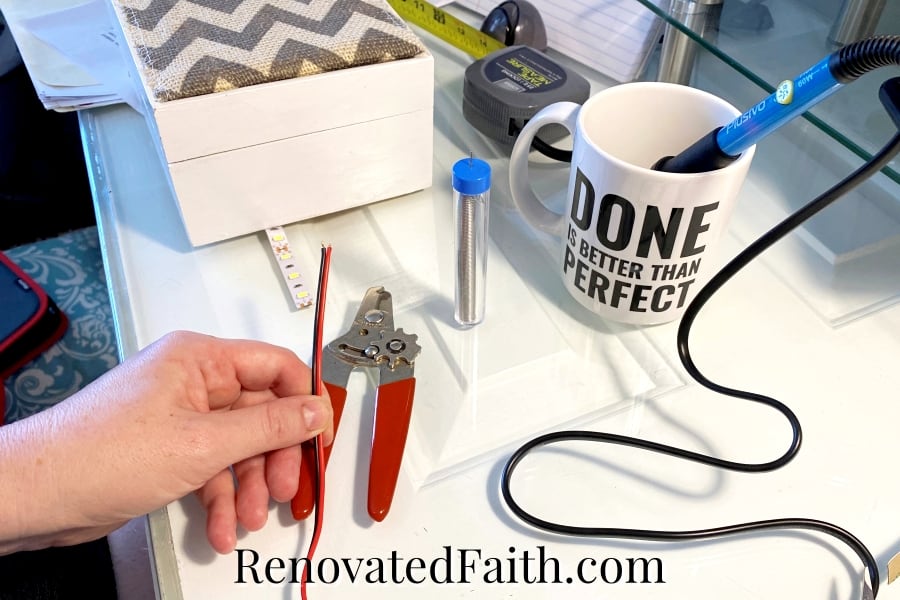
4 – 8 inch pieces of wire, stripped 1/2 inch on each end. Click here to see how to strip a wire.
2 – 22-inch lengths of light tape that have the power adaptor connected*
6 – 22-inch lengths of light tape
2 – Longer lengths of wire. – The length will depend on your light stand size.
*Each roll of light tape comes with a power adaptor end and that’s why I got two rolls. The 22-inch length of the power adaptor lengths of tape is the measurement of just the tape without the adaptor.
Soldering Your LED Grow Light Strips
If you are new to soldering as I was, I highly recommend this video: How To Solder One concern I had was the safety of soldering my own wiring but because of the AC adaptor this is a very low voltage. If you make a mistake and solder a negative side to a positive side, you will not electrocute yourself. I know, because I accidentally did this a few times. All that happens is that the light strip won’t turn on. With that said, I never use your lighting with the AC power adaptor, and be careful of the soldering iron as it is extremely hot.
My video will show me soldering but this video (How to Solder) explains it so much better than I do. I like putting my soldering iron in a mug as a holder because it’s less likely to tip over.
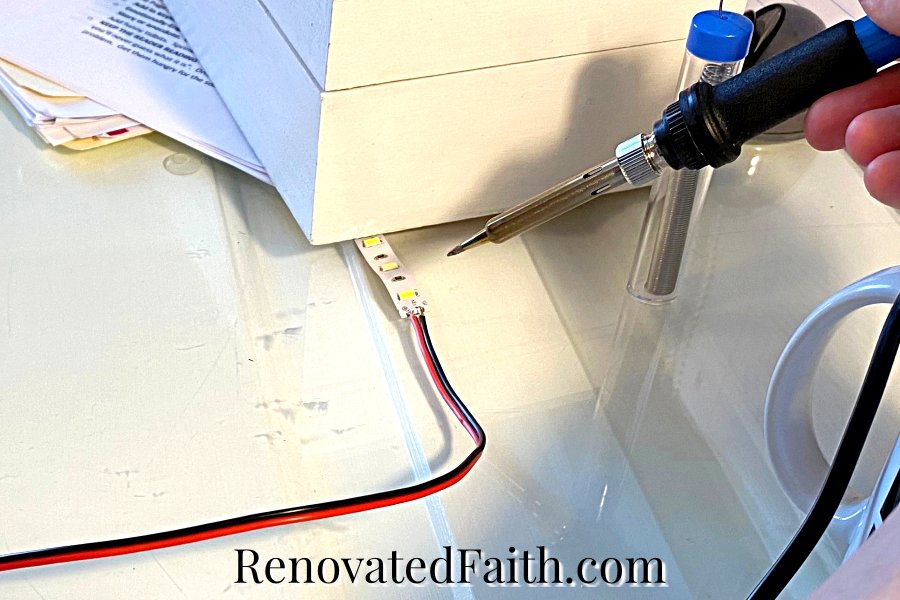
Start with the light tape with the attached power adaptor cord and solder one of the stripped wire pieces to the copper tabs on the tape, making sure to always connect positive to positive and negative to negative. Then solder the wire to the next piece of wire and so forth. Always make sure you are soldering positive to positive and negative to negative.
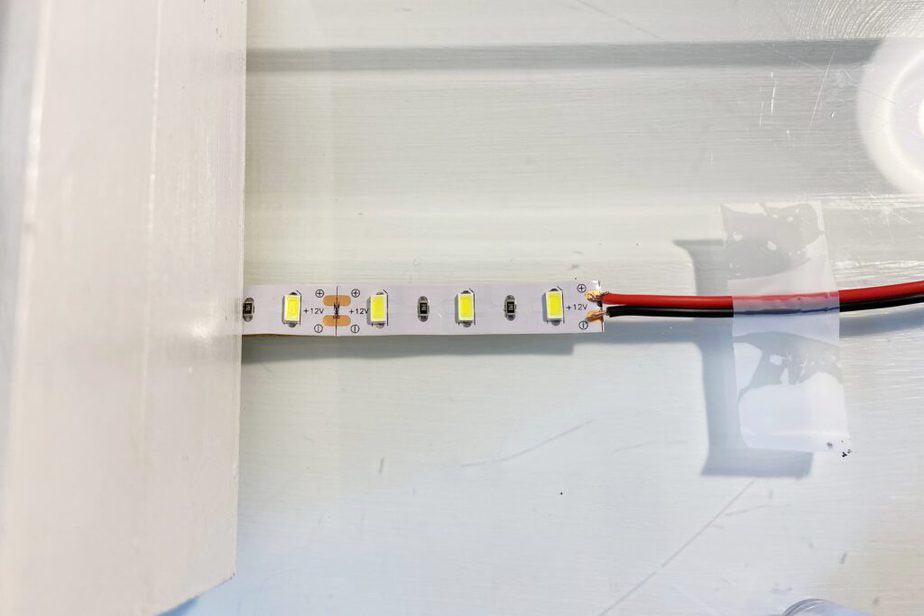
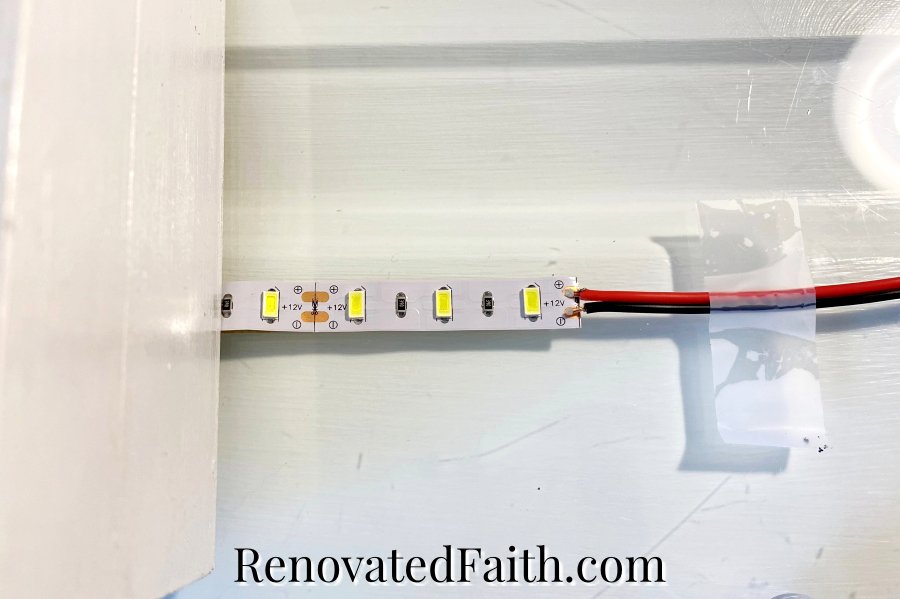
Once everything in soldered together, plug each power adaptor cable into each dimmer and plug them into the wall to make sure they are working.
Step 4: Attach The Connected LED Grow Light Strips To The Coroplast
As shown in the video, attach the lights to the coroplast before attaching the coroplast to the shelves.
Pull the backing off one piece of tape at a time and attach it to the coroplast. The adhesive backing on the light strips is very weak, which is why we will need the clear gorilla tape or some adhesive pads to hold the light tape in place.
Once your lighting is attached, add a piece of clear gorilla tape to the tape every 4-6 inches.
Step 5: Attach Your DIY LED Lighting To Your Shelves
If you have wire shelves, stab sets of 2 holes on each side of the coroplast and also one set in the center. Thread the white twist ties through each set of holes and use them to attach the coroplast and lights to the wire.
If your shelf doesn’t have wire, you can use command strips or some dabs of hot glue to attach the coroplast to the underside of each shelf. The nice thing about hot glue is that it is strong but it’s not really permanent. If you want to repurpose the shelf later, it’s easy to peel off the glue.
You can also add a digital wall timer(I love these) to your light stand so that your lighting is completely automated. I love these timers because they are not mechanical and you don’t have to hear them ticking constantly. Adjust the lights to your plants needs.
How to Adjust The Lighting on Your DIY Plant Stand
As I mentioned before, my light stand has two complete strings of lifts with two power supplies and two dimmers. The first string of lights is on the top two plant shelves and I like to put plants that need a lot of light here. The second string of lights is on the bottom two plant shelves and I adjusted the intensity to better suit lower-light plants. I use my light meter to record the light level on each shelf.
As time passes, I pay attention to each of my plants. Every type of plant – whether you’re starting seeds for a vegetable garden, African violets and even succulents – will show signs if they are not getting enough light or if they are getting too much. I watch for signs and adjust accordingly.
For example, if a succulent on the bottom shelf is starting to show signs of etiolation, I’ll move it to one of the top shelves to get more light. Then, I wait a couple of weeks to see if it is still showing signs of needing light.
If a large portion of the plants on the top shelf is showing signs of needing more light, I adjust the dimmer for the whole shelf to be brighter. Then, I watch those plants for a couple of weeks before making any further adjustments. It is important to wait to see how your plants react to culture changes and this can take some time.
Here is the light reading for my shelves at the moment by positioning the light meter level just over the top of the middle plant:
Shelf 1&2 (top): 330 fc (foot-candles)
Shelf 3&4: 260 fc
Step 6: The Final Step on Your DIY Indoor Plant Stand with Grow Lights
Last, hide any cords with duct tape the same color as your shelf so your light stand has a clean look, free of hanging cords.
RENOVATE YOUR FAITH: How To Better Trust God
I’ve always been a worrier and unfortunately, the worries of my mind would often run faster than it seemed my faith could keep up.
If you have been in this world any amount of time, you know that hard things happen. I have suffered my own struggles through my daughter’s rare autoimmune disease and mom’s breast cancer. (Both are in remission!) I have had health issues of my own as well. So, like you, I am fully aware that bad things can and do happen.
Sometimes when I look around at other women going through hard times, I question if I could actually have the same faith to endure the same hard circumstance. I have assumed that surely, their experiences and faithfulness had qualified them to be able to trust Christ in even the most difficult circumstances, thinking to myself:
“But what about me? How can I possibly have the same faith as they do? What if the same horrible situation happens to me and I fall apart?”
Fortunately, the parable of the mustard seed shows up that faith doesn’t work that way.
“The kingdom of heaven is like a mustard seed, which a man took and planted in his field. Though it is the smallest of all seeds, yet when it grows, it is the largest of garden plants and becomes a tree, so that the birds come and perch in its branches.” Matthew 13:31-32
Faith is not something that needs to be earned or stored up. If you have had enough faith to accept Christ as your Savior, He tells us that we have enough faith to endure life’s trials.
Faith is a choice, not an emotion. Sometimes we just have to choose to believe something even though our emotions don’t back up that choice. I’ve seen this in my own life and at first, I felt like I was ‘faking it’. Choosing to believe something that my emotions didn’t “feel” seemed inauthentic. But the more I choose to have faith in a given situation, the more my emotions began to line up with my faith.
Emotions are God-given and they are important indicators. But God calls us not to set our mind on how we feel, but on what we KNOW about Christ through His Word.
Our Heavenly Father is outrageously gentle and tenderhearted. Whatever you are struggling with, take some time to pray and confide in Him. Don’t insist on a feeling as proof that God has heard you and is working in your situation. He is trustworthy and He is caring for us regardless of what our emotions tell us.
The beautiful thing about faith is that its not determined by our feelings but it’s object. If the object of your faith is God, you can rest knowing that the author of all creation who is omnipotent, omnipresent, omniscient and is always on your side. This is how even the smallest faith can move mountains. Because faith is not something contingent on us in any way, we can trust God to take care of whatever hardships come and be confident that He will work things for His Good which is also for our good.
God never leaves a project half-done…He continually works on each one of us, as a lavish expression of His amazing love and grace. So many of my DIY projects remind me of how God renovates our hearts. If you are a work-in-progress, just like I am, check out the Renovate Your Faith Devotional at the bottom of this post. Click here to get a weekly reminder of new posts by email.
For more spiritual encouragement, click here for the rest of my project posts that also include Renovate Your Faith devotionals.
FREE DIY LED Grow Light Strips Printable Instructions
Here’s where you can subscribe to my weekly email list to get a free PDF printable of these instructions that are ad-free. Get the password for the free printable library that includes this printable, wall art downloads, checklists, and templates by filling out this short form:

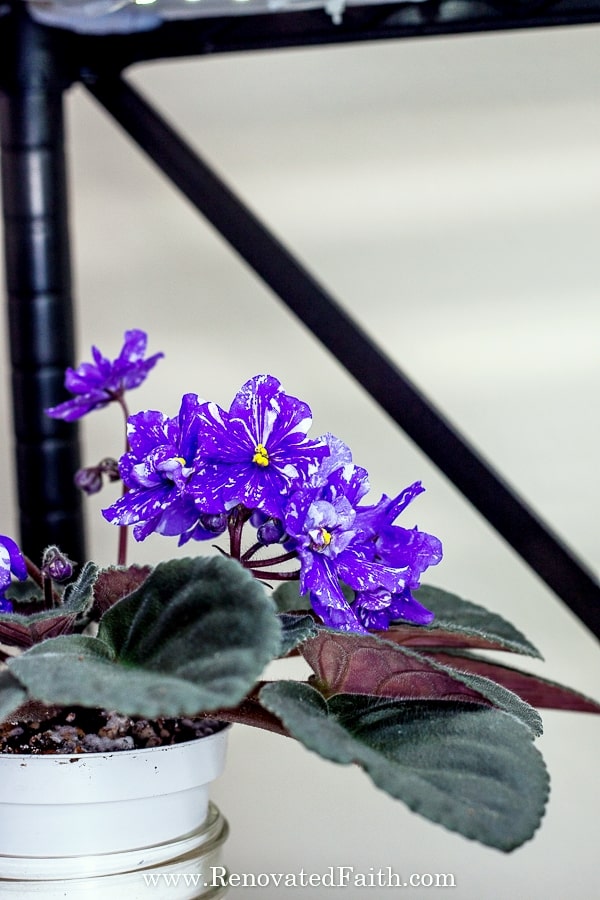
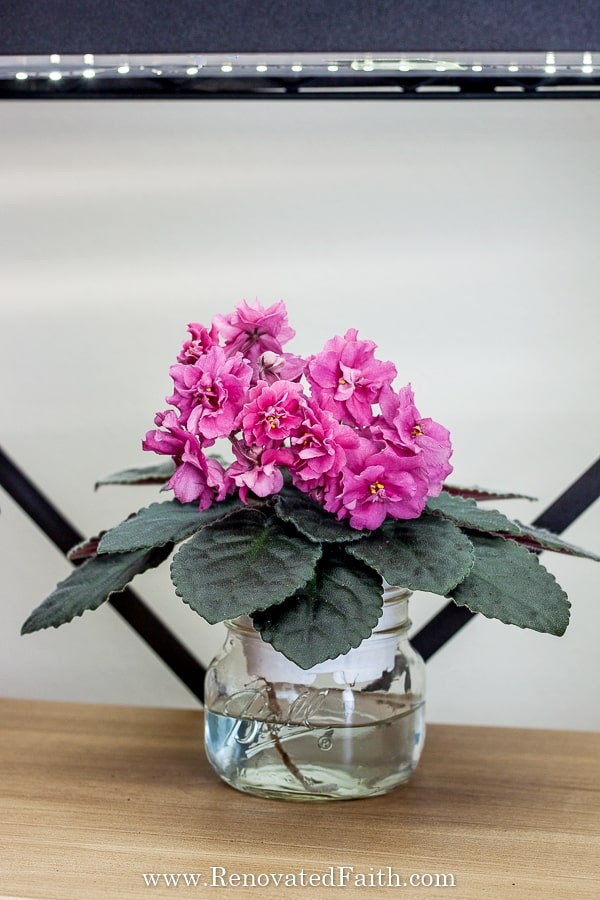
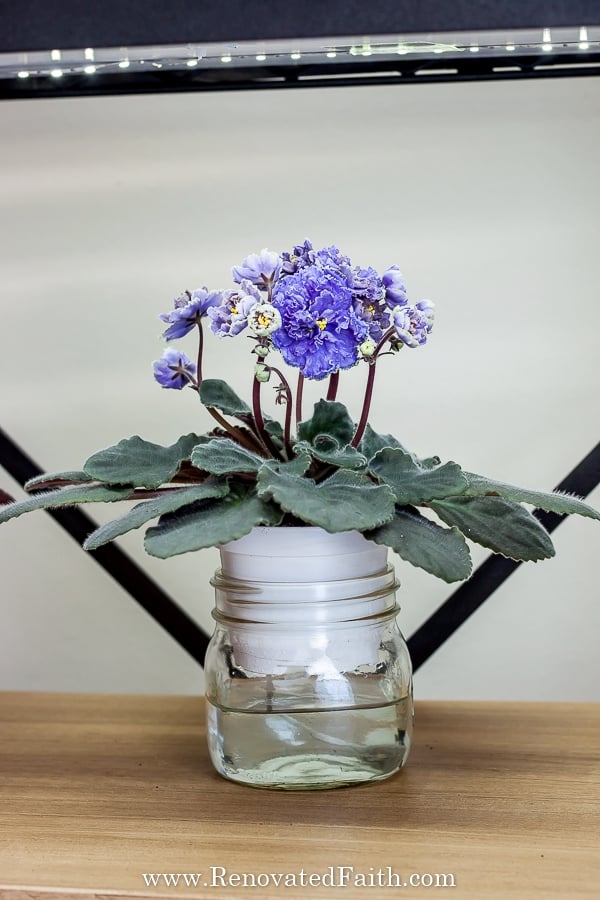
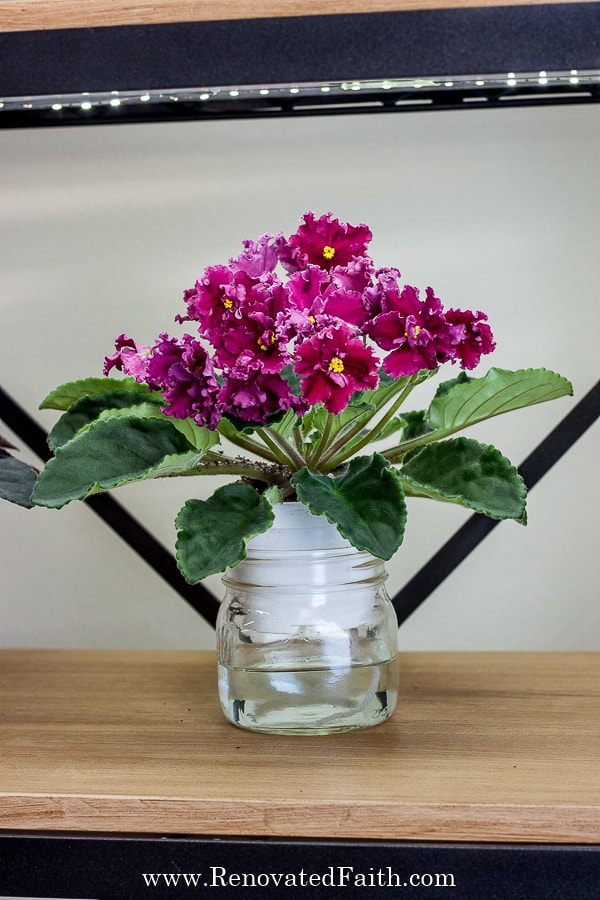
Below are some of my favorite African violets: LE-Vzbitie Slivki Sport, Mandan Dandy by Stork, Ness’ Ruffled Skies and LE-Leto Krasnoe.
FAQ’s: Easy DIY Grow Light Shelf with LED’s
What are the best grow lights for indoor plants?
LED lights are the best grow lights for indoor houseplants because they don’t get as hot as high-power fluorescent T-12 or T-5 lights where heat on leaves can cause leaf burn. Also, LED bulbs can be dimmed to customize the intensity of the light to your plants’ needs.
Traditionally, grow lights were long fluorescent shop light fixtures that you add to a PVC pipe shelf with end caps from a home improvement store like Home Depot. They would hang from the ceiling with S hooks at the end of the chain. This easy way with LED light strips allows for more room in your growing area. The good news is that not only are they a lightweight grow bulb alternative but you can customize them for your indoor garden with dimmable lights. The fluorescent grow light bulbs can get really hot and are a safety issue making the Led option ideal for various growing systems. It can also be customized at different sizes for tall plants or to ensure shorter plants don’t get insufficient light.
How Do You Make A Plant Shelf With Grow Lights? How Do You Make a Plant Light Stand?
Instead of making a DIY plant shelf where you are having to build your own shelving unit, the easiest way to make a DIY plant shelf is to attach strip lights to an already-made shelf. For a low-cost option, be sure to check garage sales. There are so many options for good quality, heavy-duty shelves that come in different shapes and sizes.
The first thing you want to consider is whether you want a wood or metal shelf because you’ll attach artificial lights differently to each. With a metal shelf, you can simply tape strip lights to your light shelves because they are so light but a heavier option might need clamp lights. With a wooden shelf, simply use an electric drill to attach them to the light shelves with tiny screws.
Can any LED be used as a grow light?
While I haven’t tested every LED light, I know that the light tape (Daylight, 6000K) used in this tutorial is great for plants. Plants love red and blue in the light spectrum and most basic LED’s have this combination already. I have used this light tape with hundreds of plants for 5 years and have had excellent results. Also, heat dissipation is minimal with LED lights so I never have scorched leaves as one might with shop lights or a south facing window.. That is especially important with tender seedlings of leafy greens and starts for my herb garden
How far should LED grow light strips be from plants? How do you tell if grow lights are too close?
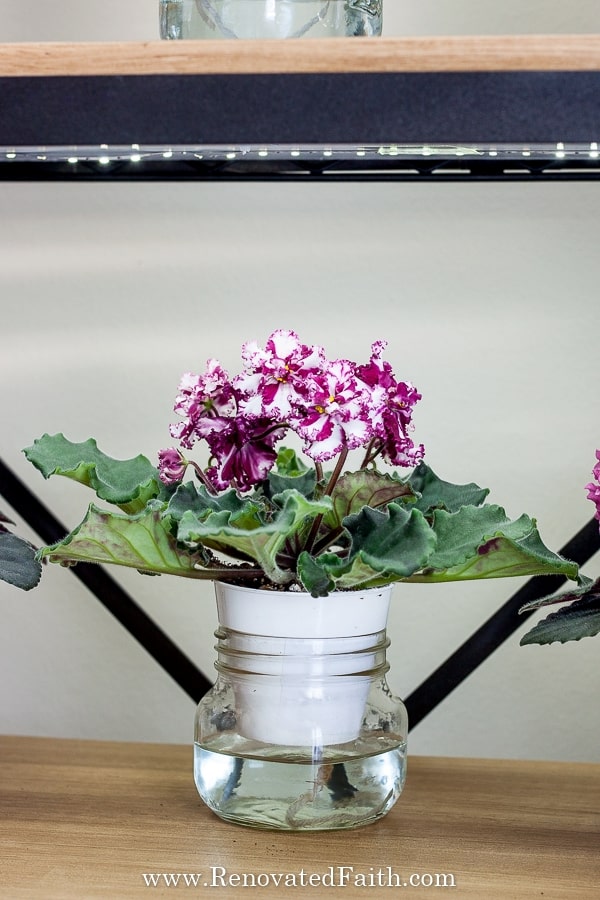
My LED light tape is approximately 7 inches from the tops of my plants. Since LED plants are dimmable, you can easily control the brightness and set a different brightness for each shelf.
Can this light stand be customized as the primary lighting in a grow space or grow room?
I used this setup in a small walk-in closet where I put laminate shelves all the way around from the floor to the ceiling. The LED light strips work well in small spaces but work well in larger growing areas as long as there are shelves to adhere the light strips to. For any other kind of indoor farming, you will need more supplemental lighting to get better results. If you use this setup in a basement on shelves, you can use heat mats to keep your seedlings or plants warm during the winter months.
Here are some helpful articles to better understand the light needs of different indoor plants:
Light Needs of African Violets
Succulents and Natural Sunlight
Can Too Much Light Hurt Orchids?
How many hours a day should plants be under a grow light?
Because indoor plants need more light that outdoor plants, it best for them to get 12-16 hours of light a day.
Can you leave your own grow lights on 24 hours a day?
LED grow light strips can be left on for 24 hours a day but your plants need a 6-8 hour break from light every 24 hours. A plant will actually die over time if it doesn’t get a break from sunlight.
Is it cheaper to build an LED grow light?
It is much cheaper to build an LED grow light stand than to buy one online. When you build your own, you not only save a ton of money but can build it to your exact specifications and your plants’ needs.
What lights do professional growers use?
Professional growers who traditionally used florescent bulbs are switching to LED’s because of the mix of red and blue spectrum in most LED plant lights. Also, there are no bulbs to replace and they are much safer in a humid environment.
Can you use this setup for a PVC or wood DIY grow light Shelves?
This indoor grow light system can be used on any plant stand whether it’s a bookshelf or a pre-built plant stand made of PVC or wood. There are no limits to the options with LED light tapes and more rows of lights can be added to increase the intensity and light distribution. It’s a good idea to clear coat any wood to protect it from moisture. Click here for my hands-down favorite clear coat for wood.
More Posts Related to The Best DIY LED Grow Light Strips
African Violet Grow Light Stand With LED Lights
How to Propagate African Violets From Leaf Cuttings
How To Transform Wire Shelving into DIY Industrial Shelves
Easy Farmhouse Light Fixture Makeovers on a Budget
Easy Two-Toned China Cabinet Makeover
How To Build A LED Grow Light Stand, YouTube Video
Final Thoughts on The Best Grow Light Strips for Plants
Don’t forget to download your printable light stand instructions by filling out the short form above before starting your light project. With this easy tutorial, you can now use LED light strips to customize a light stand at an affordable price getting the best deal possible. Not only will it look beautiful with your home decor but will also meet the various lighting needs of your plants for the long term. Now that you aren’t limited to window space, you have every excuse you need to go out and buy more plants!
I love to hear your thoughts and questions! Scroll down to leave a comment and I WILL reply! ❤️
Blessings,

Be sure to follow the fun here!
Email Subscription | Instagram | Pinterest | Facebook | Twitter
Best LED Grow Light Strips

Karin Peters is a DIY expert and the creator of Renovated Faith. She is a furniture painter, a home design consultant, and a tenacious problem solver determined to help you transform your house into a home. With 17 years of experience with DIY home improvement, she researches and analyses professional processes to adapt them to be easy and cost-effective for DIYers. She then tests every project and product before it appears on the site in a detailed, step-by-step format. After attending Texas A&M University, she received her Master of Divinity with Biblical Languages at Southwestern Baptist Theology Seminary. Her passions unite in Renovated Faith, which shows readers how to create a home that serves them so they can pursue their God-given purposes. About Renovated Faith | Editorial Policy | Facebook | Twitter | LinkedIn
Hi Karin,
I was wondering if you could help me out? I am such a newbie, and I need help. 😝
I am not quite sure about using LED tape on the bottom of my 3 foot wire shelves. May I ask please if you could respond – would either of these work for growing African violets – standards, and minis?
I would really appreciate the help. I am kind of confused.
https://www.amazon.com/gp/aw/d/B099PQ5GY7/ref=ox_sc_act_image_8?smid=A1V31LM9AH9FRH&psc=1
https://www.amazon.com/gp/aw/d/B09BQJMBGC/ref=ox_sc_act_image_6?smid=A1V31LM9AH9FRH&psc=1
The tape is really the easiest option – I promise. Just stick it under the shelf and when you get to the end of the shelf curve it around to do a new row. Let me know if you have any other questions Barbara!
This looks like a great winter project. Can I also ask what type of pots and ball jars you are using for your AVs?
Thanks!
I get all kinds of Av pots at ghviolets.com and just find whatever jar will fit the pots. Last time, I took a new pot in my purse into Walmart when looking for jars to make sure they fit. Hobby lobby has lots of jars too. Hope this helps!
Found this article on the shelf and light project very interesting. I wondered if this can be done without soldering, so I can make a choice either way. I have several shelving possibilities even a 5ft. Indoor greenhouse that has always been a challenge with lighting. I never knew these strips could work for plants 🤗 Every year my husband asks me to start his hot pepper garden seeds but they always get so leggy waiting to be planted. I’m hoping this will work out.
Hi Karen,
Your new light stand design looks great! I’m happy you liked my idea of using coroplast for the LED strip backing. I built my light stand based on your original design, but thought the coroplast and zip ties made a neater appearance. Now thanks to your video, a lot of people can benefit.
Bob G