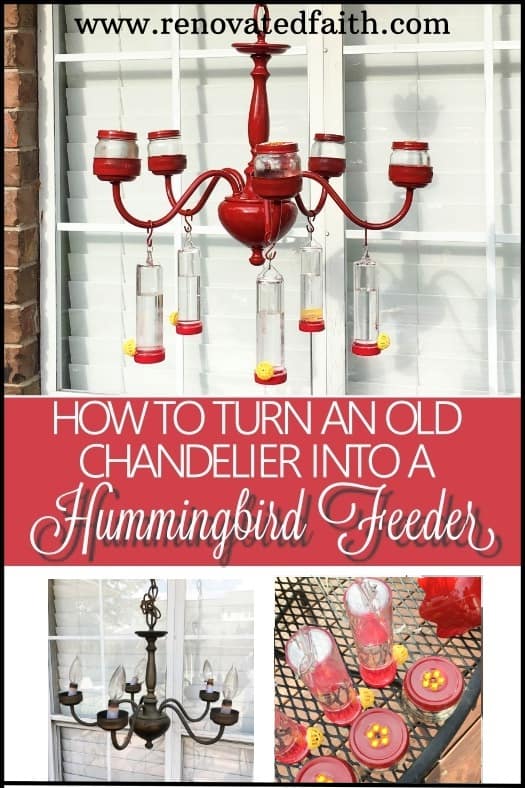
How to Make a Chandelier Hummingbird Feeder
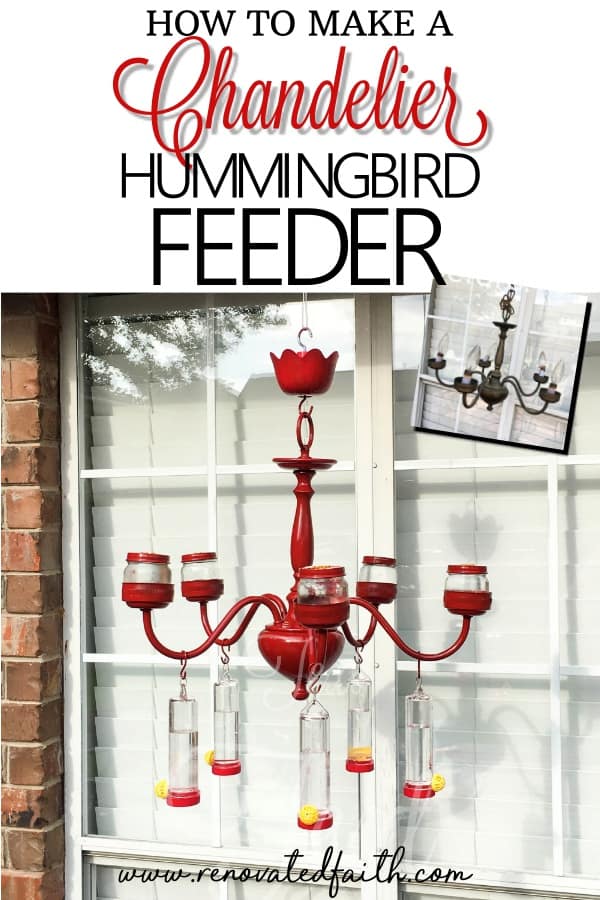
My mom has always loved birds of any kind – mockingbirds, cardinals, chickadees, and especially hummingbirds! So, I surprised her with a late Mother’s Day gift by making her a hummingbird feeder. By upcycling an old chandelier, I made a DIY chandelier hummingbird feeder that is sure to make any backyard into a hummingbird haven.
What’s so great about this feeder is the fact that it will attract a huge number of hummingbirds to one location. Hummingbirds like feeders to be grouped together so they are easy to find. Also, there should be plenty of ports for them to feed on to prevent them from fighting and so they can get all the “nectar” they need.

When I was a kid, our neighbor had two dozen hummingbird feeders lined up in rows under her back porch. Towards the end of every summer, we would go to her house and see all the hummingbirds. I kid you not, at least 200 hummingbirds were swarming around the feeders at any given time. The best part was standing in the middle of the feeders and staying very still as they flew a few inches from us! I hope that this feeder will give you a taste of that in your own backyard!
The first step was to find an old chandelier and I can’t think of a better place than Habitat for Humanity’s Restore. If you haven’t been to your local Restore, they have lots of used items that need a new home – everything from old doors, to picture frames and even slightly used cans of paint. A bonus is that all the proceeds of their sales go to building homes for people in need! You can find your local Restore by going HERE.

It is there that I picked out this beauty. Here she is in all her dust and cobweb-filled glory! This chandelier has definitely seen its day and now it has an opportunity to be reused for a whole new function! I love every chance I get to upcycle old items that would have otherwise been thrown out, giving them new life and purpose.
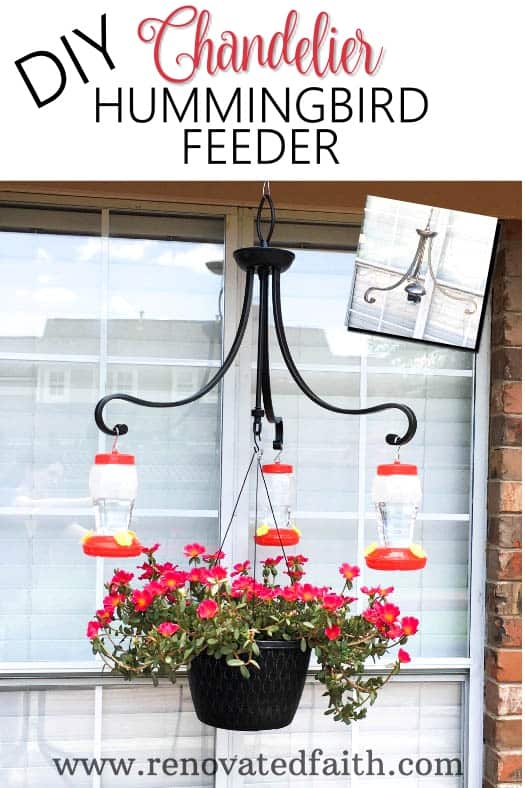
Of course, I decided that I needed a hummingbird feeder for myself, so I picked out this chandelier also. I had some slightly different plans to integrate a hanging basket with this feeder!

Supplies Needed for a Chandelier Hummingbird Feeder
Old chandelier – check out your local Restore! Each was $10.
Hummingbird feeders
Spray paint – Click here for the Best Spray Paints.
Ant moat – This ant moat is great for keeping ants out of your feeder! Hummingbirds won’t come near it if ants are trying to drink their sugar water.
Baby food jars or small spice containers – I used baby food jars but they also have these online.
Yellow Rhinestone Jewels
Velcro
Hot Glue Gun / Glue Sticks
Hammer, large nail
Chain, wire, and S-hooks, as needed
DIY Chandelier Hummingbird Feeder – The Process
1. First, take off any wires, bulbs, or other hardware that you will not be needing. I used some wire cutters to help this process go a little faster.
2. Next, you want to wipe off any dust from your chandelier. It doesn’t need to be perfect but you don’t want your spray paint adhering to a layer of dust as opposed to the metal (and mine definitely had a thick layer of dust!).

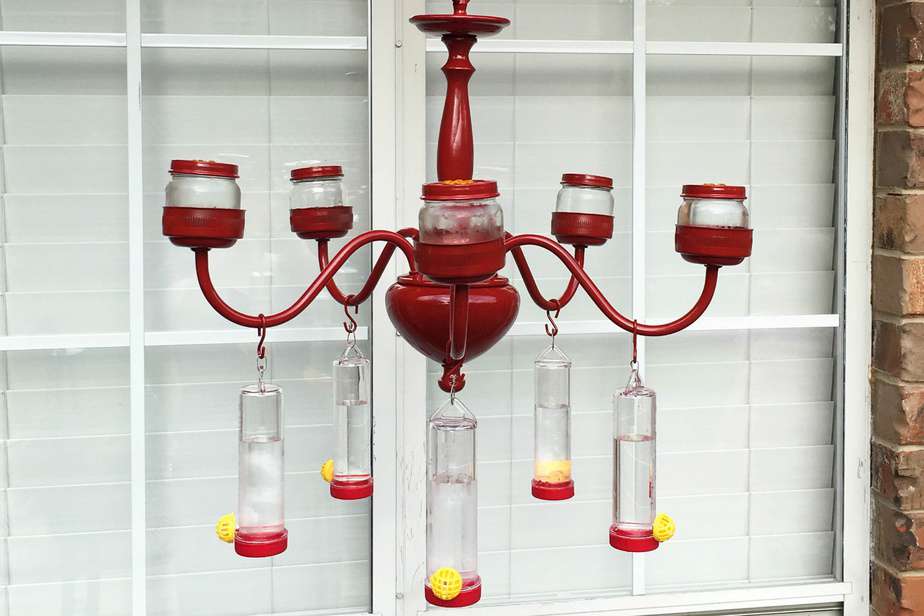
2. Because I didn’t know what to do with the parts of the chandelier that held the bulbs, I decided to add tiny feeders using baby food jars. After I took out the lighting hardware there was a small area that stood up in the middle of this section and I needed a flat surface for the baby food jars. So, I glued in some lids of various sizes to make it flat with my E6000 glue.

3. Spray paint is one of the few things that really does require following the instructions on the can. Most spray paint will say that you can re-coat either within an hour OR after 48 hours. Don’t make the same mistake I have and try to re-coat 24 hours later. The paint will inevitably start to peel away from the piece.
Free Spray Painting Tips and Tricks
New to spray painting? Check out this post on my best spray painting hacks or download my free beginner checklist using the form below:

I sprayed the bottom of my feeder first and then hung it from my daughter’s swing-set to finish spraying it. You could also use a tree limb. Shake the can before spraying and also slightly shake it as you are spraying. Spray one light coat over the piece.
You are not trying to get full coverage yet; you just want to get a thin first coat on and it will look very spotty. Then, wait ten minutes and do another thin coat. Every 10 minutes do a very light coat until your piece looks covered in paint. This method will save you from having drips and having to re-coat after 48 hours.
You also might want to spray any hardware or S-hooks used to attach the feeders to the chandelier. Let the chandelier and hooks dry for 48 hours.
4. After cleaning out the baby food jars, I made a small hole in the lid with my hammer and nail. (I also spray painted the lids red but if you use small spice jars, they are already red.)

5. Now, attach the jewels with hot glue to make a flower around the hole. Hummingbirds like shiny things so they will find these small feeders with their yellow jewels to be irresistible. I used pieces of velcro to hold the tiny baby jar feeders in place so the wind doesn’t blow them off. The velcro also allows for easy removal when it is time to refill the feeders.

6. After your chandelier has dried 48 hours, you can fill your feeders with sugar water and hang them on the chandelier. Hang your feeder in a location that doesn’t get full sun all day so that the nectar doesn’t spoil as quickly.

Hummingbird Nectar Recipe
Add one part sugar to four parts water and boil to remove any bacteria. Fill your feeders and store the rest in the refrigerator. Be sure to skip the red food coloring because it is actually dangerous for hummingbirds.
Didn’t it turn out cute?!? The shine of the spray paint gives it an unexpected touch of class.

Now you can gather the supplies for your own feeder to fill your backyard with hummingbirds.
To attract even more hummingbirds and butterflies, you can add flowering plants into your landscape design as I discussed in my post 10 Steps To Affordable Curb Appeal.
CLICK HERE for more Outdoor Decor from Renovated Faith!
Mom was pleasantly surprised with her red chandelier hummingbird feeder and I love how mine turned out as well. I added a hanging basket to mine to also attract hummingbirds.


Life Lesson:
God is leading you in a direction that seems strange or at least unexpected, know that one day it WILL make all the sense in the world. You will be thankful you stepped out in faith even when it didn’t make sense at the time.
Related Posts to this Chandelier Hummingbird Feeder:
Easy Curb Appeal Tips on a Budget
Milk Paint vs. Chalk Paint vs. Latex: Which is The Ultimate Paint for Furniture?
A Beginner’s Guide to Furniture Painting
Easy Light Fixture Makeovers with Spray Paint
Did you like this post? Be sure to share it with others. Have a wonderful week!
Quick Links to Information in this Post
Blessings,

Be sure to follow the fun here!
Email Subscription | Instagram | Pinterest | Facebook | Twitter

Karin Peters is a DIY expert and the creator of Renovated Faith. She is a furniture painter, a home design consultant, and a tenacious problem solver determined to help you transform your house into a home. With 17 years of experience with DIY home improvement, she researches and analyses professional processes to adapt them to be easy and cost-effective for DIYers. She then tests every project and product before it appears on the site in a detailed, step-by-step format. After attending Texas A&M University, she received her Master of Divinity with Biblical Languages at Southwestern Baptist Theology Seminary. Her passions unite in Renovated Faith, which shows readers how to create a home that serves them so they can pursue their God-given purposes. About Renovated Faith | Editorial Policy | Facebook | Twitter | LinkedIn
Karin,
I too have been influenced by my mother when it comes to birds (maybe its our generation 😜). I have a comment on the scripture you shared.
My husband bought me a bird feeder with a Wi-Fi camera on it for Christmas. And I am addicted! I now even love all the squirrels that visit & have begun to recognize them! I’m now thinking up names for them!
Anyway, on Wednesday nights our church has been studying Matthew and a few weeks ago we studied those exact verses. I was struck by how often I have started to think I need to get outside & fill the bird feeder! Mistakenly thinking that the birds (& squirrels) need me! That they will suffer or go hungry without ME! I almost had to laugh at myself. Who do I think I am?!? Like God said to Job “where were you?” But I somehow had taken ownership of His creation, & thus responsibility for caring for them! Completely forgetting who created them (and me) and who cares for them (and me) and who is always in control (NOT ME). If He chose to take me home today those birds & squirrels would continue on just as they did before I hung my feeder, blissfully unaware of me or my curious & admiring eyes. So now I remember to give God the glory for his provision, remembering to pray for my daily sustenance but I have a new appreciation of His creation that my mother introduced me to as a child. For this I say Soli Deo Gloria!
I love this idea! Will be making one next spring for sure! I have the chandelier already and hadn’t decided what to do with it!
Oh great! Don’t you love it when that happens. I’d love to see it when you’re finished.
Hi Karin,
I love reading about your renovated projects. Love the chandelier hummingbird feeder. I have a question about the ant moat. Did you make that, or is it a purchased moat? It almost looks like the bottom of a soft drink bottle.
Blessings,
Kathy V.
Hey Kathy, Great question. I got it off Amazon!
I love your idea I also Love Hummingbirds. Your chandelier is Beautiful. Thank You for
sharing. God Bless Barb
I like this idea. My neighbors and I meet every Friday evening during the summer and have enjoyed watching those wonderful birds. They get very territorial and it is fun to watch them fight for a seat at the hummingbird bar for their liquid treat. Thank you for sharing your talent.
YES, they are so fun to watch. One time I sat and drank some coffee a few feet from the feeder and I finally decided to move because they were getting so feisty! Thanks for your comment Teri!
How do the hummingbirds eat out of the baby food jars? Won’t the sugar water evaporate and make it impossible for the hummingbird beaks to get to it?
They have such long beaks so fortunately, it’s not a big issue but you do need to keep them at least 1/3 full. Thanks Irene!
Dear Karen,
Greetings from Canada! Just stumbled unto your page and I LOVE LOVE LOVE it!
So gonna steal the hummingbird chandelier feeder idea!
We’re just getting into the gardening season up here in Zone 5-6. Tulips are strutting their colors, as are the magnolias.
I have a HUGE front yard that is all grass and weeds right now. So looking to “borrow” ideas so I don’t have to take out a second mortgage just pay a landscaper! Will send along some pics along the journey–if you’d like me to?!
Stay safe! Stay well!
HAVE A BLESSED DAY!!
Borrow all the ideas you want Resa! And please send me pictures when you get a chance. I’m about to plant a magnolia in our back yard next week!
I planted one 10 yesterday ago and so enjoy watching
the life cycle of it, buds setting in fall till the last fragrance in summer.
Isn’t it the best plant? I ended up planting several on one side of our house. I’m surprised it’s not more well-known! Thanks Julie! Blessings, Karin
This is adorable. My cats would love watching all the hummingbirds. And it looks like a fun project to make too! Now I’m on the hunt for some things to upcycle. 🙂
It really is! I had fun picking it out and getting it exactly how I wanted it. I think a turquoise one would be pretty too. I hear hummingbirds like other colors instead of just red. Thank you for stopping by Tessa!
I love this idea, and it does sound like the perfect Mother’s Day gift. I, too, am a huge fan of my local Restore. I’ve lost count of how many things I’ve bought there to style my home! This feeder is nice because it’s functional, but it’s also a statement piece. Have you gotten any comments from neighbors about it? It looks like it has curb appeal. Anyway, excuse my fangirling, but it’s a great post, and your blog is very uplifting, too.
Thank you so much for your sweet words! Yes, it is a great mom gift. My mom loved it…granted, she would love a toaster that I had spray painted and hung from her back porch. Thanks for stopping by Lela!
What a wonderful idea! I love working in my garden. It reminds me every day of all the beauty and love God has for us. I truly enjoy reading your blog. Thank you for reaching out to others sharing the live of Christ!
Thank you so much Martha! I so appreciate your encouraging words. Can’t thank you enough!