Best Faux Brick Backsplash (EASY, Low-Cost & Durable!)
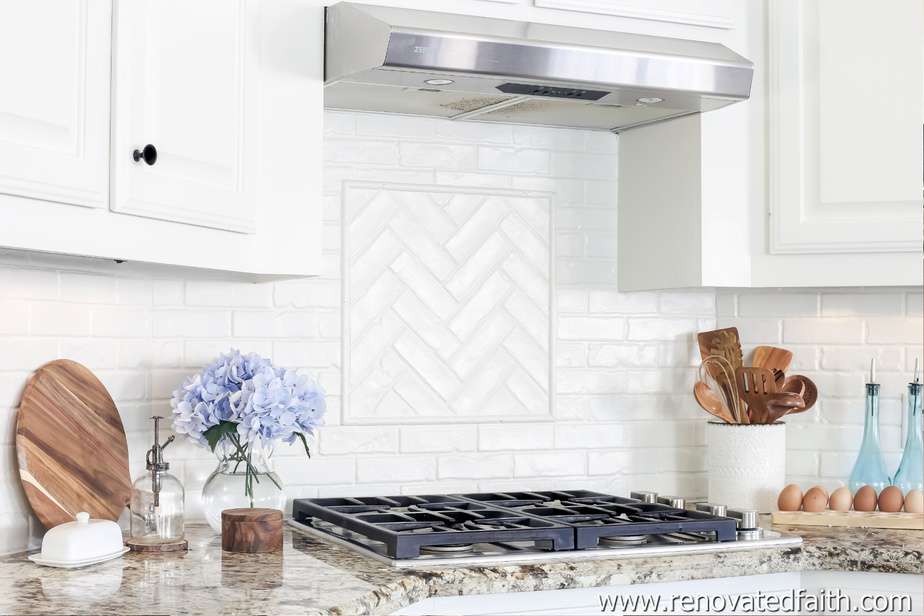
Want a stunning backsplash that’s low-cost, easy, and looks authentic? This faux brick backsplash is easy-to-cut and can even go over your old tile!
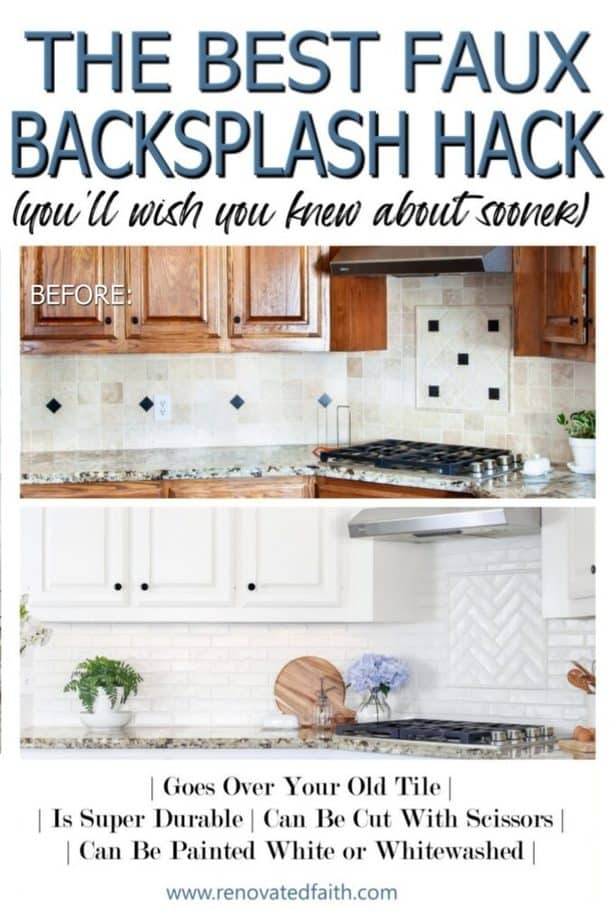
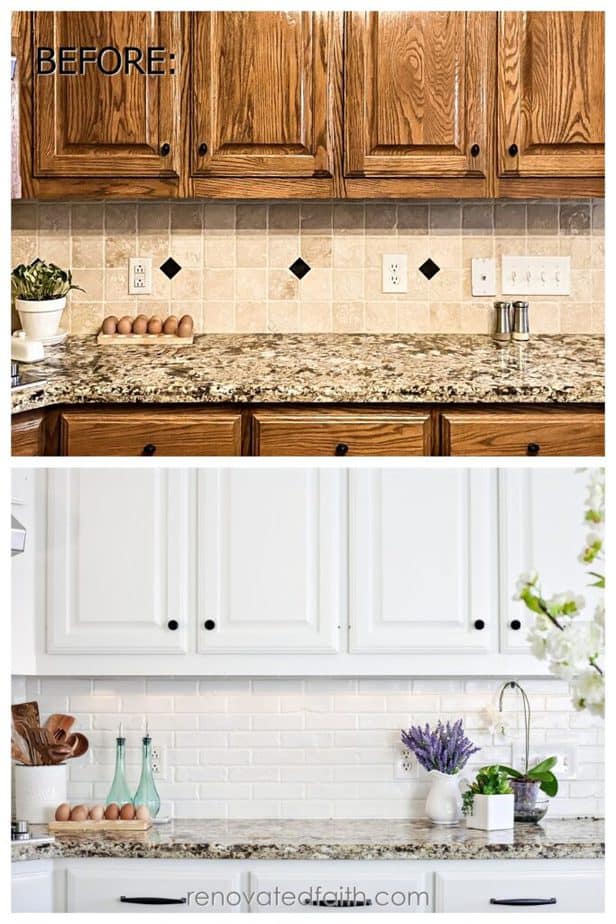
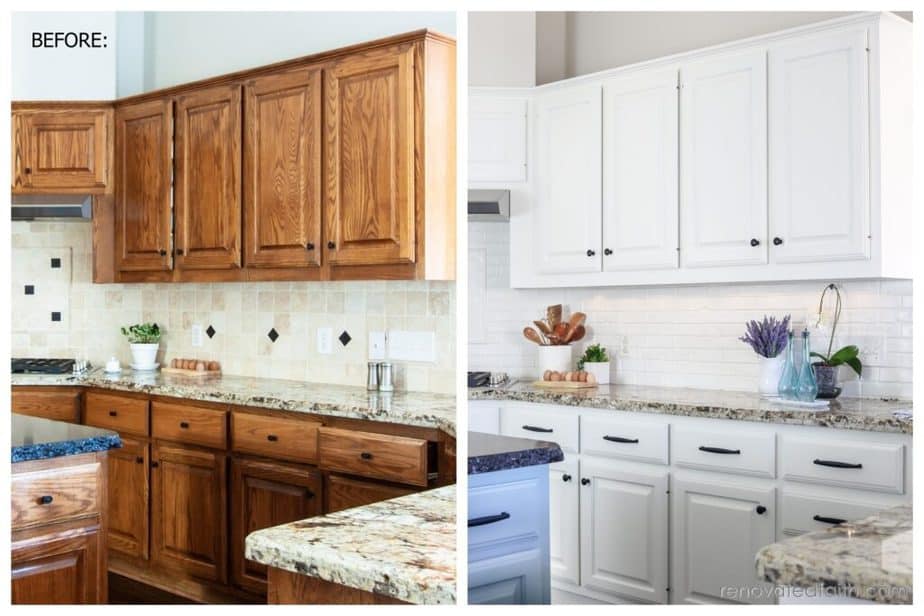
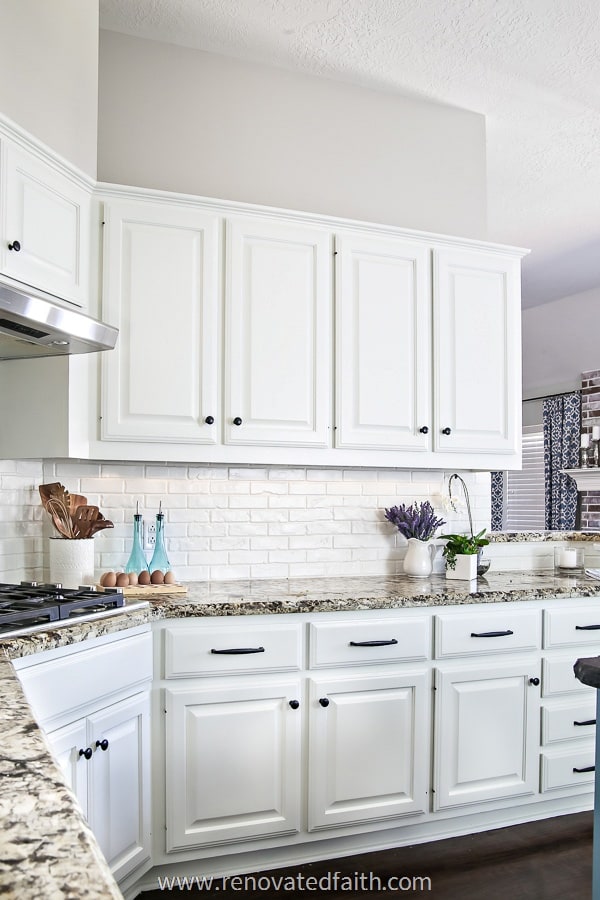
You don’t have to spend a lot to have a beautiful kitchen! After painting kitchen cabinets, I realized my old backsplash looked outdated. Fortunately, I found the perfect solution that matched the fresh new look of my cabinets and required no demo!
***After a full year, I’m happy to say that these backsplash panels look exactly the same as the day I finished installing them. They are very durable, water-resistant, and wipeable, which is great for standing up to our every-day messes for a long time. This product is an ideal choice, and I am so glad we went this route!
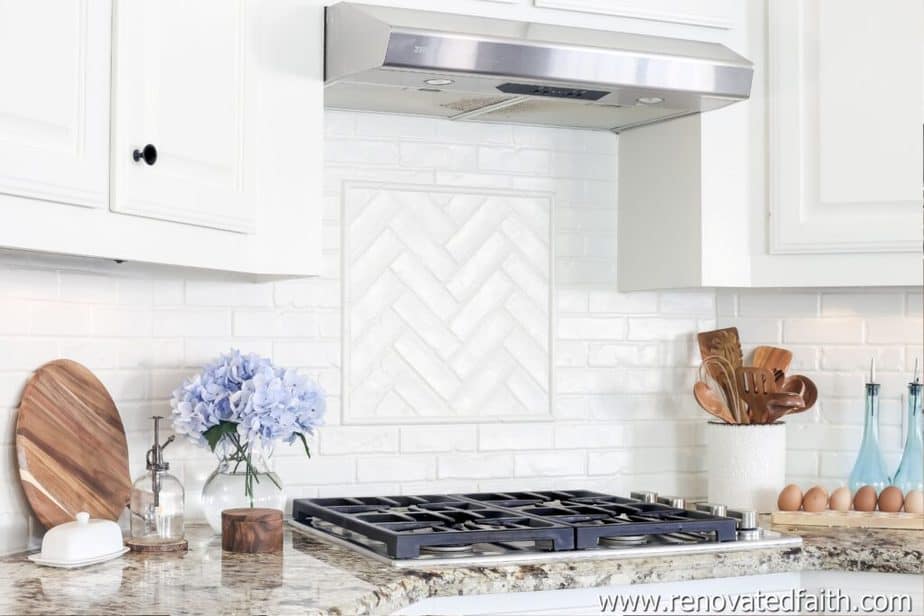
It’s hard to believe there’s a low-cost backsplash option that not only looks like real brick but is durable, waterproof, can be cut with scissors, and can go over your current tile backsplash. By using 3d faux brick PVC panels for kitchen walls, you can get the look of a high-end backsplash but without the high costs and hassle!
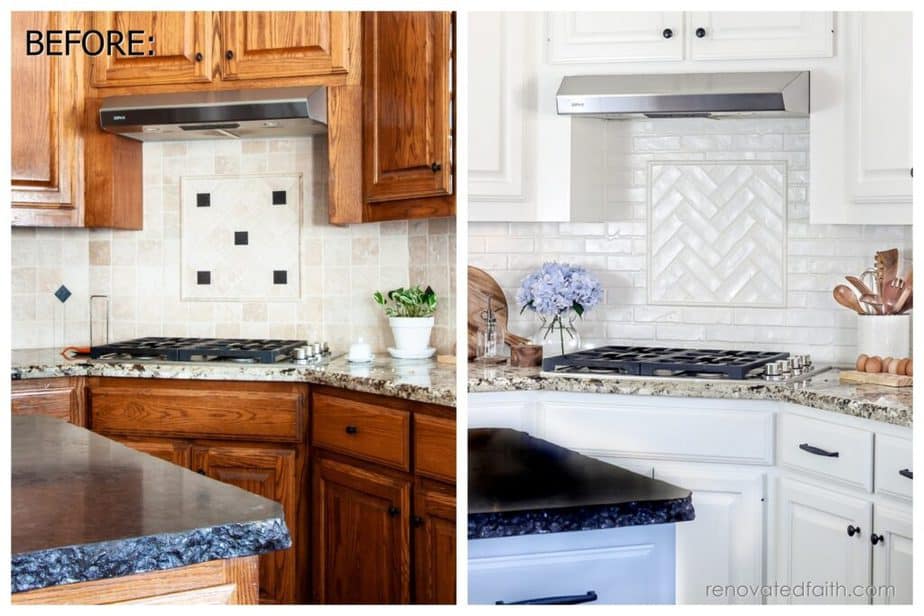
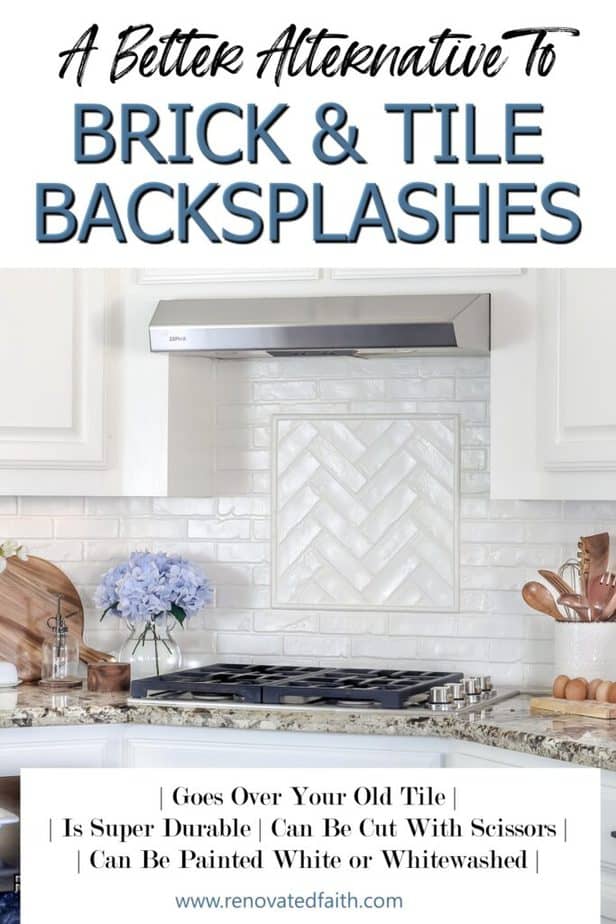
Not only is this backsplash option surprisingly durable, I was even able to do a mosaic feature over my stove with the same PVC bricks. This DIY faux brick backsplash gave my entire kitchen a whole new look without learning how to install tile or renting a tile cutter!
In this step-by-step tutorial and video, I’ll show you the best ways to get the look of the real thing by using PVC wall panels you order on Amazon!
(As an Amazon affiliate I earn from qualifying purchases. I only use affiliate links on products I use and love. Please see my full disclosure HERE).
The Best FAUX Brick For Backsplashes
☑️ If you are in a hurry or just curious, here is a quick link to the brick PVC wall panels I got on Amazon. PVC brick panels are not created equally! After trying out several, these were by far the most durable and realistic: Brick PVC Panels for Walls and Backsplashes And if those are out of stock, get these: Whitewashed Brick PVC Panels
Quick Links to Information in this Post
- 1 The Best FAUX Brick For Backsplashes
- 2 Can You Use Faux Brick as a Backsplash?
- 3 Supplies Needed – How To Make a Faux Brick Backsplash
- 4 How to Install A Faux Brick Backsplash With PVC Wall Panels
- 5 RENOVATE YOUR FAITH: Blessings Disguised As Disappointments
- 6 Brick Backsplash Pros & Cons: What Are My Options?
- 7 Other Uses for Faux Brick Panels
- 8 FAQ’s: How To Update Kitchen Tiles Without REmoving Them
- 9 More Posts Related To My DIY Faux Brick Backsplash
- 10 Final Thoughts ON The Best Faux Brick for A Backsplash
- 11 BEST Brick For Backsplash – Fake Brick Backsplash Panels
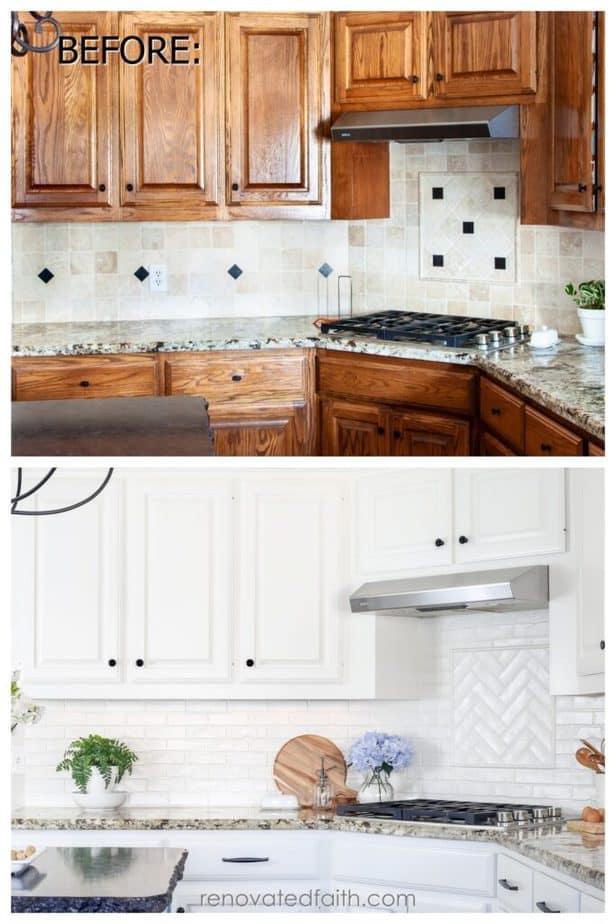
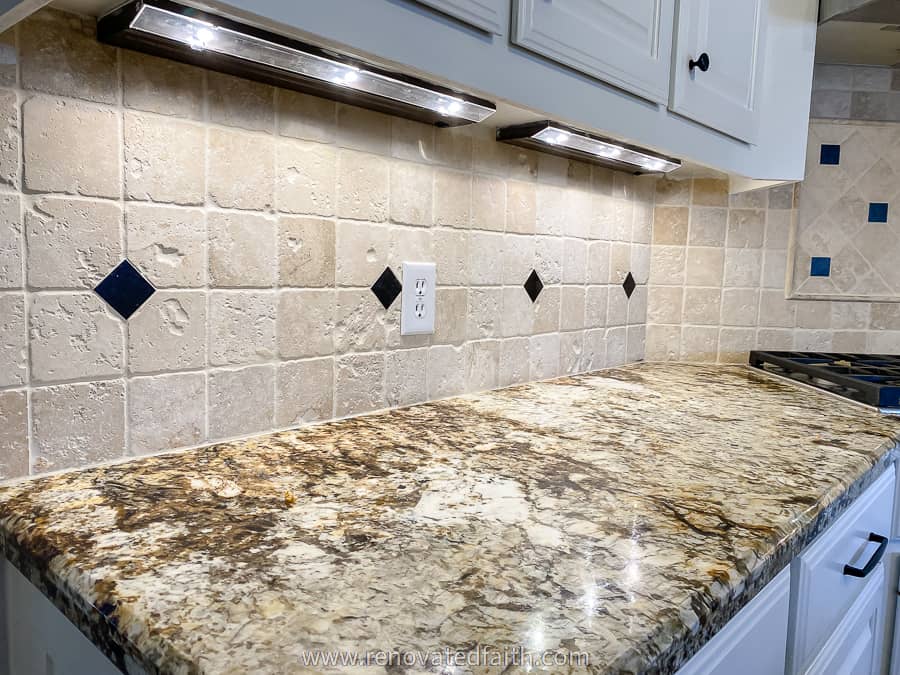
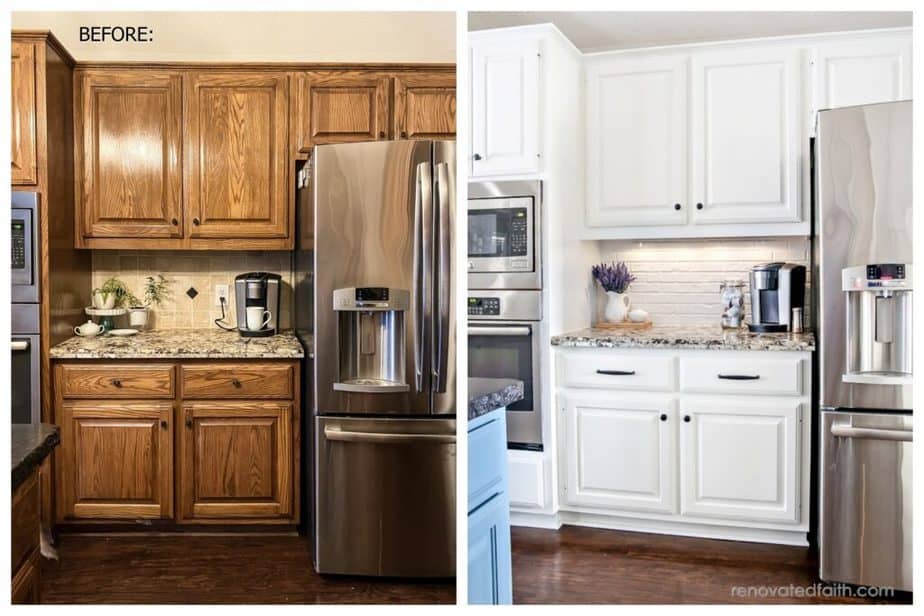
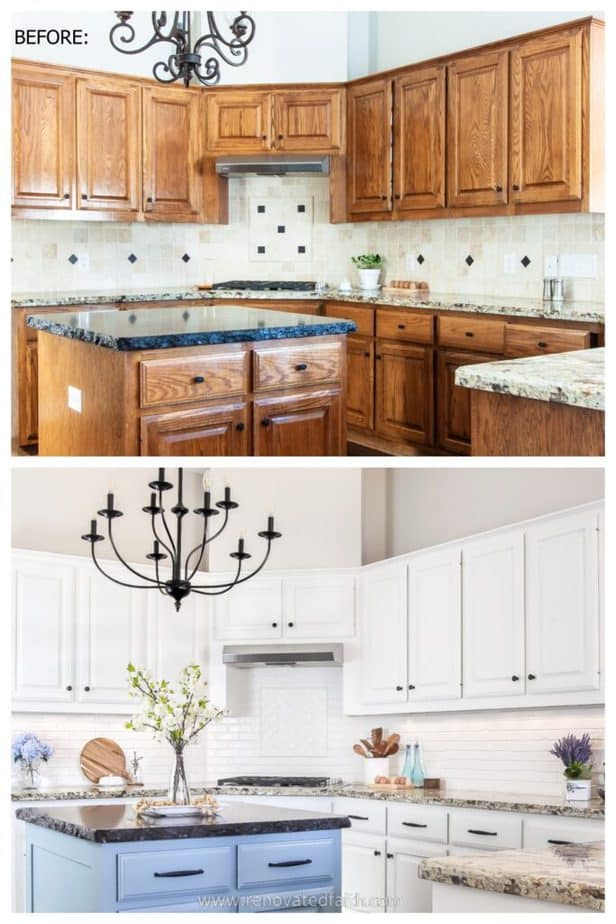
After I painted my cabinets, I was so impressed with the results but what I wasn’t so crazy about was the dated tile backsplash.
I wanted to replace it but didn’t want to demo the old tile and make a mess out of my freshly painted cabinets. Also, I needed a low-cost option that was easy! I was so happy that I found this option for creating the look of real brick.
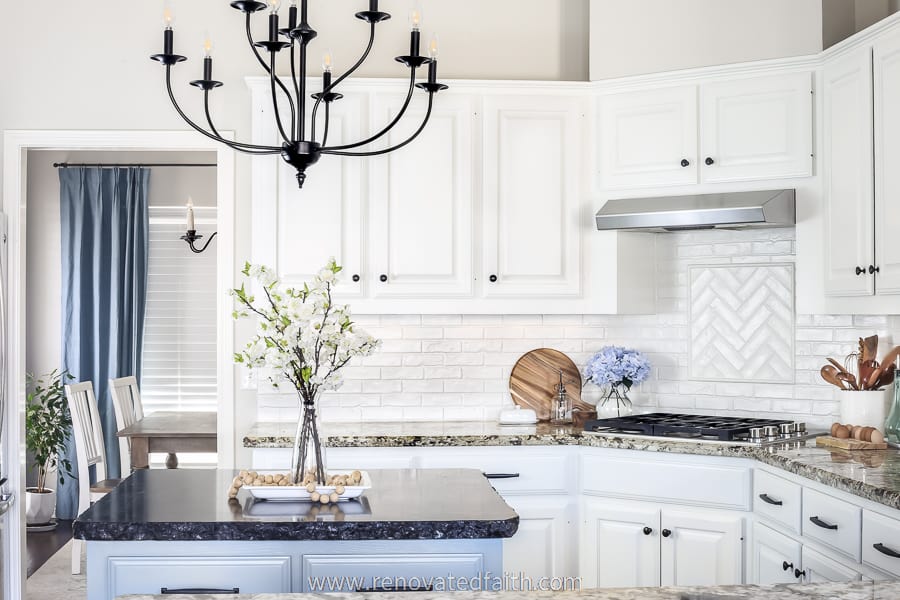
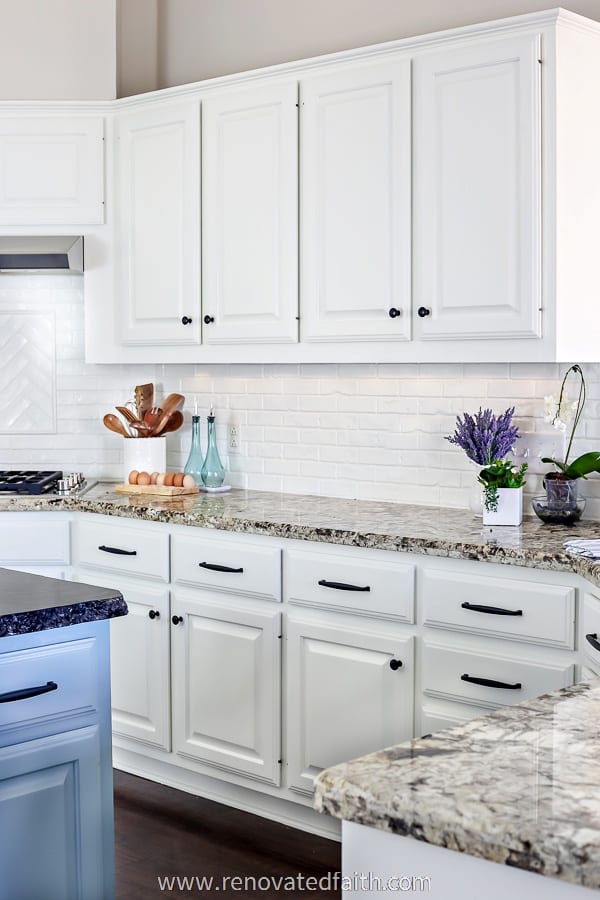
The PVC panels I used completely exceeded my expectations! They not only looked exactly like painted brick or expensive white tile but they gave me the option to do a mosaic over my stove! I am still amazed at how well the backsplash turned out. Even though I spent hours and hours painting my kitchen cabinets, the backsplash ended up stealing the show for my whole kitchen makeover!
RELATED: How Much It Costs to Paint Kitchen Cabinets (DIY or Hire a Pro?)
Can You Use Faux Brick as a Backsplash?
PVC panels are a new design trend that gives any wall a modern look on a budget. I love the PVC brick panels I used because they are water-resistant, chemical-resistant, non-staining, and corrosion-resistant(unlike metal panels). They are also low maintenance, and you can get them on Amazon so they are delivered to your door. They are such a cost-effective alternative to real brick, brick veneer, or brick hardboard because they don’t require any special equipment.
Even if you have a stubborn problematic wall, PVC faux brick panels are not perfectly smooth because real brick is not perfectly smooth. Therefore, any imperfections in the wall are just hidden by the normal texture of the brick.
One thing I LOVE about this DIY faux brick backsplash was that it gave me a lot of flexibility. The brand I used came as interlocking decorative wall panels so that you wouldn’t be able to detect one straight line between where each panel linked up.
Also, if I didn’t cut the PVC perfectly straight between the “bricks” I knew that the caulk would cover it up so I didn’t feel like I had to get each cut perfect.
Can PVC panels be painted?
The plastic panels I use can absolutely be painted. The fact that can be painted gives you lots of options whether you want to paint them a solid color, whitewash the panels or change the grout color.
How to Make a Faux Brick Backsplash That’s Durable
I was initially skeptical about how durable these faux panels could actually be. However, using the liquid nails underneath leaves you with a rock-hard surface. When I knock on the panels with my fist, it feels and sounds like real brick!
Which PVC Panel Is Best for a Fake Brick Backsplash?
There are several 3d faux brick wall panels on the market and some of them are much more realistic and durable than others. After ordering several different faux brick panels on Amazon, I was happy to find that the most durable was also the one that gave me the most authentic look. Here is a link to the PVC wall panels I used: The Best Faux Brick For A Backsplash
How Much Does A PVC Panel Cost?
The cost of the waterproof PVC wall panels I used is $3.08 a square foot. Real brick is about $12 a square foot on average and your typical white veneer brick at Home Depot is in the range of $5 to $15 a square foot.
Can You Put PVC Over Tile?
I can’t speak for all PVC panels but the ones I used were so easy to install over my old natural stone tiles using Liquid Nails. You can also put the panels over ceramic tile and glass tile but you would need the liquid nails for glass.
DIY Faux Brick Backsplash Color Options
My original plan was to have a whitewashed backsplash instead of the antique white brick backsplash. I was so happy with how my whitewashed fireplace turned out (see the reveal here) and I was hoping to have the same look on my backsplash.
However, the only reason I didn’t go with the DIY whitewashed brick backsplash, was because it didn’t match my countertop. Also, I don’t love my countertops and because they are pretty busy I needed a simpler backsplash. If you want the loo of a DIY whitewashed faux brick backsplash, I’ll show you how to get this look in the painting step.
The PVC panels come in various colors but also you can change the color options with paint as I did.
If you love the look of classic red bricks, you can leave the red brick backsplash panels as they are. I’ll also show you how I got the brick of the painted white brick backsplash. These panels are great because you have a wide range of color options since they are paintable.
Supplies Needed – How To Make a Faux Brick Backsplash
PVC Brick Paneling Pieces – I tried several and these looked the most realistic and are the most durable: Best Brick For a Backsplash And if those are out of stock, get these: Whitewashed PVC Brick Panels
Scissors – These are my favorite scissors and I own three pairs. They work well for making precision cuts: Fiskar Scissors
Pencil
Zinnser Cover Stain Primer – It’s a good idea to prime first to make sure the paint adheres. You can find it in a quart at Lowe’s or Home Depot usually.
Benjamin Moore Advance Paint – You’ll want a quart of this paint because it’s really durable and covers well. The color I used was to match my cabinets I painted in Sherwin Williams Alabaster and a satin sheen. It was my top paint in this post: Best Paint For Cabinets (24 Brands Blind Tested & Reviewed) For color ideas: The 33 Top Kitchen Cabinet Colors | The Best White Paint Colors for Cabinets
Liquid Nails Construction Adhesive – The maker of the PVC brick panels recommends the Liquid Nails strong adhesive for Heavy Duty Projects ( Model# LN-901) so be sure to get that formula. I used about 7 tubes of this! You can find it cheapest at either of these home improvement stores: Liquid Nails at Wal-Mart | Liquid Nails at Lowe’s
*For a temporary brick wall, you can try using double sided carpet tape to the back of the panel for temporary installation method.
Paintable Caulk and Caulk Gun – I used two tubes of caulk. The good thing about caulk is that it looks like grout but is not as messy and easier to apply. I used this brand: Dap Paintable Caulk
Zibra Brush – This is my favorite brush for cabinets and furniture projects. You will use this to get a smooth finish without brush strokes with your paint: Zibra Soft Bristle Paint Brush
Cheaper Brush for Cover Stain – Use this cheaper brush for the oil-based stain that you can just throw out when you are done instead of having to clean it with Mineral Spirits: Best Brush for Primer
Spirit Level – You can also use a smaller level if you have one and a straight edge like a yardstick.
Damp Rag – When you are gluing and caulking it’s not a bad idea to have a gallon of warm water with a few drops of dawn soap in case things get messy gluing. Just dip your paper towel or rag in the water when you need to wipe up glue or caulk.
Painter’s Tape or Masking Tape – This kind is my favorite when it comes to getting a really clean line – Frog Tape Delicate Surfaces Painter’s Tape
How to Install A Faux Brick Backsplash With PVC Wall Panels
Here is the step-by-step tutorial but you can also see the video tutorial that better shows the process. If the video tutorial doesn’t pop up, you can find it here also: The Best Brick for Backsplash, YouTube Video
STEP 1: Paint Your Panels Before Installing Them
IMPORTANT NOTE – Sometimes the panels I bought for this project are out of stock, BUT these are just as good and easier to paint solid white or just leave them whitewashed – Whitewashed PVC Faux Brick Panels
I like doing most of the painting before you install them because paint covers better when the surface is flat and you also don’t have to worry about drips this way.
Going the faux brick route gives you lots of room for different design ideas. You have three color options with these PVC brick panels:
Painted White Brick Backsplash Panels
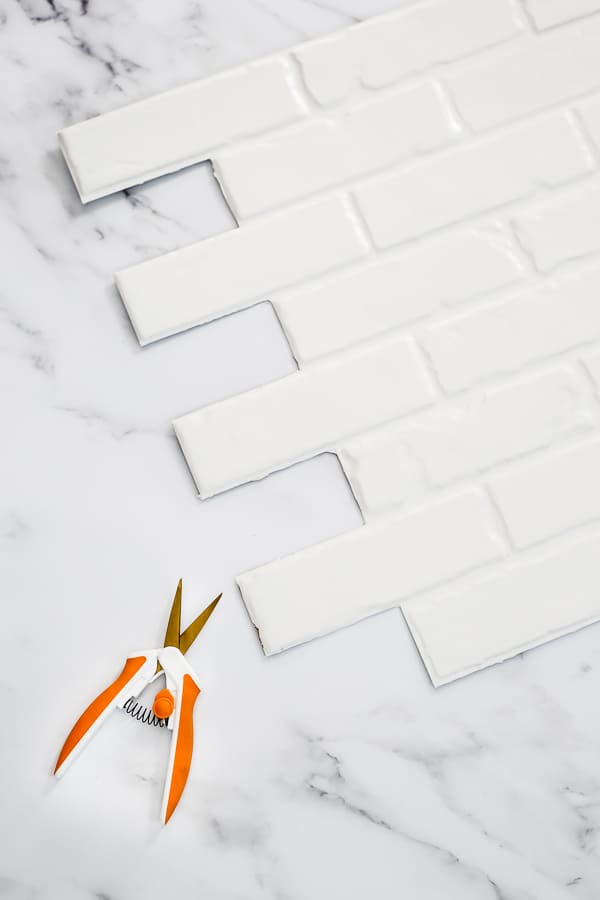
For white panels like mine, add a coat of Cover Stain to the surface of the brick before you even cut them. Brush on the cover stain with your cheap brush, so you can just throw it away and not have to use mineral spirits to clean it. Brush on the cover stain as shown in the video to save time and let it dry for about 4 hours.
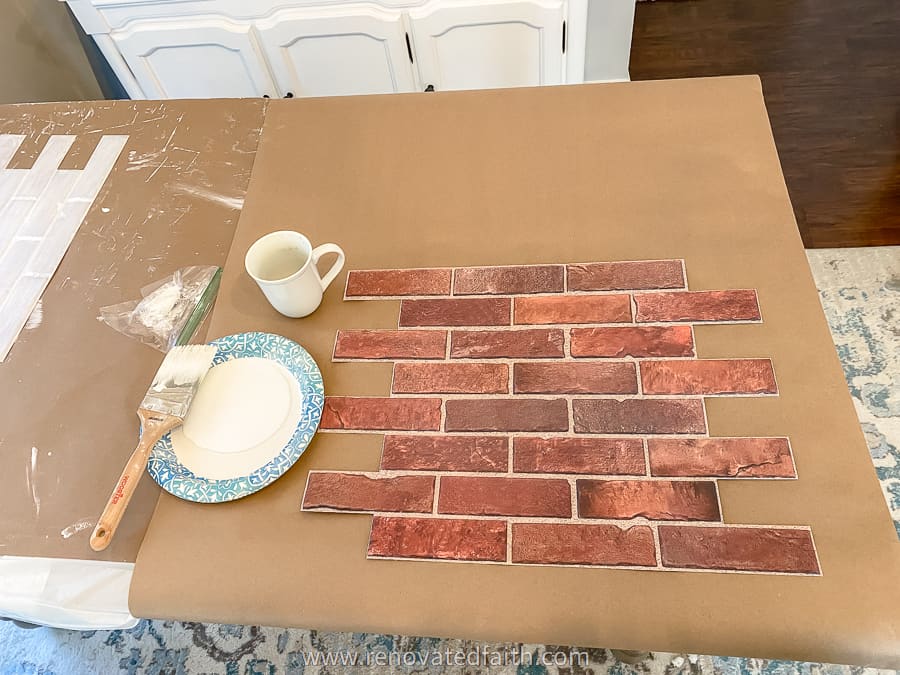
Use your Zibra Brush (click here) to brush on the first coat of paint – Benjamin Moore Advance. It will give you a durable finish and with the combination of the Liquid Nails behind the panels, the surface will be surprisingly hard.
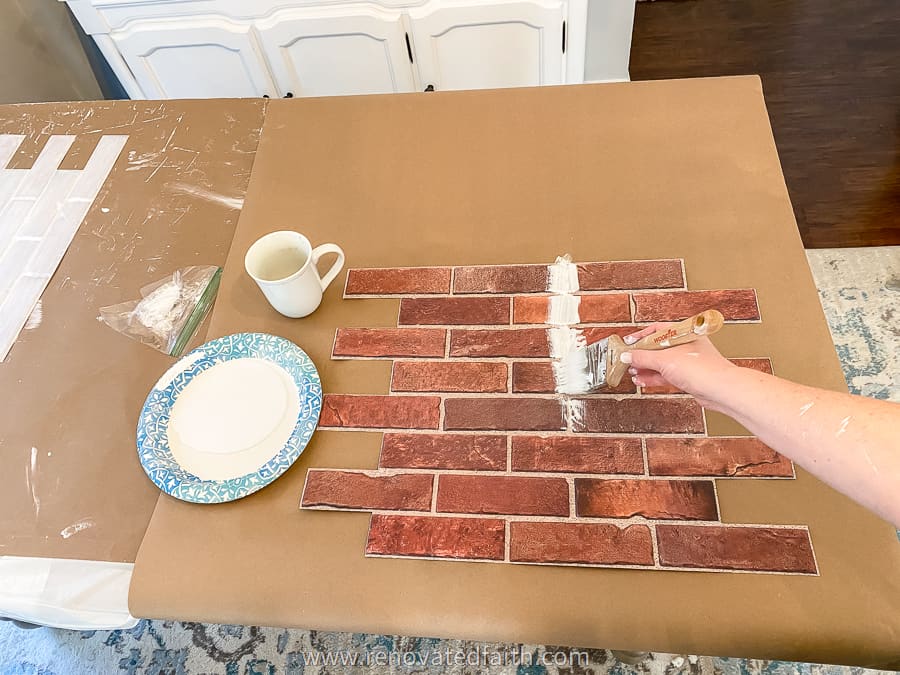
Paint a coat or two of paint on the panels and let them dry for 16 hours between coats. We will add one more coat after they are installed and after we caulk. For now, if you aren’t getting full coverage, that’s ok. I had these spread out around my house to dry fully.
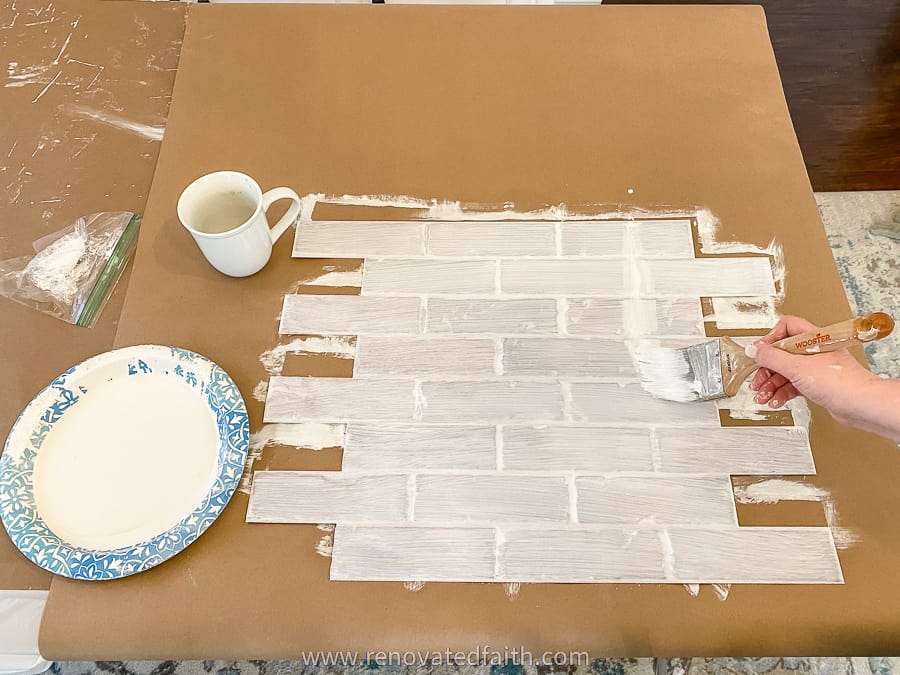
Whitewashed Brick Backsplash Panels
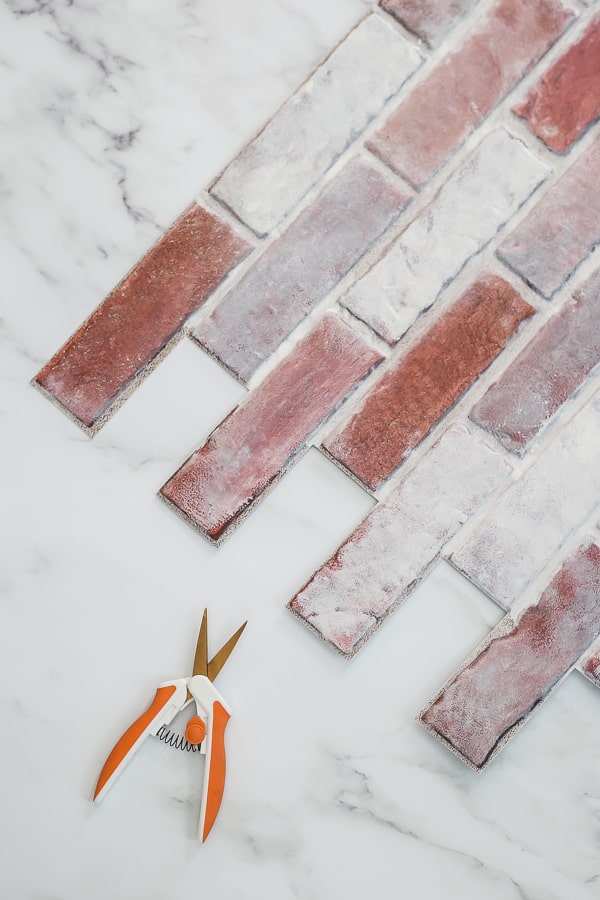
As I mentioned, I really wanted a whitewashed brick backsplash but it didn’t coordinate well with my backsplash. However, this option is very doable. Go to this tutorial and use the exact same process as on the bricks on my fireplace: How To White wash a Brick Fireplace
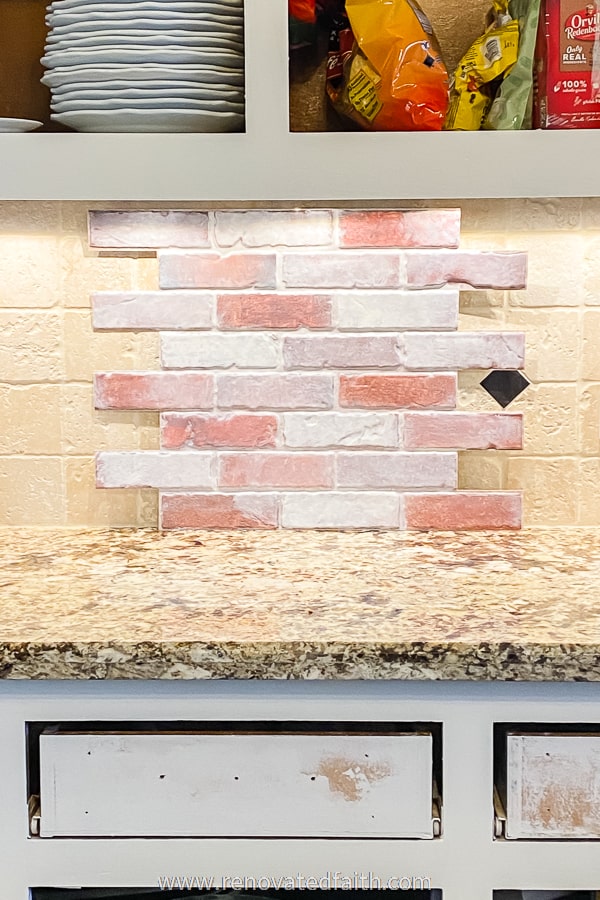
I like to have a picture in front of me when doing this whitewash technique as a guide to help me get the exact same whitewashed look on my own backsplash. Here are some great ideas: Whitewashed Brick Backsplash Kitchen Ideas
Rustic Red Brick Backsplash
To get the more rustic look of an exposed brick backsplash, you can leave the panels unpainted.
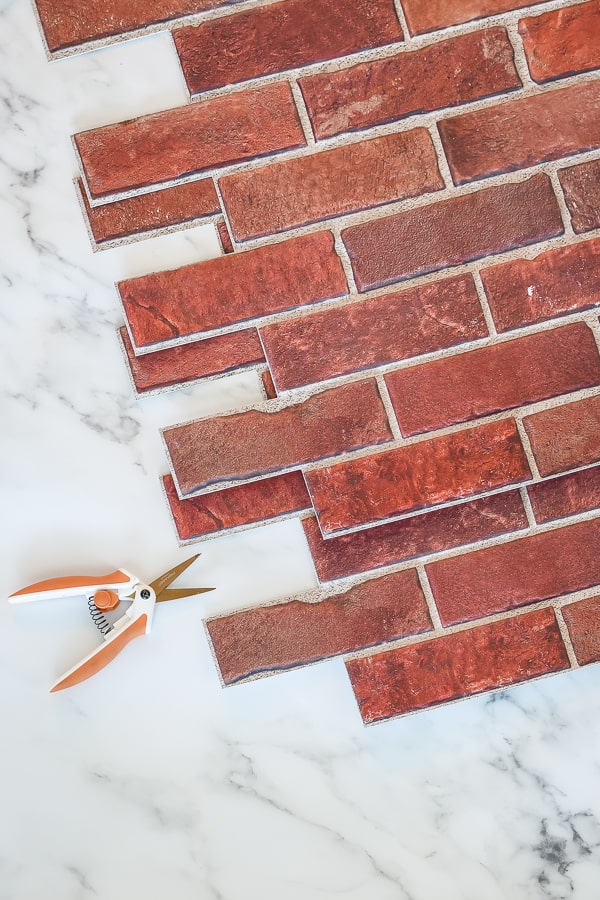
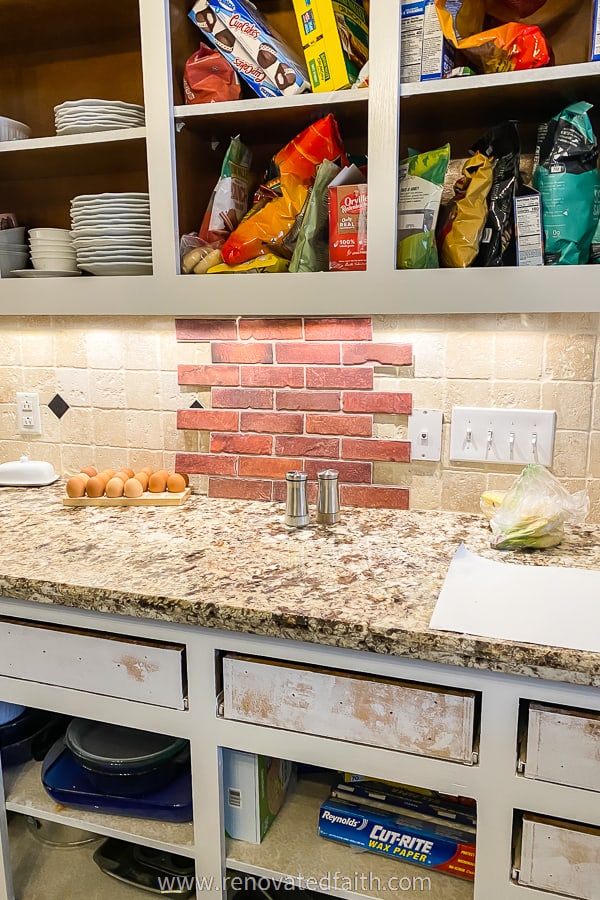
If you want to leave the bricks red, just put them up as is. We will caulk and then paint over the caulk lines with the same color paint as the grout lines. If you like the look of white grout, you could also paint the ground lines white with wall paint. This will give your kitchen a more rugged appearance or you can mix in stainless steel elements for an industrial look.
The best and most durable paint for this is Benjamin Moore Advance in either a satin or semi-gloss finish. After blind testing over 24 different cabinet paints, it was by far the best paint for cabinets and works well for backsplashes too: Best Paint for Cabinets (24 Brands Blind-Tested and Reviewed)
RELATED: For the entire kitchen reveal, click here: Before and After Painted Cabinet Reveal
STEP 2: Make A Level Line for Your Faux Brick Brick Backsplash
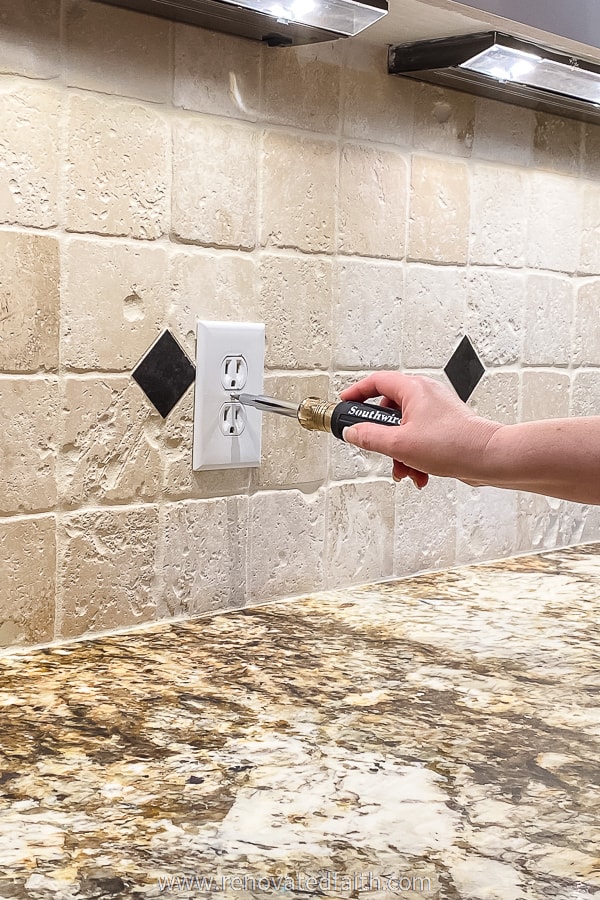
Remove all outlet and switch covers.
If you are doing white brick panels like mine, your panels will now have one coat of primer and one or two coats of paint.
Now that your PVC panels are dry, decide what orientation you want the PVC pieces to be. In other words, decide which way you want to be up. They can go either way but it’s good to be consistent.
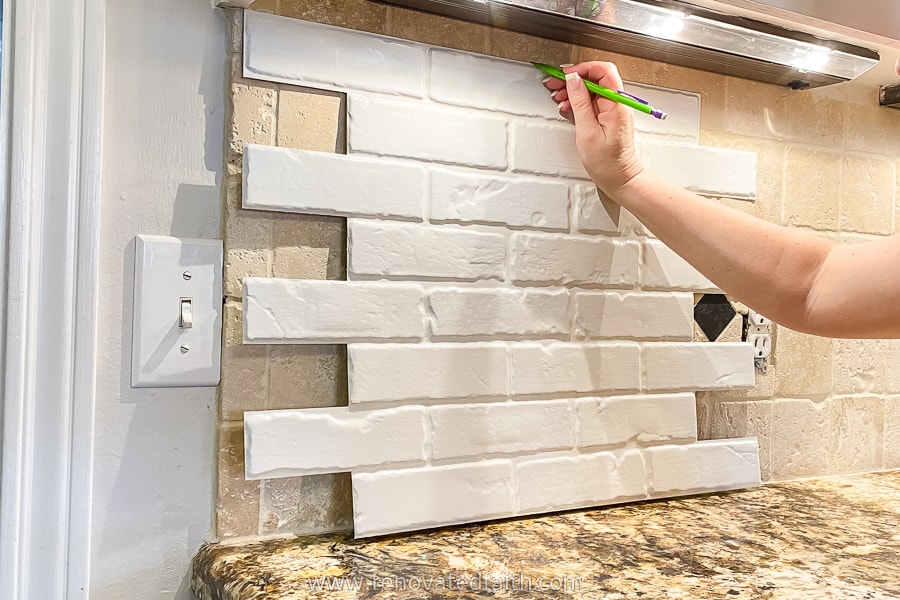
I like to work from left to right. Put up a wall panel on the wall so the bottom edge is flush with the countertop, leaving a little space for the caulk line.
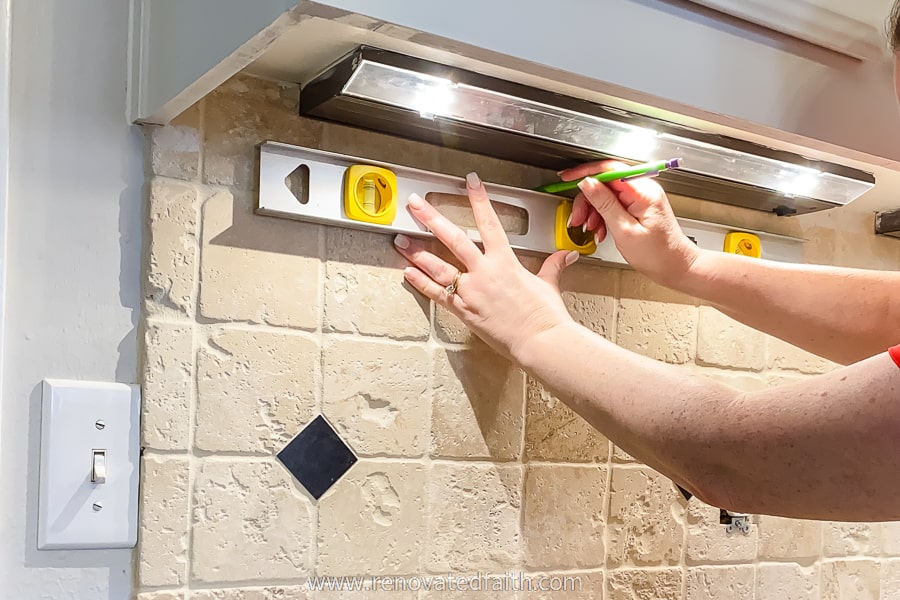
Mark a few dashed lines with your pencil along the top edge of the PVC brick panel as I do in the video. Take the brick panel down and see if the line is level. Once you find level, trace a level line a the same height as the dashes along the rest of the wall. This level line will be a guide for all our pieces.
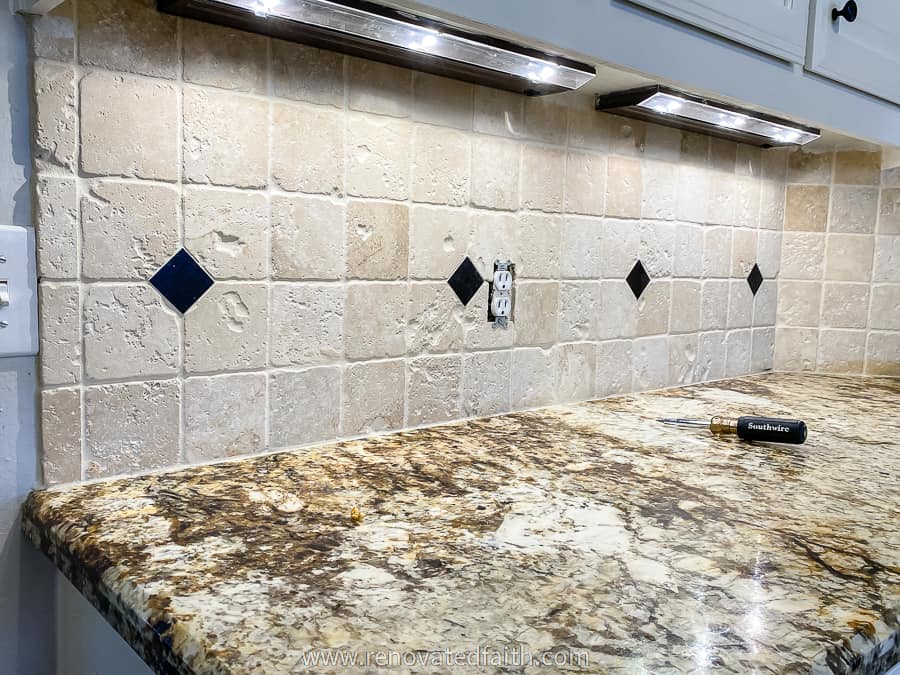
Step 3: Dry Fit The Faux Brick Panels
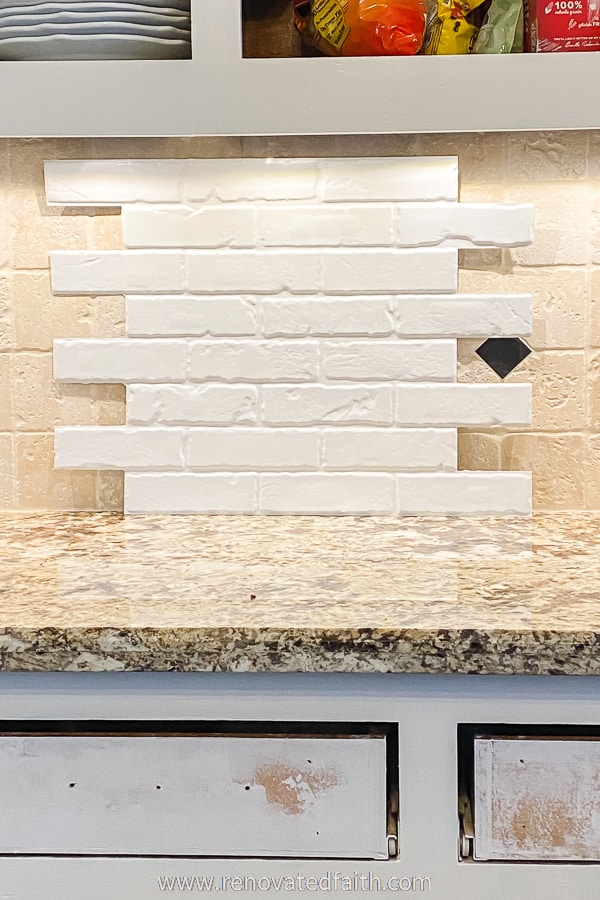
Use painter’s tape to dry-fit the panels to the wall. By doing this, we are getting of sense of how they will line up on the wall and will mark where to cut holes for switch plates.
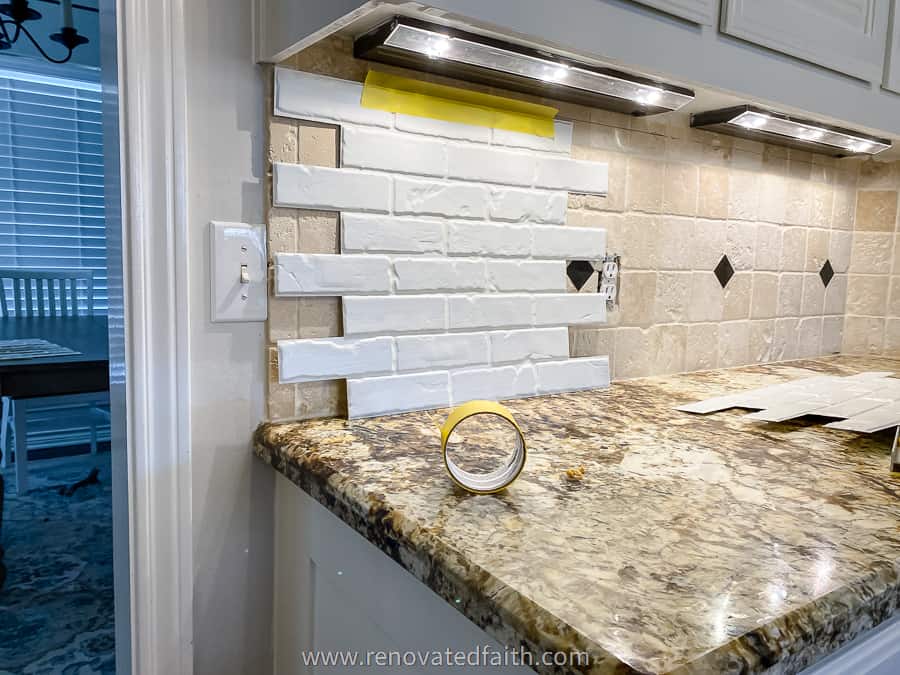
Put up as many full panels as you can with the painter’s tape. Make sure they are lined up with the level line you already made.
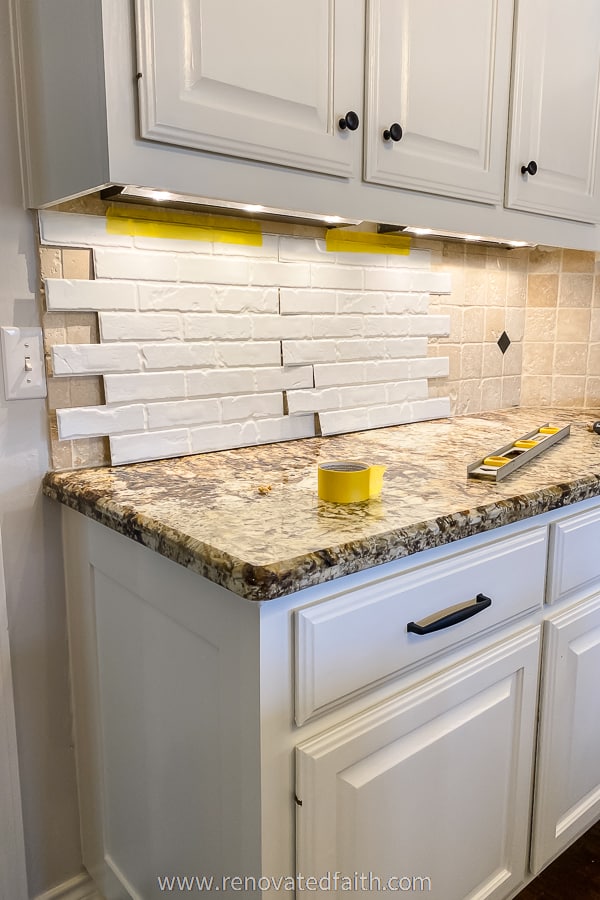
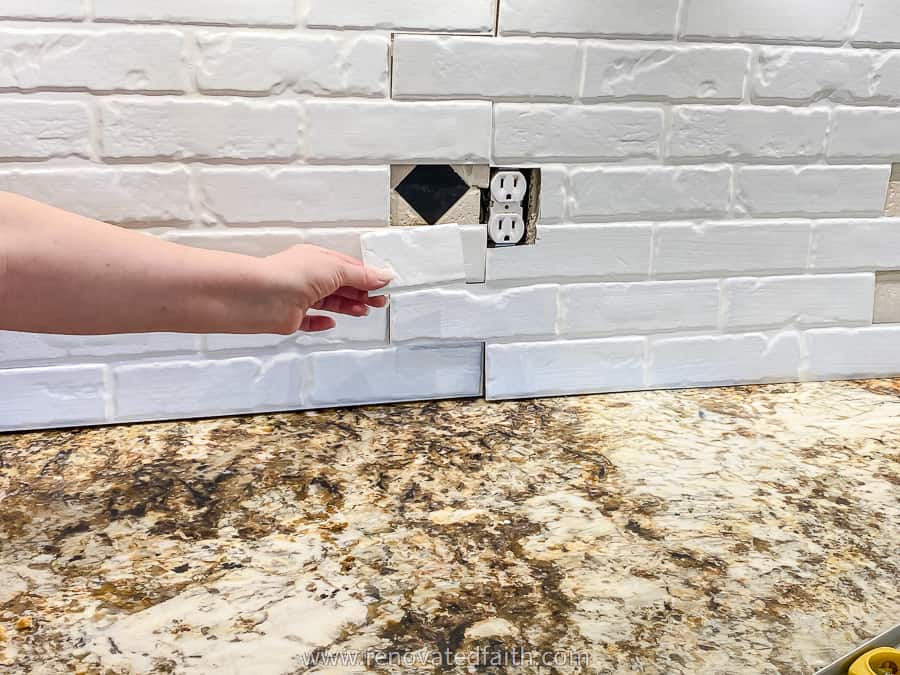
Feel where the switches and outlets are behind the panels and mark those locations with a pencil. Take down the panels and cut out those areas. This is going to take a little trial and error. Mark the area, cut out a hole, put it back up again, and cut a little more.
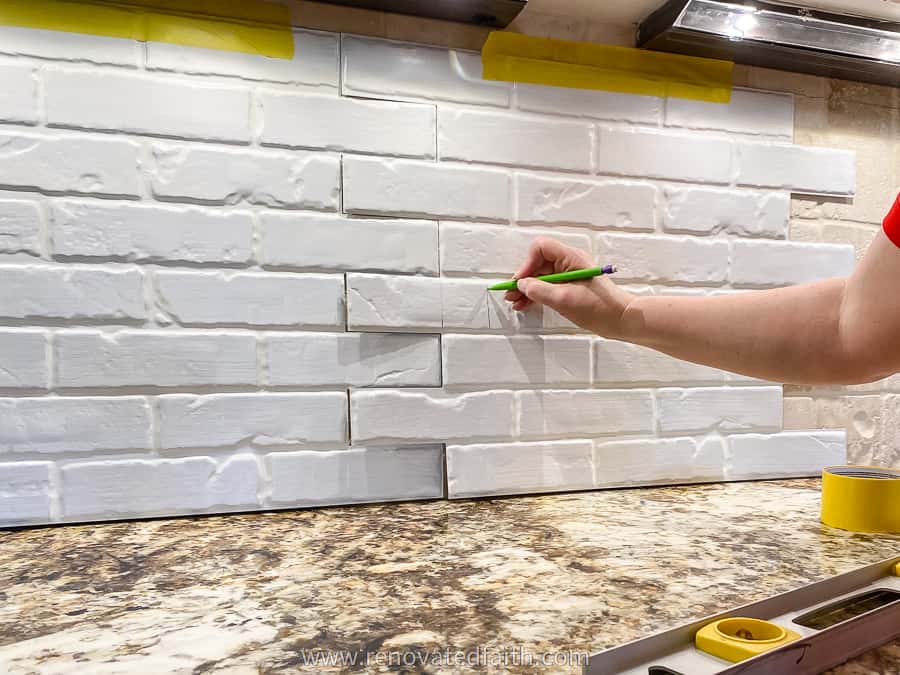
Do this until you have a hole big enough to expose the screw holes for the switch plates and outlet covers.
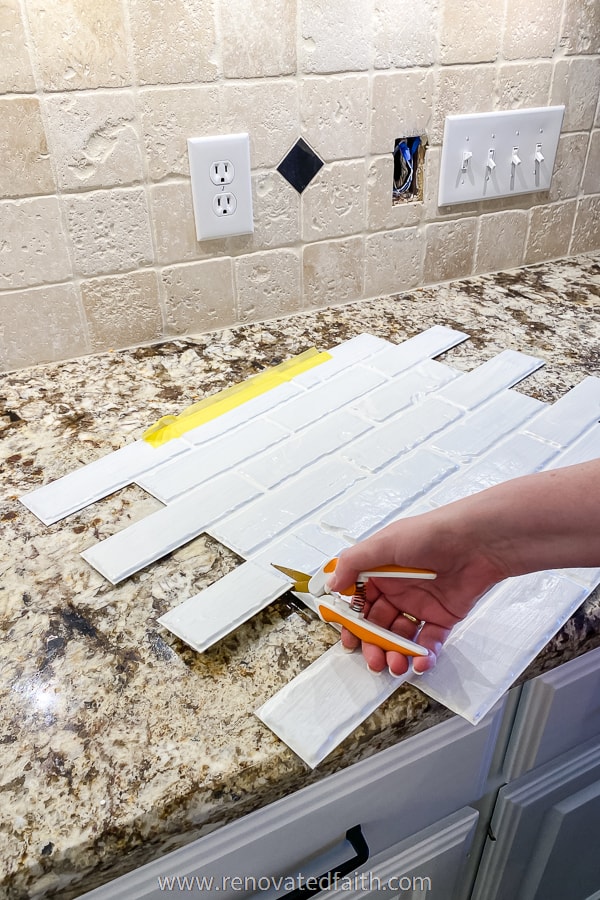
Any gaps on the wall that were created from cutting holes for the switches and outlets will be filled with smaller pieces later.
STEP 4: How do you attach Fake Brick to Drywall?
The best way to attach PVC sheets is with Heavy Duty Liquid Nails. I like to apply it to mostly the indented grout areas between the bricks but you can also add it in the centers of the bricks.
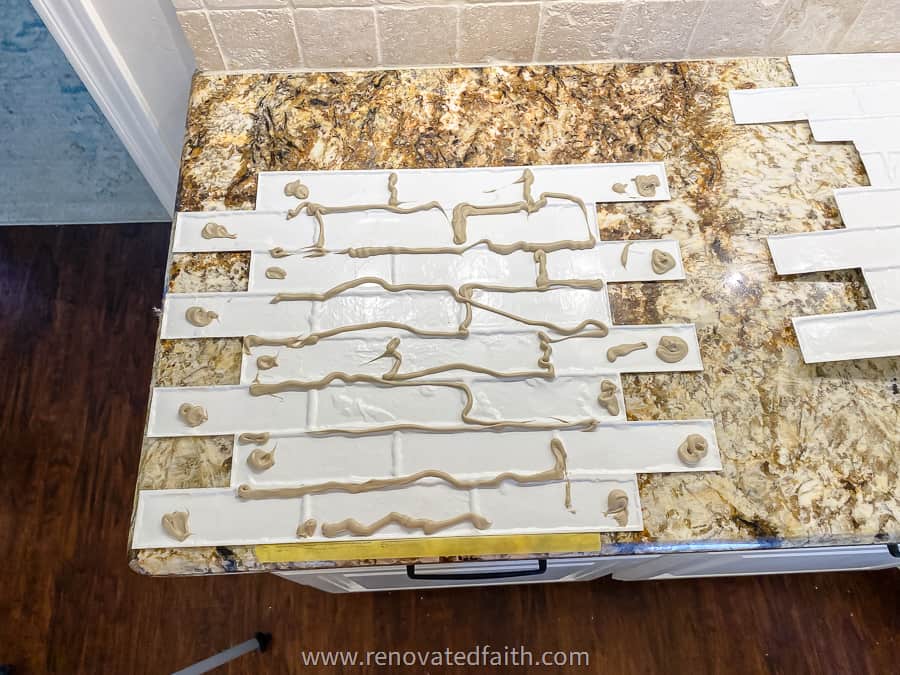
You will use a lot of liquid nails for this and that’s ok! If any squeezes out on the edges, just use a damp rag to wipe it.
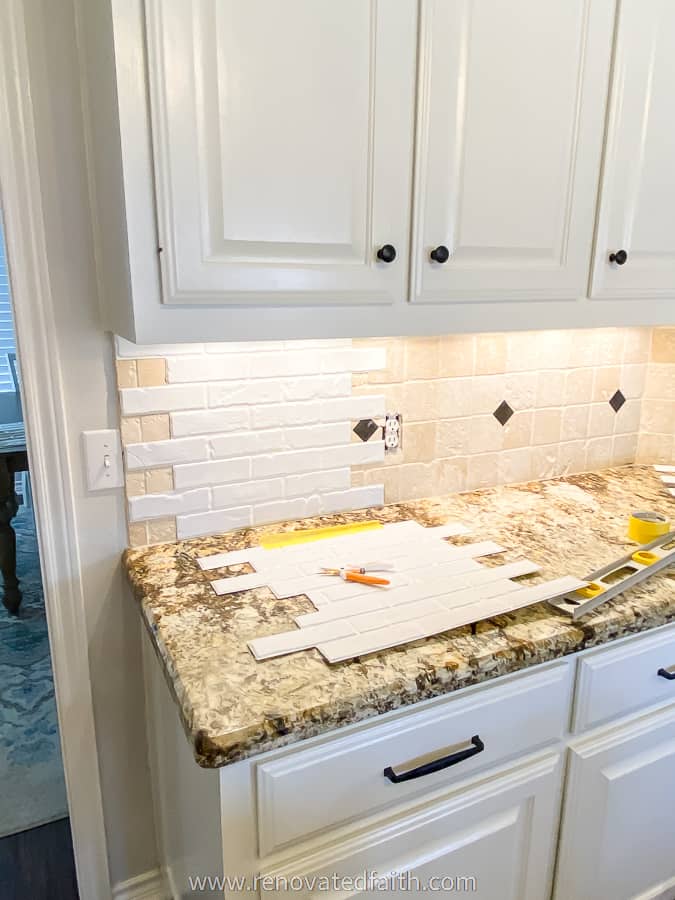
Apply glue to the back of the first piece and push it onto the wall in place, making sure it lines up with your pencil line.
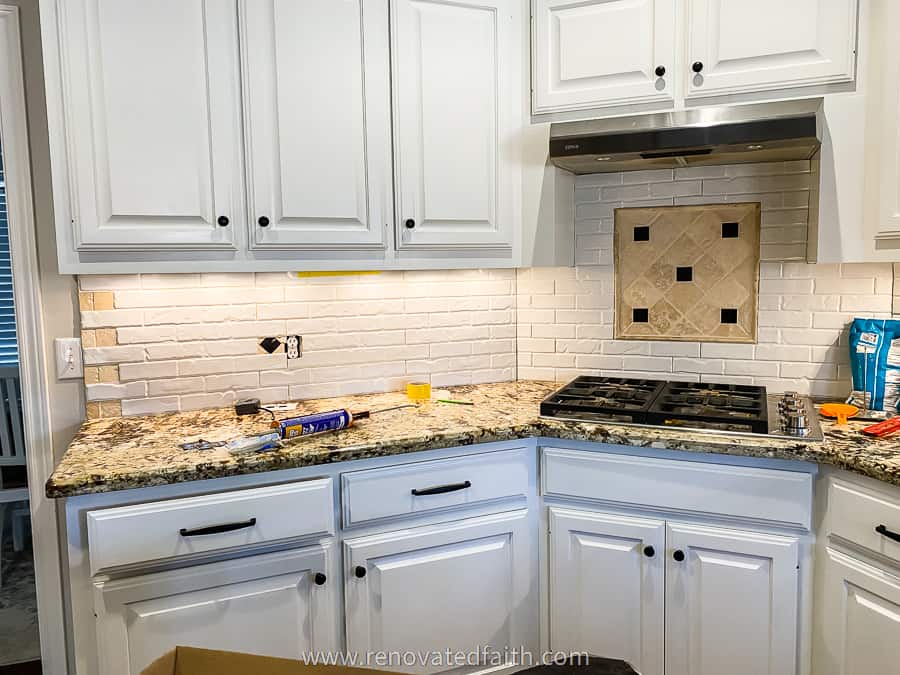
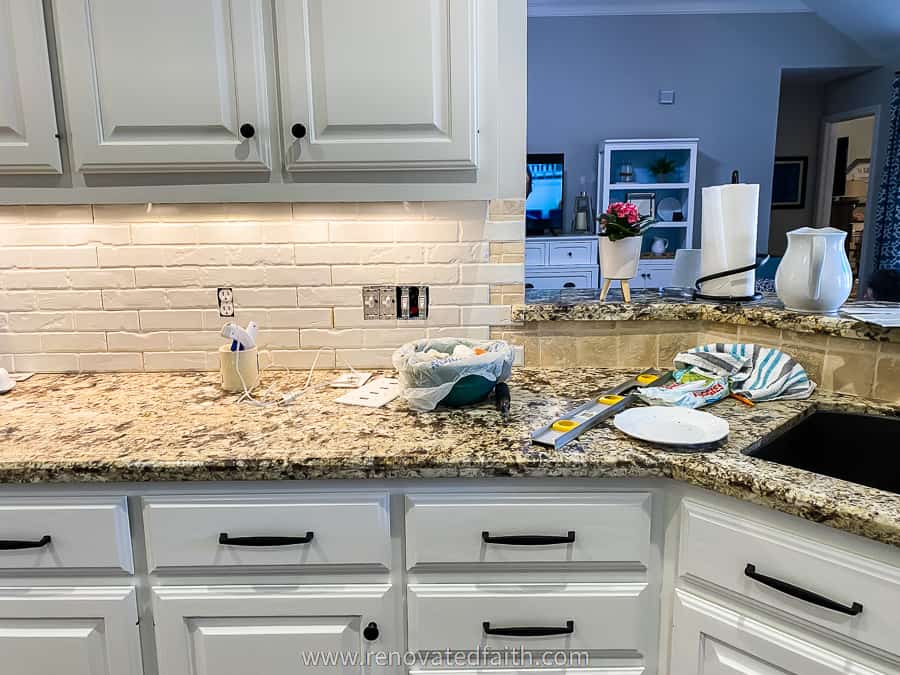
Keep gluing the PVC panels sections from left to right starting in a wall corner, as shown in the video.
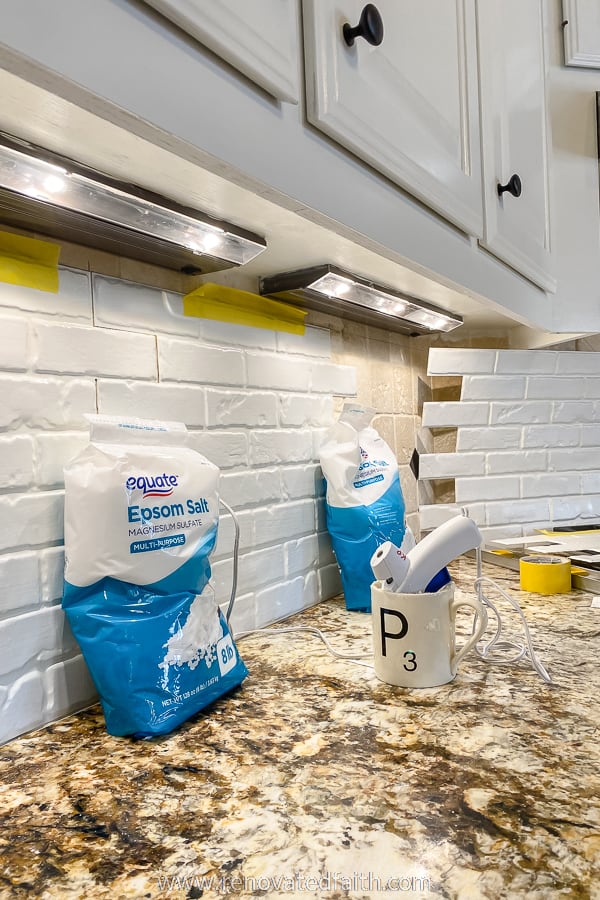
When I finished gluing on all the full panel pieces, I put bags of Epsom salts (you can use anything) up against the panels to keep them in place while they dry fully.
Once the full panels are dry, you will go back and fill in the holes. Just cut down the middle of the grout lines to make smaller brick panel pieces. Add glue on the back and glue them into place. If the cut edges don’t line up perfectly, no worries! We will cover those edges with caulk.
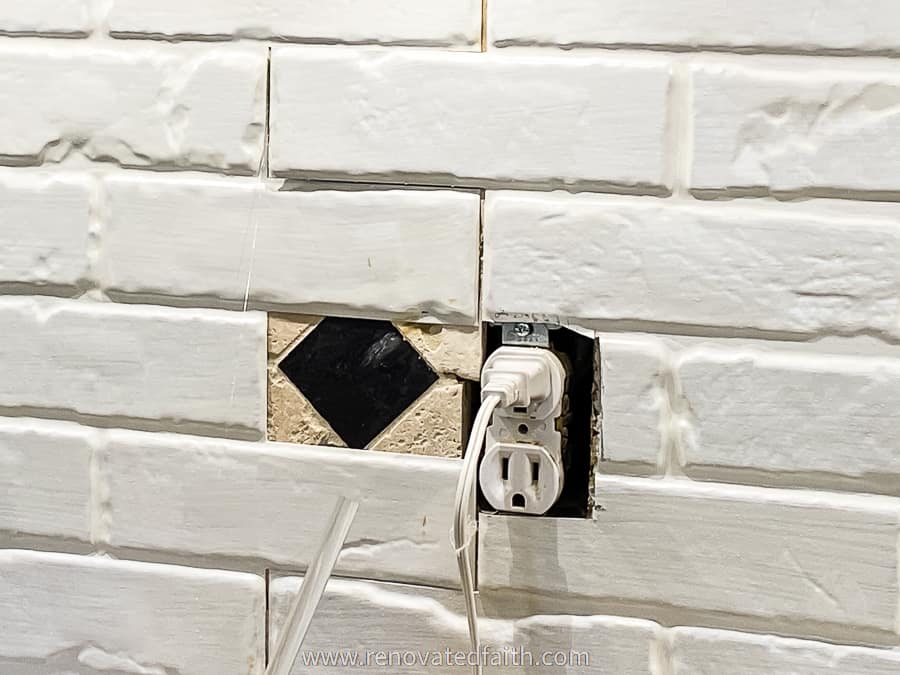
Continue cutting the final pieces to fill in all the leftover sections without brick. Let the Liquid Nails dry overnight.
How to Make A Stove Backsplash Mosaic with Faux Brick Wall Panels
To my surprise, you can make a variety of patterns by cutting out individual bricks.
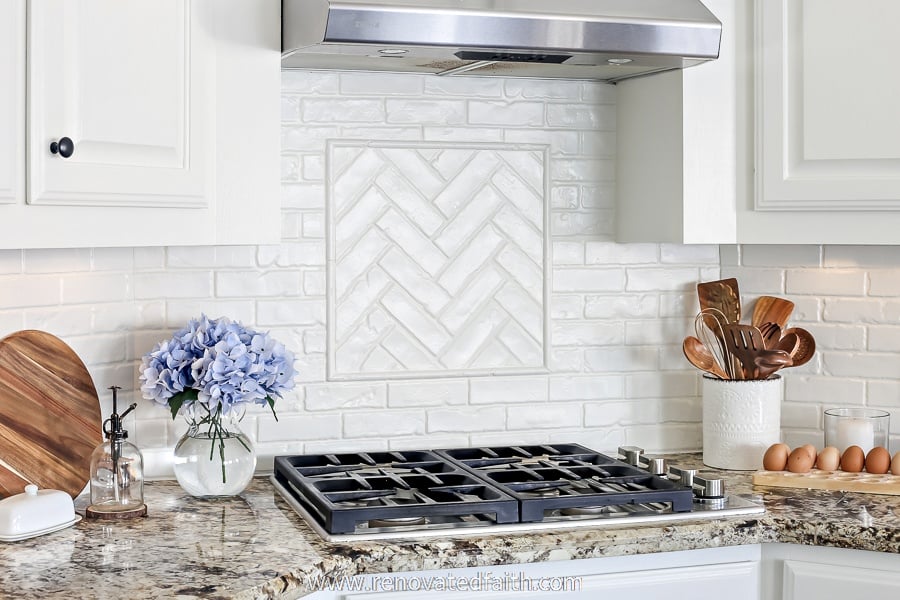
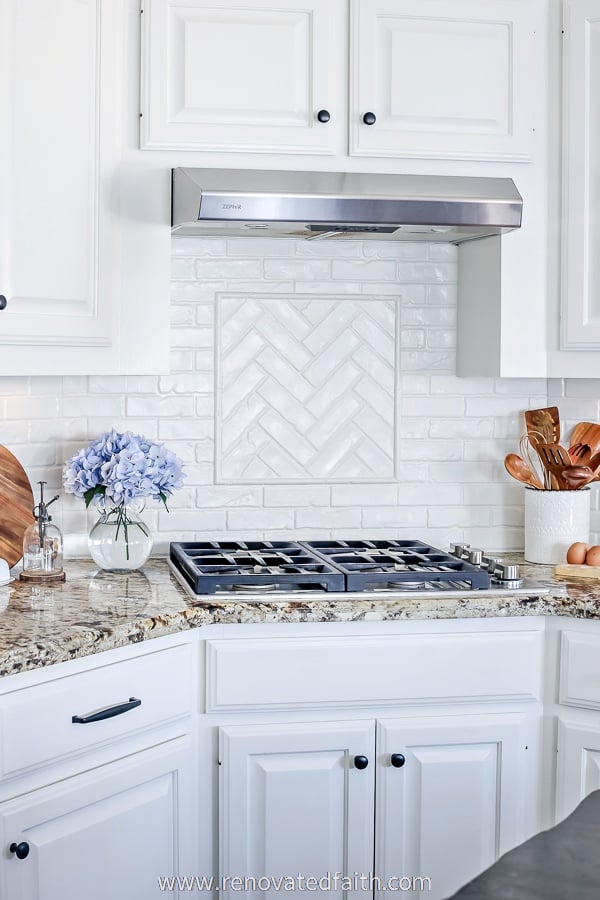
My existing backsplash over the stove and the edge tiles stuck out a little. So, what seemed to be a problem at first was actually a really great opportunity to do my own little brick mosaic on the inside in a herringbone pattern. It turned out so much better than I imagined and makes a great focal point for my kitchen!
To make the herringbone tile mosaic, I got a piece of cardboard and cut it to the exact measurements as the inside of the square of the tile border.
I cut out several individual bricks from my leftover panel pieces and placed them on the cardboard that was flat on a table. I laid them out exactly how I wanted them and put rows of painter’s tape all along the top of the mosaic bricks. Then I cut the edges of the bricks that overhung over the cardboard with the scissors.
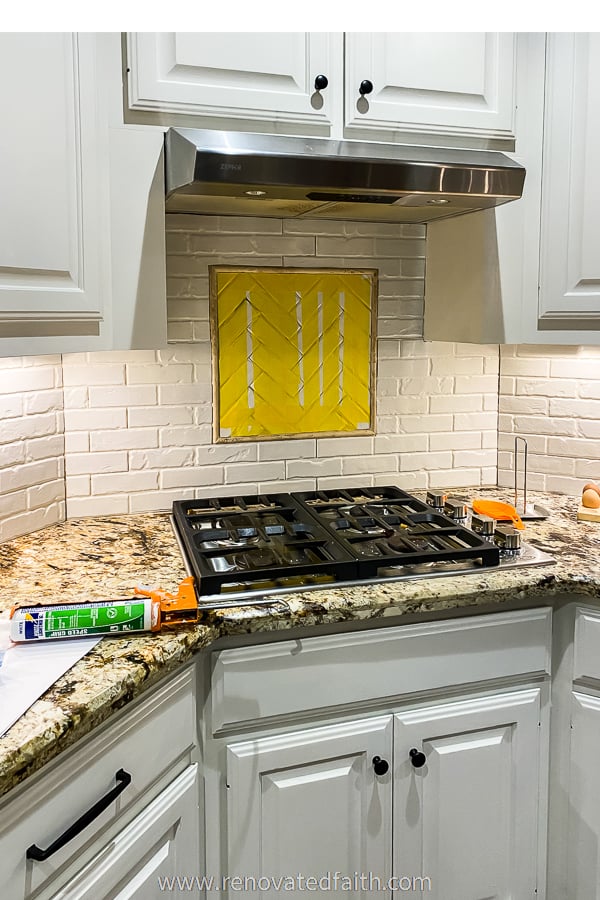
Now I had a perfectly sized brick mosaic held together with painter’s tape on the top. I removed the cardboard and put Liquid Nails on the back of the mosaic tiles.
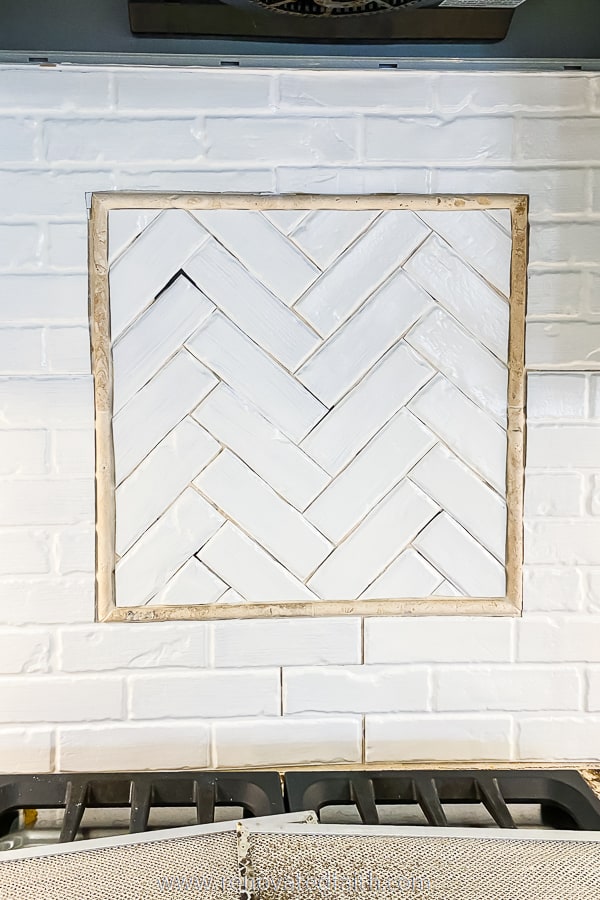
Then, I pushed it in place over my old tile mosaic. After a few hours of the Liquid Nails drying, I carefully pulled off the tape with one hand and the other hand holding the bricks in case the glue was still tacky. I let the liquid nails completely dry overnight.
On the next step, I caulked between all the edges of the tiles in the mosaic.
STEP 5: CAULK Between The Faux Brick Panels
I love that you can use caulk instead of grout for this step. It’s a lot less meticulous and you don’t have a messy grout bag to deal with.
You are going to caulk just the edges of the panels and panel pieces where a cut edge is exposed. This also includes the top edge, bottom edge and wall corners.
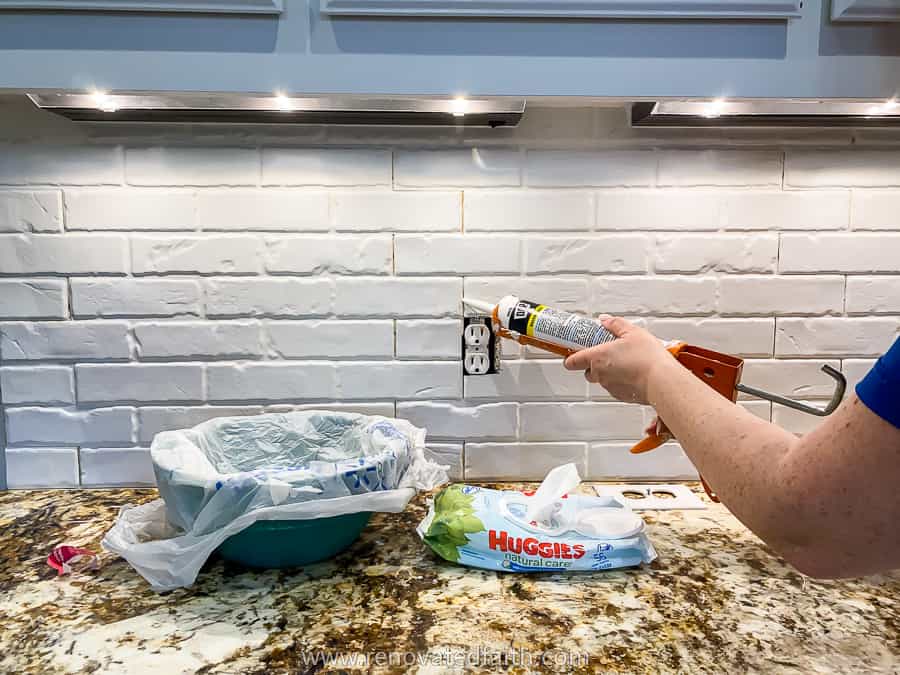
To caulk, apply a thin bead to a section of the cut edge as shown in the video tutorial. Moisten your index finger with a damp paper towel and lightly smooth out the caulk line. Then wipe any extra caulk onto the moist paper towel or a baby wipe. The line won’t be perfect and that’s ok!
I show this better in the video and it’s probably easiest to do without long nails. Regardless, it takes a really like touch and a little practice. Fortunately, caulk lends well to the overall effect of irregular grout lines.
Be sure to also caulk the corners of walls where the backsplash meets your cabinets. Let all the caulk dry overnight.
For the bottom edge that meets the countertop, I put down a long line of painter’s tape. I pulled it up a few minutes after putting down the caulk. Pulling up the tape before the caulk has dried allows you to wipe up any mistakes..
Step 6: Apply The Last Coat of Paint To The PVC Panels
Now you’ll want to add one last coat of paint over your PVC panels. You always want to add a coat of paint over caulk because if you don’t, it will attract dirt. Add the last coat of paint with your Zibra brush to get a brush-stroke-free finish. Let it dry for 16 hours.
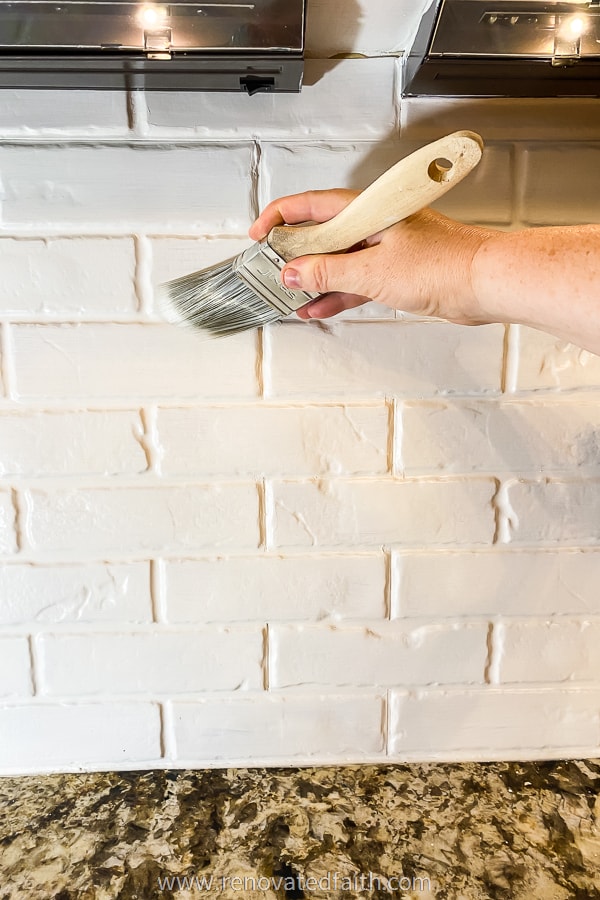
You can also go back and touch up the top of the bricks later if you have any bricks that don’t have full coverage.
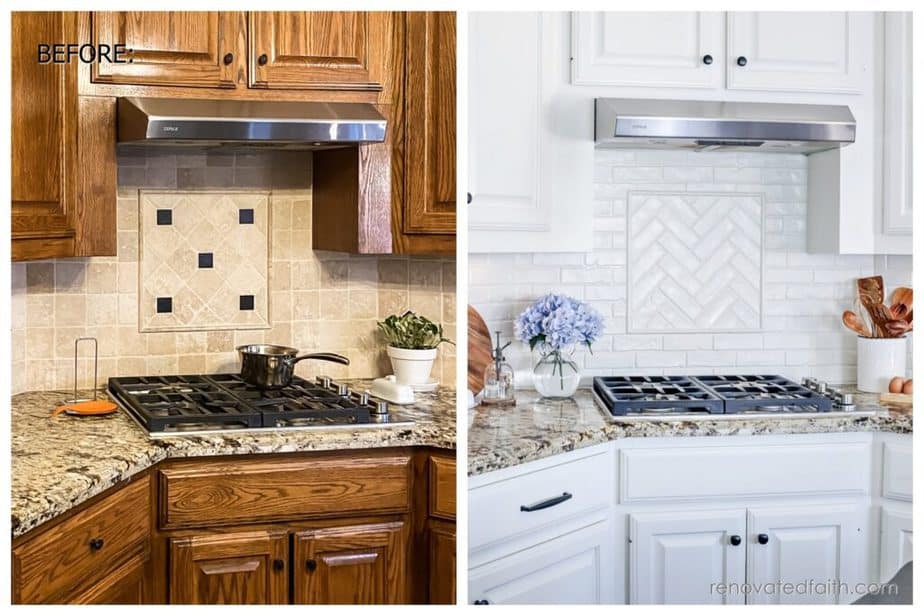
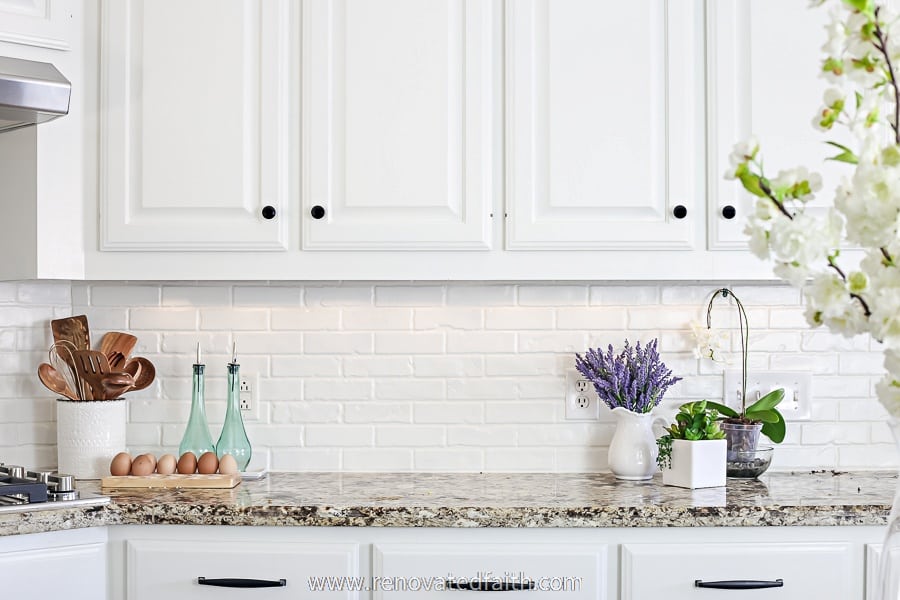
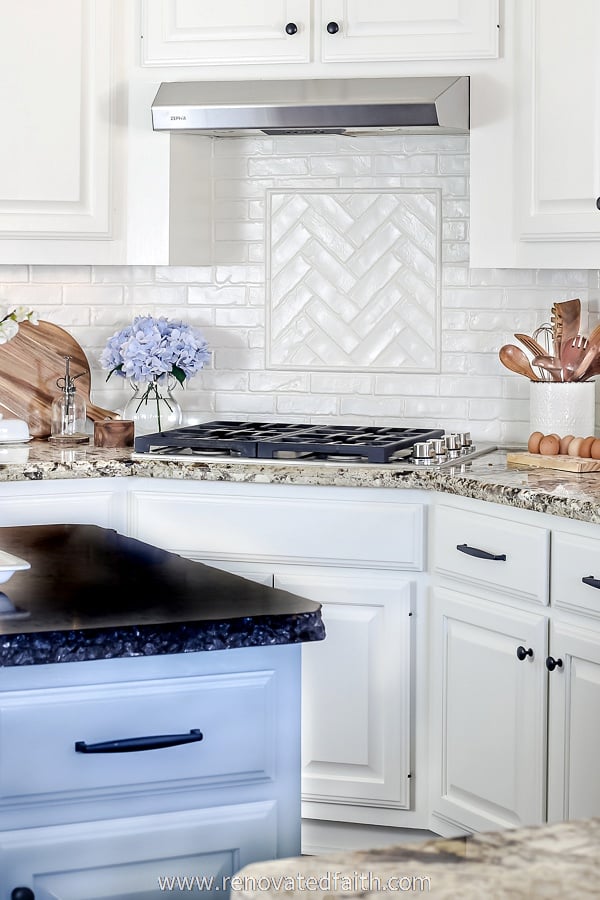
My kitchen has a whole new look. I think that my old tile would have severely dated my newly painted cabinets. I’m so glad that I opted to update the backsplash too!
RENOVATE YOUR FAITH: Blessings Disguised As Disappointments
To escape the hot Texas sun, my daughter and I spend a lot of time at the pool each summer. She’s an avid swimmer now, but she was so scared of the water when she was little.
One day many years ago, I saw a huge water bug in the pool that was at least 2 inches long. I didn’t think much of it until a few minutes later when I noticed it perched on Morgan’s arm floaty. I quickly brushed it off without her noticing. We swam a few minutes more before I realized how unsuccessful I was at getting rid of the bug as it was now in Morgan’s hair! READ THE REST HERE
For more spiritual encouragement, click here for the rest of my Renovate Your Faith devotionals.
Brick Backsplash Pros & Cons: What Are My Options?
What kind of brick is used for a backsplash? There are several ways to get the look of a brick backsplash but not all of them are low maintenance with easy installation at a reasonable price.
Can You Use Brick As a Backsplash?
Brick backsplashes offer your home a depth of warmth and character while working with several different design styles including traditional, farmhouse, coastal, and even contemporary.
Using real brick is the most durable option but it is the priciest option. Also, solid brick backsplashes take up precious counter space or you need to find a solution for a backsplash material that is so much deeper than tile.
If you don’t want the solid brick backsplash to stick out, you may have to have extensive drywall work done to reduce the new backsplash’s depth. If you don’t want to see an overhang, it might mean changing out the countertop configuration. You’ll also have to have an engineer inspect your kitchen to make sure that the studs can support the weight of so many bricks.
All building materials have their pros and cons. So while regular bricks are beautiful, they are not very user-friendly!
What About a Brick Veneer Backsplash?
Brick veneer tiles are basically thin brick tiles that mimic the look of brick without the size and weight issues. As with regular brick material, veneer brick can be very absorbent and that means it can easily stain and absorb moisture. Also, if you have a lot of water-soluble salts in your tap water, you might be left with white mineral deposits near your sink.
Also, thin bricks usually has to be installed by a professional which means an additional cost for the installation labor. If not, be prepared for a learning curve and to rent a tile cutter. In addition, the cost of brick veneer or porcelain brick-like tiles can get pretty pricey!
What about Fake Brick Backsplash Hardboard Panels?
When I first started this process, I was going to use the hardboard panels you might have seen used for other DIY faux brick backsplashes. But I went to Home Depot and they only had 1 in stock and it was damaged. They didn’t know when the next shipment would come in but after taking a closer look, they are incredibly heavy because they are essentially high-density fiberboard (HDF).
While HDF brick panels are cheap and durable, they will require a jigsaw or circular saw to cut. They also only come in 4′ x 8′ pieces and they won’t cut them smaller to put in your car.
My main issue with these is that you have to have some solution to cover up the edge because they are so thick in comparison to the my very thin brick backsplash kitchen panels. Hardwood panels will stick out at least 3/4 inch on top of your old tile and you have to cover up the left and right edges so it’s not obvious it’s not a solid panel and now individual bricks.
I was so disappointed in this option after checking at Home Depot because I thought this backsplash project would not work out. Fortunately, I’m so glad they didn’t have more in stock because the PVC panels I used are such a better alternative!
Other Uses for Faux Brick Panels
PVC Wall Panels aren’t just for brick-look backsplashes. They are great for different applications other than just backsplashes like accent walls, bathroom walls, and ceiling interfaces and you can even use them on a bed headboard. You’ll also find PVC panels, 4×8, used in industrial buildings and carwashes. Many of these are made with indestructive agrilite and come with EZ liners.
Here are some other ideas other than using them on a traditional wall space:
PVC Wall Panels for Outdoor Use
PVC Ceiling Panels and Ceiling Liner Panels
4 x 8 Plastic Panels for Walls
FAQ’s: How To Update Kitchen Tiles Without REmoving Them
What Are The Best Shades of White For a White Brick Backsplash In A Kitchen?
If you want a slightly off-white backsplash that is just a tad warm, I highly suggest Sherwin Williams Alabaster. It’s the closest you can get to a warm white without being too creamy. If you want a true creamy antique white brick backsplash, go with Sherwin Williams Chantilly Lace.
For a pure white backsplash that isn’t too bright, go with Sherwin Williams Pure White. Go to your nearest Benjamin Moore store and get Benjamin Moore Advance color-matched in these colors. They have all of these codes in their computer!
Can You Use ThESE Panels for a DIY faux brick Wall?
These faux brick panels give you a variety of options. You can absolutely use this for a faux brick kitchen wall and it would probably not take as much time since there will be more of the full panels used and fewer additional cuts. Just follow the tutorial above for a standard size backsplash except I would use some sort of thick wallpaper paste instead of Liquid Nails in case you want to take down the entire wall later.
Should I clean my old tile backsplash before installing the PVC panels?
If you have a lot of grease buildup on your old backsplash you can degrease it with Krud Kutter or water mixed with a tablespoon of boric acid. Use a Scotch Brite scrubber to scrub the tile and rinse it off with a damp rag.
Are backsplashes outdated?
As long as we have kitchens, we will have backsplashes. Functionally, you need something to protect the drywall above your countertops. Wall panels will become more popular because they are less difficult to install, cheaper and more wipeable.
Skinny backsplashes are out of style though and not a great idea functionally. Make sure to install a backsplash that goes from your countertops to your upper kitchen cabinets.
How do you attach PVC wall panels?
The best way to add PVC panels for walls is with liquid nails. Not only does it provide a really strong bond but it dries fast – but not too fast that you can’t make minor adjustments right after you put up your panels. It’s also low-cost and can be used on a variety of surfaces.
What about white brick backsplash peel and stick options?
After looking at some of the white brick backsplashes at Home Depot, I came across some peel and stick brick backsplash tiles. I have never been a fan of peel and stick because if you don’t put the panel in the right place the first time, you will have trouble unpeeling it and then, you can mess up the finish. I like Liquid nails because it dries fast but not instantly so you have extra time to adjust the position of the panels.
How do you make a brick backsplash look whitewashed?
Many modern kitchens today are going with the whitewashed look. Use the exact instructions in this post to get a gorgeous whitewashed brick backsplash with paint: How to Whitewash a Brick Fireplace With Latex Paint
Is brick backsplash hard to keep clean?
Real brick backsplashes are notorious for staining because brick is so porous. For this reason, coffee or tomato sauce can easily stain brick.
Does a brick backsplash need to be sealed?
To prevent real brick from staining, you can add a sealant to make the surface more wipeable and easy to maintain. Fortunately, the PVC panels for walls are waterproof and don’t need sealing.
How do you mortar brick backsplash?
We are using caulk where our PVC panels meet to replace the look of grout. Fortunately, caulk is much easier to work with and less messy than using joint compound with normal brick walls. You can read more about mortar washing authentic brick here: How to Mortar A Brick Backsplash
How long does a PVC panel last?
PVC panels will generally last 15 years without warping or bending. They are very durable and are also water-resistant. They will last just as long as other options like subway tile, stick wall tiles, and porcelain brick-look tiles.
Is PVC Panel good for damp walls?
Waterproof PVC wall panels are great for damp areas because they are completely waterproof. Be sure to use a bathroom caulk to be sure to seal all the edges. I wish I would have known about them when I used a closet to propagate plants.
What is the cheapest way to cover a wall?
The only thing cheaper than using PVC panels for walls is beadboard wallpaper. I used it on our old house and wrote a post on how to hang it here: How to Hang Beadboard Wallpaper. I love how it turned out but it’s not as durable as the PVC panels. If you want to see how they turned out, check out this post: How to Sell a House in 24 Hours
Can you get the look of a white brick backsplash with black grout with PVC panels?
To get this look, paint the panels as described above in the tutorial. Then, take a small brush to paint the grout black or dark gray. Have a damp rag ready to touch up any mistakes on surrounding areas. You can get the look of an entire brick wall if you want to use these brick panels for an accent wall.
More Posts Related To My DIY Faux Brick Backsplash
How to Paint Kitchen Cabinets Like A Pro
The Best Wall Color For A Living Room: Agreeable Gray
How to Whitewash A Brick Fireplace (The Simple Way)
27 Tips for Selling Your House Fast
How to Get a Beautiful, Grain-Free Finish on Cabinets
The Easy Way to Install Kitchen Cabinet Hardware
Painting Furniture with White Paint: The Best Tips for Your Next Project
Final Thoughts ON The Best Faux Brick for A Backsplash
The backsplash can make or break the look of any kitchen. After I went to all the trouble of painting my oak cabinets, I didn’t want to stop there. But I needed a modern backdrop to cover up the old dated tile without a messy demo. Fortunately, I’m so glad I found this option for a modern faux brick backsplash on a budget. What was once a drab and outdated backsplash is now a beautiful, brick backsplash I can be proud of.
With ease of installation, and the ability to apply them over existing tiles, PVC wall panels are the best faux brick for backsplashes. They give you the best results overall with the same classic look and durability as painted brick or white tiles, but are water-proof, stain-proof, and a fraction of the price. PVC brick wall panels are a great way to upgrade the look of your kitchen on a budget. With this tutorial and video, you can install it yourself and be so impressed with the gorgeous results!
DON’T FORGET – If you are looking to update your kitchen, be sure to download my FREE cabinet painting roadmap in this post: The Ultimate Guide to Painting Kitchen Cabinets Like A Pro
Easiest DIY Faux Brick Backsplash, YouTube Video
I love to hear your thoughts and questions! Scroll down to leave a comment and I WILL reply! ❤️
Blessings,

Be sure to follow the fun here!
Email Subscription | Instagram | Pinterest | Facebook | Twitter
BEST Brick For Backsplash – Fake Brick Backsplash Panels

Karin Peters is a DIY expert and the creator of Renovated Faith. She is a furniture painter, a home design consultant, and a tenacious problem solver determined to help you transform your house into a home. With 17 years of experience with DIY home improvement, she researches and analyses professional processes to adapt them to be easy and cost-effective for DIYers. She then tests every project and product before it appears on the site in a detailed, step-by-step format. After attending Texas A&M University, she received her Master of Divinity with Biblical Languages at Southwestern Baptist Theology Seminary. Her passions unite in Renovated Faith, which shows readers how to create a home that serves them so they can pursue their God-given purposes. About Renovated Faith | Editorial Policy | Facebook | Twitter | LinkedIn


Hi, I was looking into this product on Amazon and noticed in the questions/answer section, the seller stated it would not suit to use behind a stove as the product would melt. What has been your experience and are you still as happy with the finished product? Thanks so much!
Hey Laura, I saw that too and wondered if they meant behind a free-standing stove/oven unit. I’ve not had any issues at all with my backsplash and I use the stove every single day for my eggs. So far, I’m happy to say it looks the same as it did the day I painted it! I hope that helps Laura. Thank you!
Thanks for sharing this post I like this brick black splash post because the beauty of a brick backsplash in the kitchen is that it is timeless, functional, and visually charming. It’s also easy to clean! brick backsplash
Debbie from Tennessee
I’m going to try the backsplash in your article! I want to order the same PVC as you used-only I want to white-wash it. Read the section on you whitewashing the brick fireplace but really wondering if the same application would work on these PVC pieces…? Would the whitewash adhere to these as they would the real brick you show? How different would the final appearance be? Thank you so much for your great ideas
Yes, there should be a picture toward the bottom of this post of how I used the whitewash technique on a sample. You might get the PVC bricks and paint one with the whitewashed effect and the fireplace tutorial to see if you can get the look you want. That was my goal at first but I decided to paint them solid white. Let me know if you have any other questions, Debbie!
Everything looks beautiful! I have followed your instructions on how to paint cabinets and what to use. You have always been spot on!
I want to do the brick back splash but I’m worried if someone touches it will they be able to tell that its not real brick? How does it feel and look close up?
Thank you for your faithful site!
Jane
YAY! This comment makes my whole week! So glad you are happy with it! I feel very confident telling you that the backsplash looks like real white brick. My dad is the biggest perfectionist I know and he kind of cringed when I told him what I was going to do with the faux brick panels. But when he saw it completed, he was adamant it looked like real painted brick. Feel free to ask me any questions along the way. You’ll go through a lot of liquid nails so get extra – you can always return what you don’t use. Keep me posted Jane!
I love your blog posts, thank you! An Amazon product reviewer said, as a renter, he used staples and a removable “sticky putty” to have a removable product. If used as a backsplash, do you feel this would work? Also, once installed, does the backsplash feel solid to the touch or does it flex when touched?
I wasn’t able to find your post on your above the stove mosaic you created, if you could share that. That little addition absolutely makes your project all the more stunning! Thank you 🙂
Hey Lee Anne, Those are great ideas! I think the staples would just depend on what is under the faux brick. I think the sticky putty would be great as a temporary product. Just know that the caulk will get on the old tile and will probably be hard to remove. That might be my only reservation. Also, if you look toward the bottom of this post, I describe how I did the mosaic. I wish I would have taken more pictures but if you have ANY questions, don’t hesitate to ask. Thank you so much for your sweet comment Lee Anne!
Can you share how you finished the end where it does not meet a wall corner? Thanks!
Wow, this looks great. How did you finish the end where it does not meet a wall corner?
Hey Robbie, I should have included a picture of this. I made sure to line up the edge of the panel flush with the end of my old tile. Then, on the caulking step, I filled in the gaps under the panels with caulk. My goal was to cover the edge of the old pile and to use the caulk to make look like the cut edge of a real brick backsplash. Let me know if this doesn’t make sense.
Then did you paint the side of your existing stone that is still exposed under the end of the panel that you filled in with caulking?
Yes. After caulking, I painted the mosaic including the old stone all together. If this doesn’t answer your question, let me know! Thanks Kari!