The Secret To Removing Wood Grain On Oak Cabinets (2025 Review & Video)
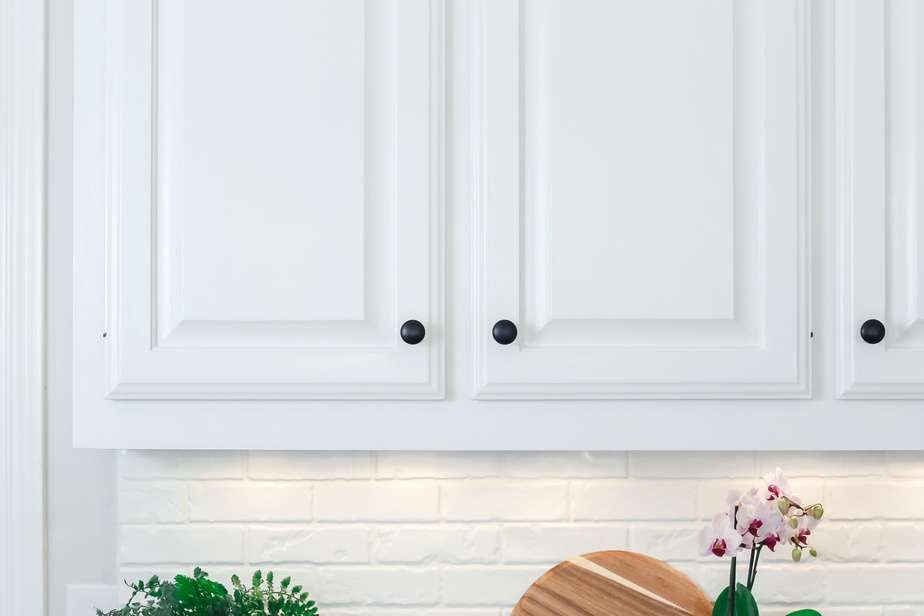
Aqua coat Grain FIller Tutorial
For a super-smooth, professional finish, I’ll show you the best wood grain filler for oak cabinets and the easiest way to apply it!
Nothing can transform a kitchen like painting old oak cabinets. But don’t miss out on a smooth grain-free finish by skipping the most important step – using a wood grain filler!
Honey oak cabinets were fine for the ’80s but their orange hue and busy grain pattern are an eyesore when it comes to today’s kitchen trends.
But covering that stained oak with paint doesn’t necessarily solve all your problems! Unfortunately, certain wood species like oak wood have a very open grain. That means the grain makes deep divots in the wood that, even when painted, can show up as distracting little pock marks in your paint finish.
Fortunately, I have an easy solution to fill in the deep grain of oak cabinets that will leave your paint finish smooth and flawless! This step-by-step DIY tutorial will show you how to use the best wood grain filler to get a professional look on oak cabinets.
(As an Amazon affiliate I earn from qualifying purchases. Please see my full disclosure HERE).
What’s The Best Wood Grain Filler for Oak Cabinets?
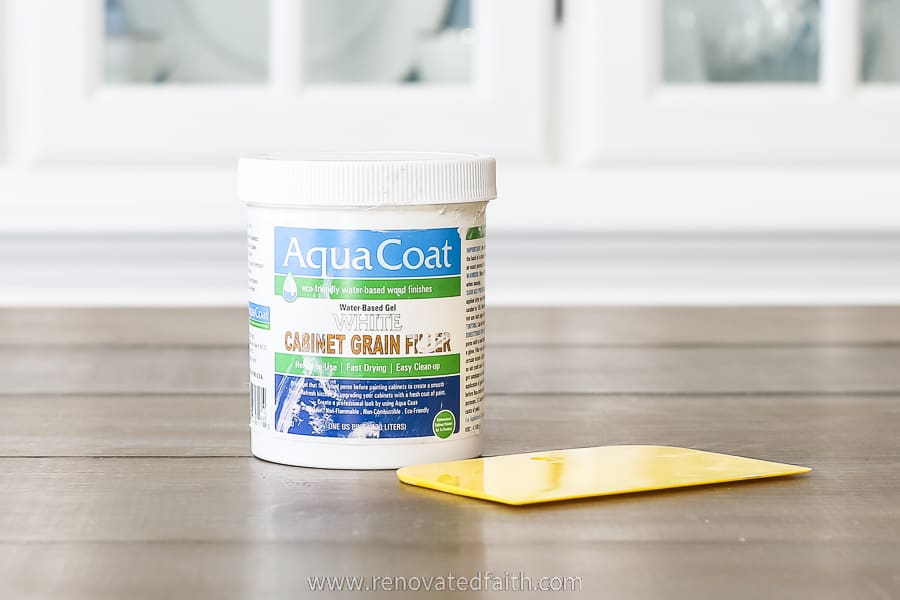
After researching the best option and trying a few myself, I had a really good experience using this grain filler. See this sponsored link for the current price:
MY FAVORITE GRAIN FILLER FOR CABINETS AND FURNITURE
Quick Links to Information in this Post
- 1 Aqua coat Grain FIller Tutorial
- 2 What’s The Best Wood Grain Filler for Oak Cabinets?
- 3 How Do You Get a Smooth Finish on Oak CABINETS?
- 4 Why A Wood Grain Filler Was Worth It
- 5 Supplies Needed: How To Fill Wood Grain in Oak Cabinets
- 6 How Do You Use Aquacoat Grain Filler?
- 7 RENOVATE YOUR FAITH: GIVE YOURSELF A FREE PASS
- 8 FAQ’s: THe Best wood grain for oak cabinets
- 9 More Posts Related To The Best Wood Grain Filler For Cabinets
- 10 How to Fill Wood Grain in Oak Cabinets, YOUTube Video
- 11 Final Thoughts on Filling Wood Grain
- 12 HOw To Fill Wood Grain With Aqua Coat Grain Filler
How Do You Get a Smooth Finish on Oak CABINETS?
Using the right paint and primer is important but using a good wood grain filler will give you the smoothest finish when painting oak cabinets. (See my full tutorial on painting oak cabinets from start to finish by CLICKING HERE.)
Is wood grain filler necessary?
No one wants to add a step to their cabinet refinishing project but using a good grain filler will make such a dramatic difference in the look and texture of your cabinets that is it worthwhile. Also, you will use less paint and primer and the grain filler not only evens out the surface but provides some coverage.
Paint color also determines how much you will be able to see the grain of the painted wood. Lighter colors show grain more than dark colors.
RELATED POST: The 33 Best Paint Colors for Kitchen Cabinets

Why A Wood Grain Filler Was Worth It
Cabinet painting isn’t easy. It’s a long process with several steps that creates a mess in the most important room in your home. And adding Aquacoat is yet another step in the process.
Since repainting my own cabinets, I feel like Aqua Coat (click here for the current price) was the key to my DIY project not looking like a DIY project. Even though I did everything myself, I still wanted a professional finish and for my oak cabinets, a grain filler was the key!
RELATED: How Much It Costs to Paint Kitchen Cabinets (DIY or Hire a Pro?)
So, yes, it adds a big step to a project that is a lot of work but if you are going to the trouble of painting your cabinets, you want them to look amazing and the finish to last a long time! The good news is that Aquacoat gave me the professional finish I was looking for.
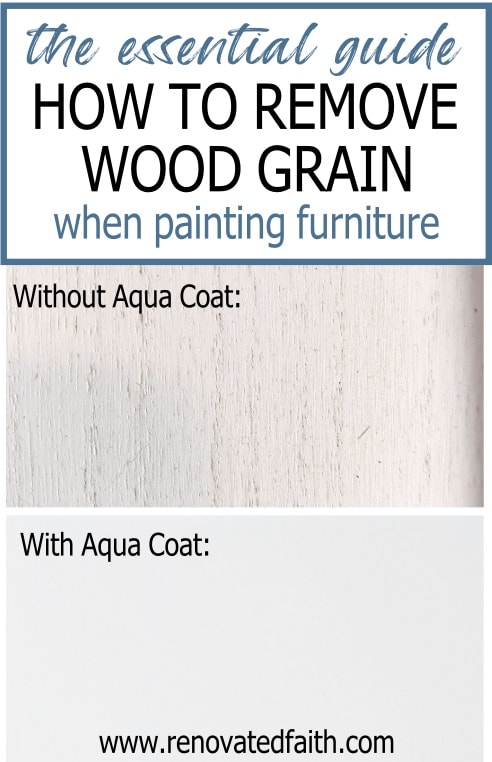
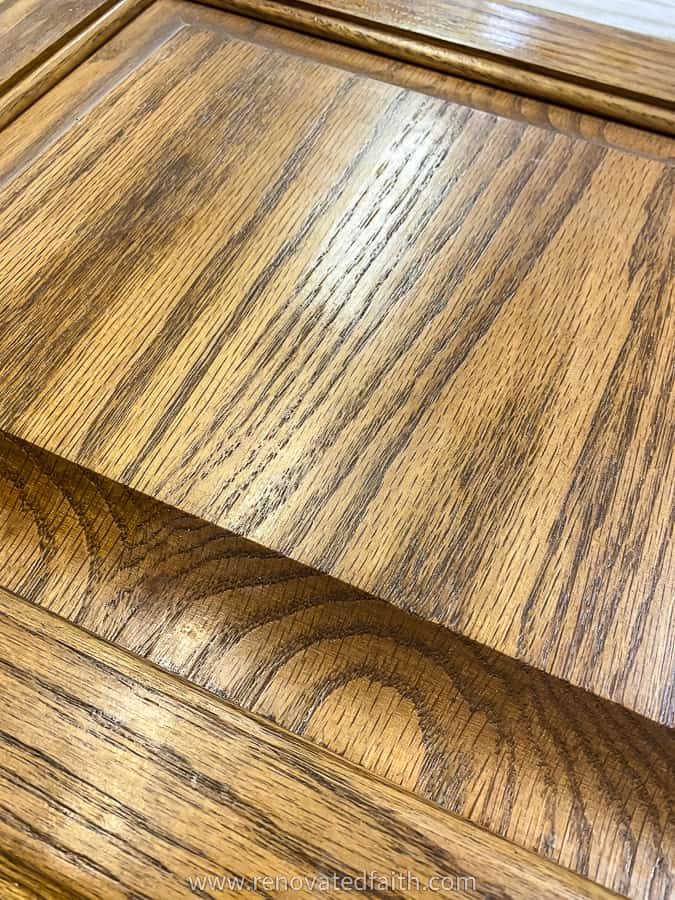
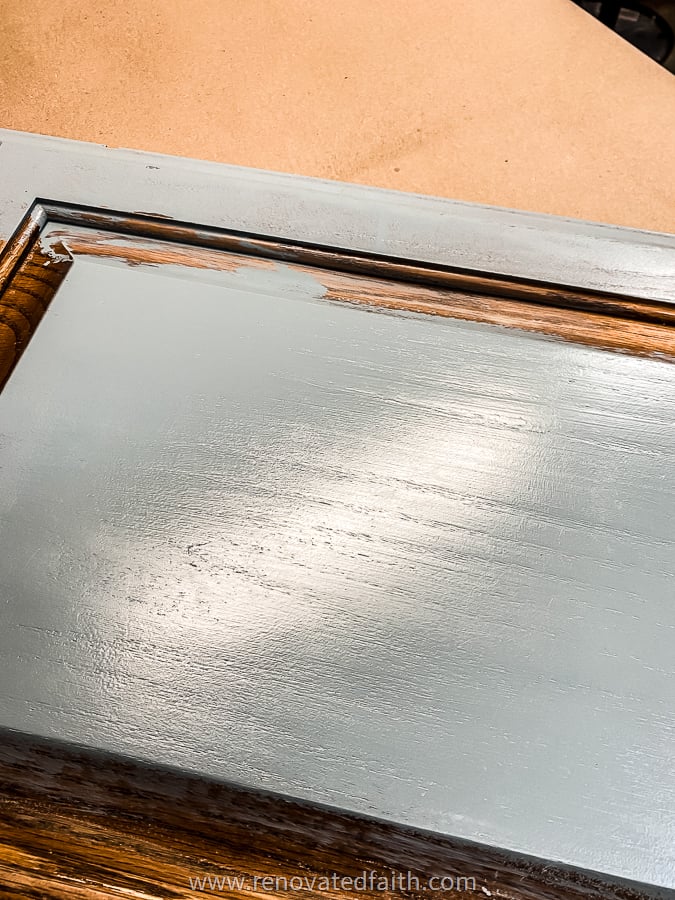
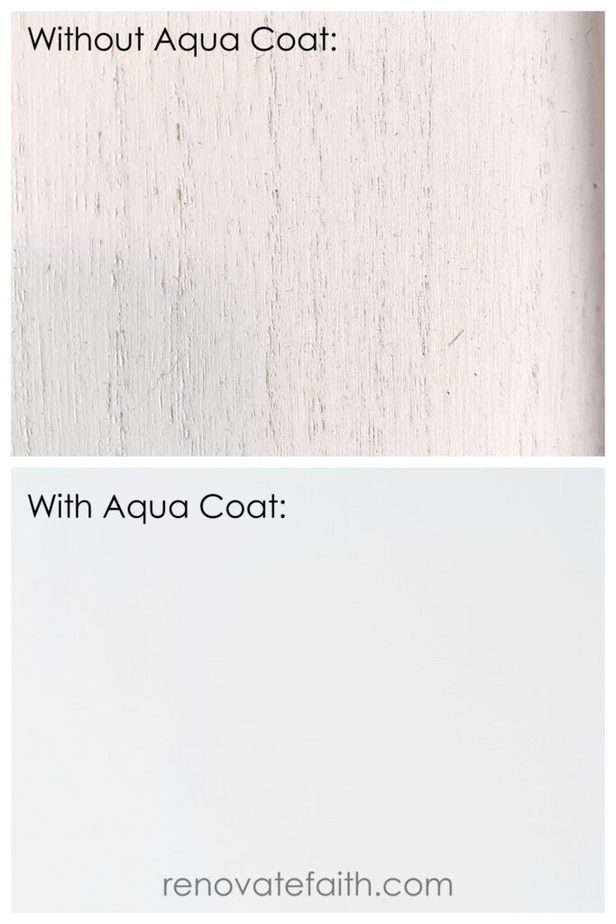
Here’s one of my cabinet doors painted without grain filler:
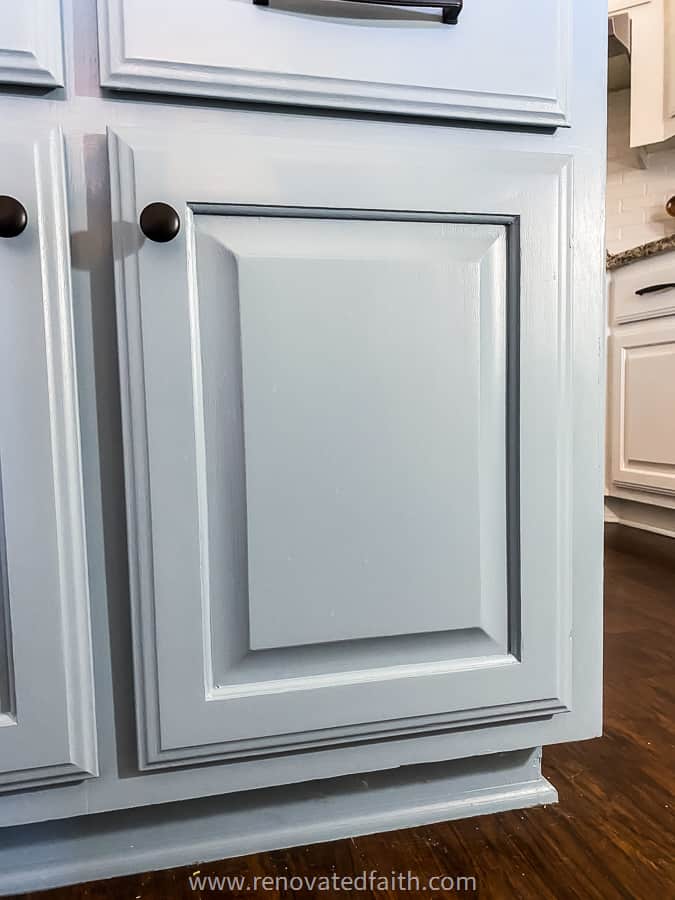
Here is the same door on my kitchen island with grain filler. I took the picture with a glare so you can see the surface better. You can still see a little of the grain and I don’t mind that. I still wanted the cabinets to look like hardwood and not laminate. But you can definitely see all the grain indentions were filled in and the finish is much smoother.
If you want a COMPLETELY smooth finish with Aquacoat, I show you how to do that below.
Does primer fill in wood grain?
Some primers do a better job of filling in the grain of the wood than others. For example, the two primers I used most are Zinnser BIN and Zinnser Cover Stain. Because Cover Stain is thicker and has a bulkier texture that sands really well, I recommend it to help fill in deep wood grain. Although a primer helps, it’s not nearly as effective as a paste wood filler made for filling grain.
Is there a paint that fills wood grain?
Some paints are better than others when filling wood grain. After testing over 24 paints for cabinets, I found that Benjamin Moore Advance came out on top: The Best Paint for Cabinets (24 Paints Reviewed & Blind Tested)

I wish I would have known about Advance when I painted the wood cabinets in our old house. But even as great as Benjamin Moore Advance is at helping to fill the grain, nothing is more effective than a grain filler that is specialized for filling wood grain over large surfaces.
Using the right grain filler will make the biggest impact on making sure that your cabinets are smooth but using the right paint and primer will help that much more. That’s why I include all the best products in this tutorial.
Is grain filler the same as wood filler?
Standard wood filler is usually for filling large holes, nail holes, or damage on furniture. But a wood grain filler is specifically for filling pores of open-grained woods. There’s also stainable wood filler that contains real wood fibers and is specifically for filling holes in bare wood that will be stained. Bondo wood putty is often used to fix damaged furniture where a durable hold is needed. What you really need is a wood poor filler.
Related: How to Easily Fix Damaged Wood and Furniture
5 Options to Fill Wood Grain in Oak Cabinets:
Joint Compound – Several professional painters use joint compound to fill the small holes in oak wood. However, when it comes time to wipe off the sanding dust, the dried joint compound can easily wipe out of the woodgrain. In other words, it fills well but doesn’t adhere to the surface of the wood as well as Aquacoat.
Bondo Wood Grain Filler for Oak Cabinets – Bondo is a good product but it has to be mixed to the right consistency and getting it too thin can mean extra coats.
Crystalac Clear Wood Grain Filler – Clear grain fillers don’t have the substrates needed to settle into wood grain because they have to remain clear. Clear grain fillers are the best grain filler for guitars and other stained wood. However, they aren’t thick enough as a wood filler for cabinets. Aquacoat grain filler in white also helps to provide extra coverage so you use less paint.
Drydex Grain Filler for Wood – Several professionals use Drydex as a wood filler for cabinets. Since Drydex is created for walls and not wood cabinets, it will eventually fall out of the grain over time. One professional told me that Dry-dex has the tendency to cause flashing to the finished cabinet surface. The same applies for Famo Wood Filler.
Aquacoat Grain filler for Wood cabinets
Aqua Coat’s pore and grain fillers penetrate and seal the pores of the wood, minimizing the absorption of your topcoats or paint, or primer. They are ideal for filling the grain on oak cabinets to provide a smooth and beautiful finish. CLICK HERE TO SEE MORE REVIEWS AND THE CURRENT PRICE.
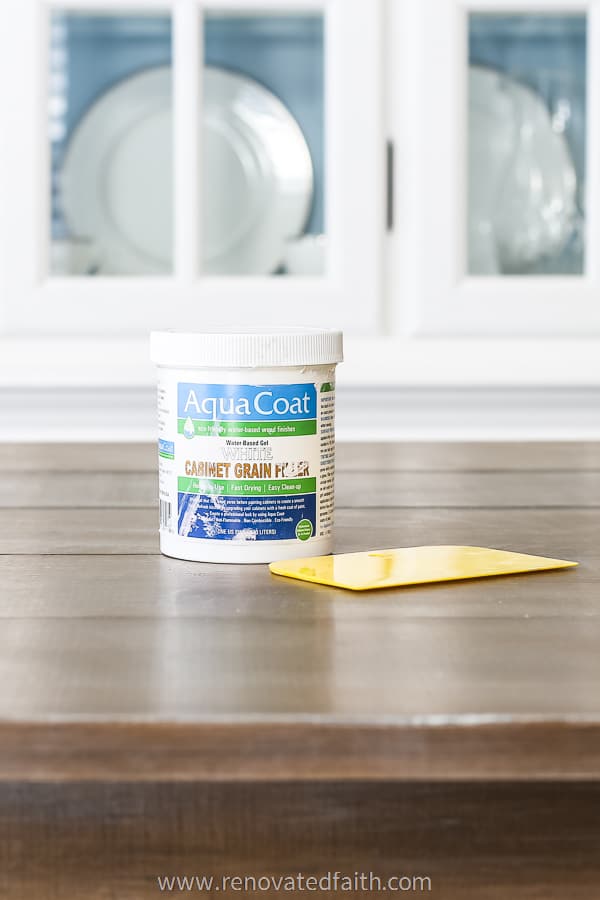
Aqua Coat Grain Filler for Cabinets on Amazon
Aqua Coat is the lead producer of wood grain fillers and their products are environmentally friendly, safe for use (non-Flammable and non-Combustible), low odor, low VOC, and designed to dry fast. It also sands easily, and you can use water cleanup for quick and easy application for filling oak grain.
Aquacoat is the best grain filler for wood because it has the least amount of shrinkage, it adheres well to the pores of the wood, and its thin paste consistency makes it incredibly easy to work with. Since Aquacoat is a paste filler and thinner than traditional wood grain fillers and the consistency is that of thin toothpaste.
There are a couple of different types of Aquacoat. Be sure to get the white grain filler as opposed to Aquacoat clear grain filler. You can see the current price of the white filler here: Aquacoat White Grain Filler

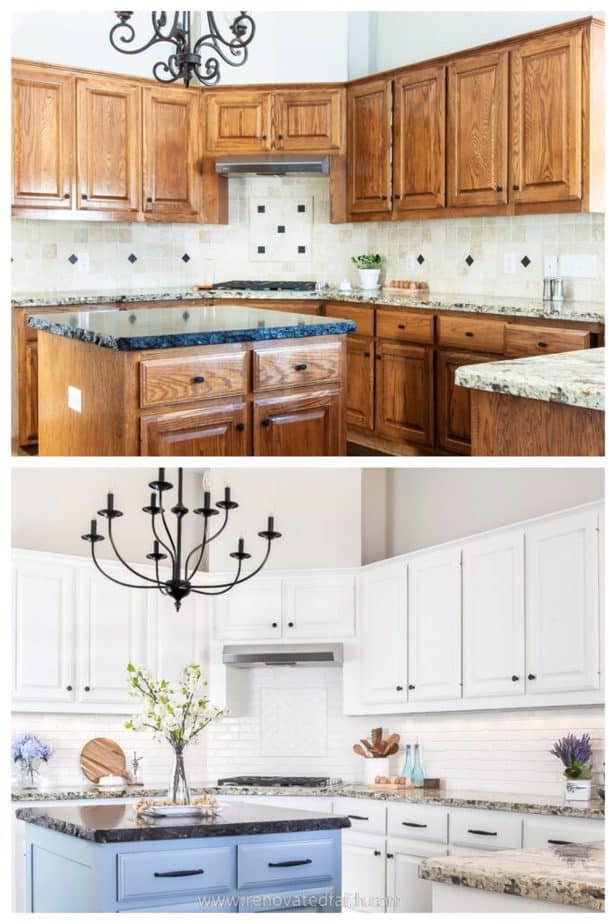
RELATED: For my entire kitchen reveal with before and after photos, click here: Before and After Painted Cabinet Reveal
Supplies Needed: How To Fill Wood Grain in Oak Cabinets
Aquacoat Grain Filler in White – Click here to see the current price. For most kitchens, the 1 quart container is enough but I ended up having to buy an extra pint because I have a lot of cabinet doors. A quart doesn’t seem like much but a little goes a LONG way!
Damp Paper Towels or Huggies Natural Baby Wipes – I tried a damp cloth but had the best results with wetting a whole roll of paper towels at once. The baby wipes are nice to have on hand though.
Spreaders or a wide Puddy Knife – This little set of plastic spreaders was great: Spreader Set You could also use an old credit card.
Gloves – This stuff is messy (and fun!). Disposable gloves are a must: Low-Price Gloves on Amazon
Green Scotch-Brite Scrubber – You can also get them here: Scotch Brite Scrubbers
Krud Kutter Degreaser – You can get a bottle at your local home improvement store or Amazon here: Krud Kutter Degreasing Spray
Cover Stain Primer – This is the best primer for oak cabinets with a deep grain. You can find it here: Zinnser Cover Stain
Orange Essential oil or Mineral Spirits – You’ll need something for clean-up in case you get grain filler on your hands or a surface. Aqua coat is water-based but it can still adhere well to surfaces. Of course, I’d much prefer this for my hands: The Best Natural Paint Remover
Sander and 240 Grit Sanding Pad – I love using an electric hand sander. Not only is it low-cost and easy to use but it saves SO much time. Here is my favorite sander: Black and Decker Sander I like these sanding pads which are slighly big for the sander which makes it easy to get in the grooves: Sanding Pads on Amazon
The Full Tutorial on Painting Oak Cabinets and A FREE Cabinet Painting Roadmap (see the form below).
Related: How to Sand Furniture in Less Than 5 Minutes | The Best Electric Sanders Reviewed and Tested
Aquacoat is pricier than some of the other grain filler options but this is one of those instances where you get what you pay for (and so much more!) Do NOT skimp and get another grain filler because it could mean having to completely redo your cabinets if the grain filler doesn’t adhere to the pores well.
Fill Any Old Hardware Holes First (How Do You Use Wood Filler on Cabinets?)
Before we get started, you want to go ahead and fill any old hardware holes but for this, you’ll use standard wood filler. Here is everything you need to know for that step:
The Best Wood Filler for Screw Holes | The Easy Way to Fill Hardware Holes | The Ultimate Guide to Fix Damaged Wood and Furniture
How Do You Use Aquacoat Grain Filler?
I did the whole process below from start to finish on my cabinet boxes first. Then, I did the process on my doors and drawer covers. This made it less overwhelming and works better for Aqua Coat’s dry time.
Be sure to follow along with the video as you go through the tutorial. The video better illustrates how to apply the grain filler to best fill the pores of your cabinet doors, drawers, and boxes. If the video isn’t showing up, you can also find it here: How to Use Aquacoat Grain Filler on Oak Cabinets, YouTube Video
Step 1: SAND The Cabinets
Be sure to check out my post on installing hardware to find out why I like to drill my new hardware holes first: The Easy Way to Install Cabinet Hardware
Sand with your electric sander or a block of 220 sandpaper. This is to rough up the entire surface so it better accepts the Aqua coat and it adheres well.
I love my Black and Decker Sander. Its so easy to use and if you aren’t familiar with using one you check out this post: How to Sand Furniture in Less Than 5 Minutes
Also, I use these sanding pads that are slightly bigger so that it’s easy to sand in the grooves with the edge of the sander. I used the 240 for this step but you’ll use the other grits later in the project.
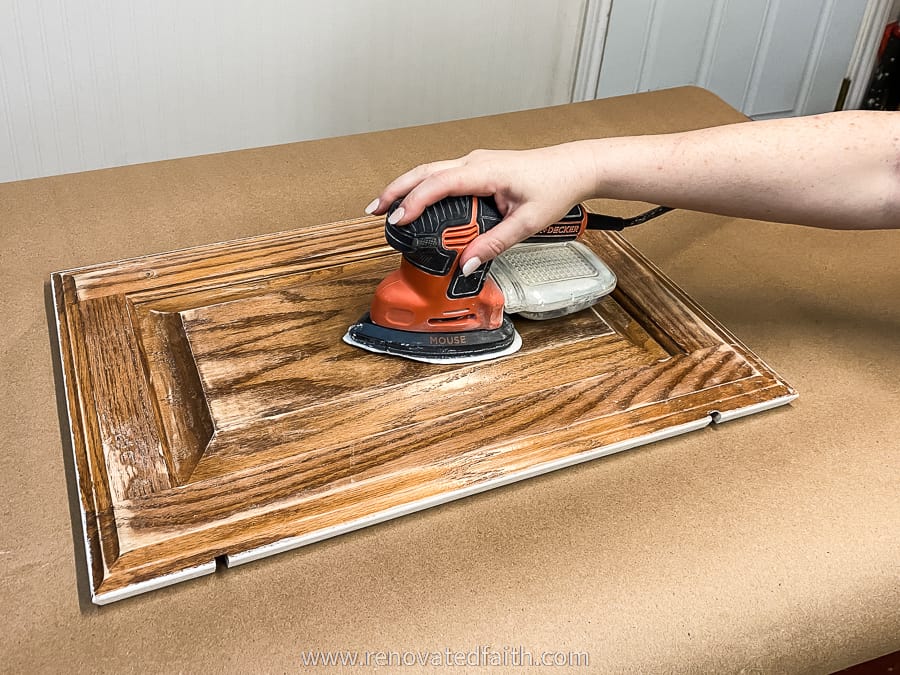
Do you need to sand before using Aquacoat?
Yes, but you are not sanding off the old finish, just roughing it up. You can see in the video that this doesn’t take long at all!
Renovated Faith: What’s in a Name?
God never leaves a project half-done…He continually works on each one of us, as a lavish expression of His amazing love and grace. So many of my DIY projects remind me of how God renovates our hearts. If you are a work-in-progress, just like I am, check out the Renovate Your Faith Devotional at the bottom of this post. Click here to get a weekly reminder of new posts by email.
Stop! Don’t forget to take a pic. When you are done, post the pic on Instagram and tag me @renovatedfaith! ❤️
Step 2: Degrease
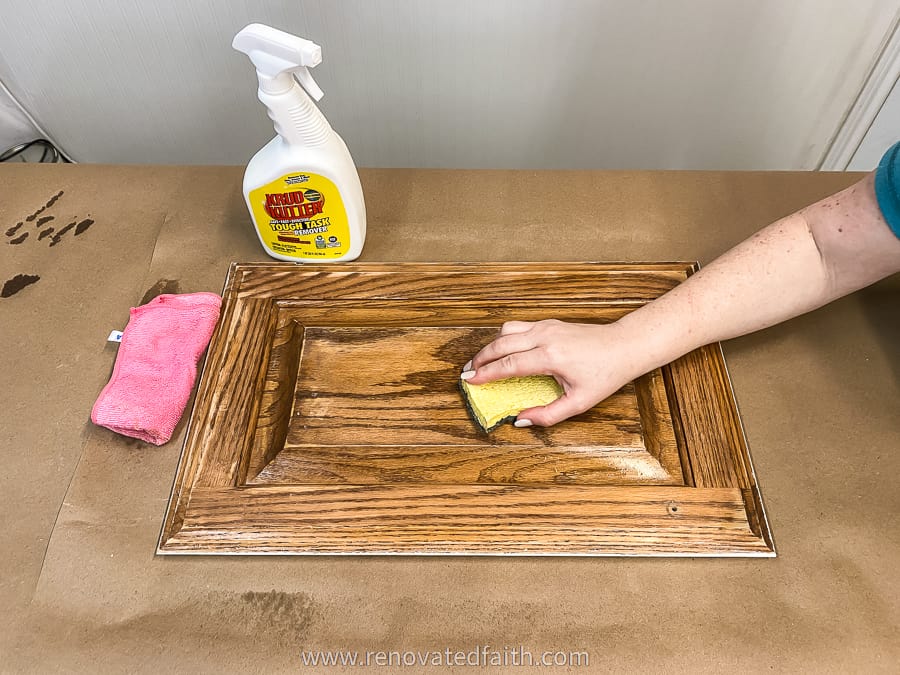
I chose to degrease my cabinets after sanding in order to combine two steps. By wiping down the cabinets you are cleaning them and also wiping off the sanding dust. Even though we already sanded the surface, we want to degrease the wood’s surface including any oils that may have penetrated the surface.
I like to use Krud Kutter or degreasing cabinets. Simply spray it on and scrub with the green side of a sponge. Then, wipe off the surface with a damp rag to remove excess degreaser.
Step 3: How to Fill Oak Grain Before Painting Cabinets
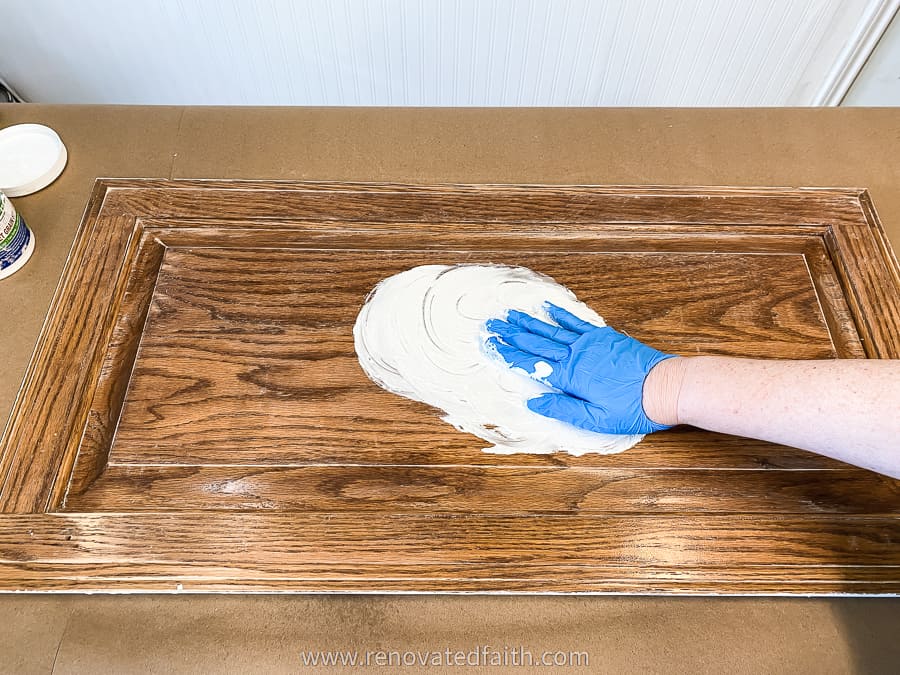
Now is the fun part! Put on your disposable gloves and wet a roll of paper towels. You also want to cover your workspace. Sometimes I’ll use kitchen garbage bags and just use them for trash as normal after I’m done with applying the grain filler
IMPORTANT NOTE: I used grain filler on my cabinet boxes and the fronts of my cabinet doors and drawers. I did not use the grain filler on the backs of the doors because it’s just not worth it, in my opinion.
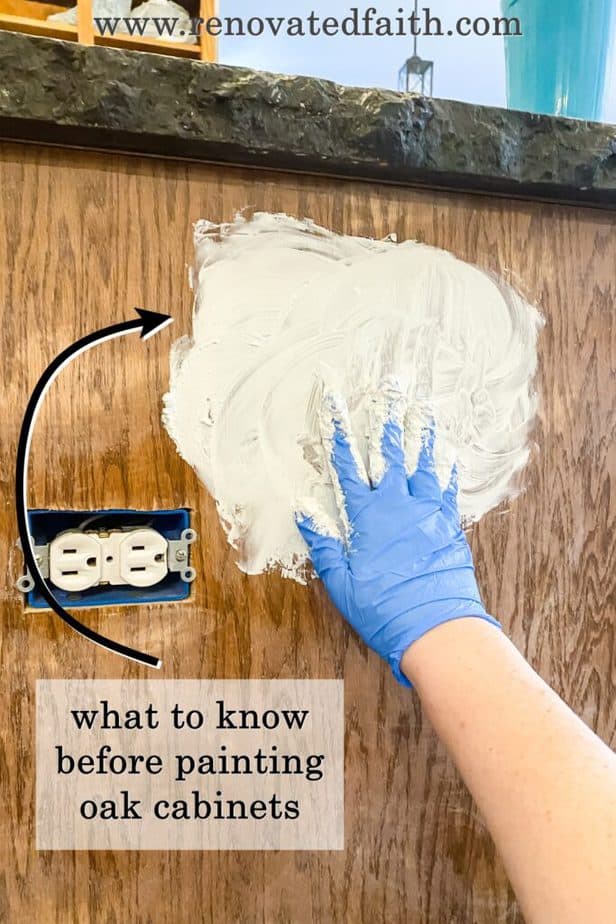
I like to work in the center of the door first. Take a generous glob of Aqua Coat in your hand and wipe in a circular motion. This is to help work the grain filler into the pores of the wood. It’s pretty cool to see how there are whole sections of the wood surface that the Aquacoat fills in that were lower than the rest of the surface.
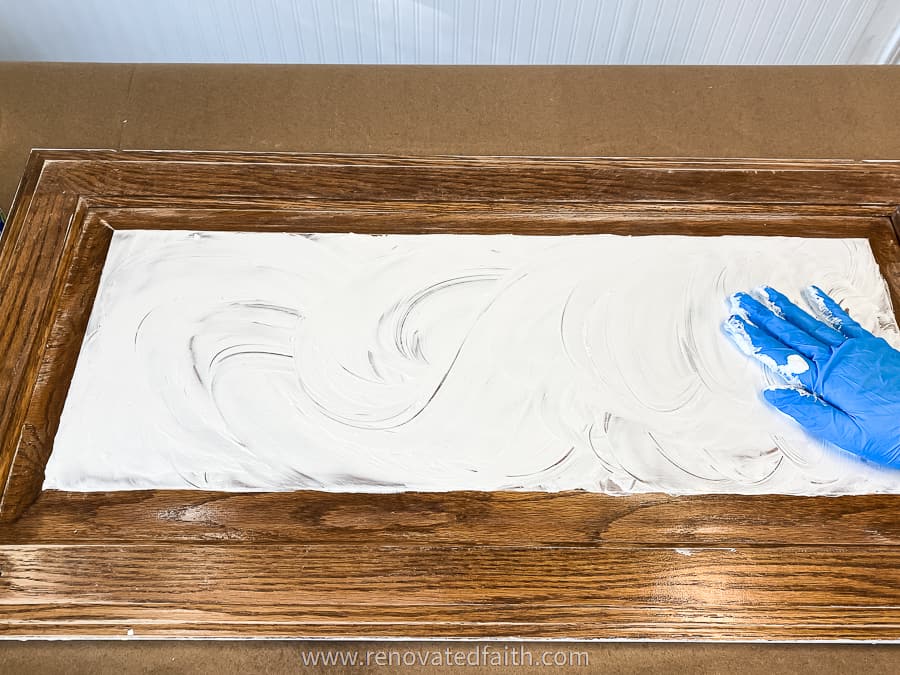
Now, I will wipe the excess filler off the center panel with a spreader. You’ll want to run the spreader over the wood in the opposite direction of the grain. Put the excess back in the Aquacoat container. You will be wiping off a lot more excess than what actually fills the grain, so that’s why it’s important to save the excess.
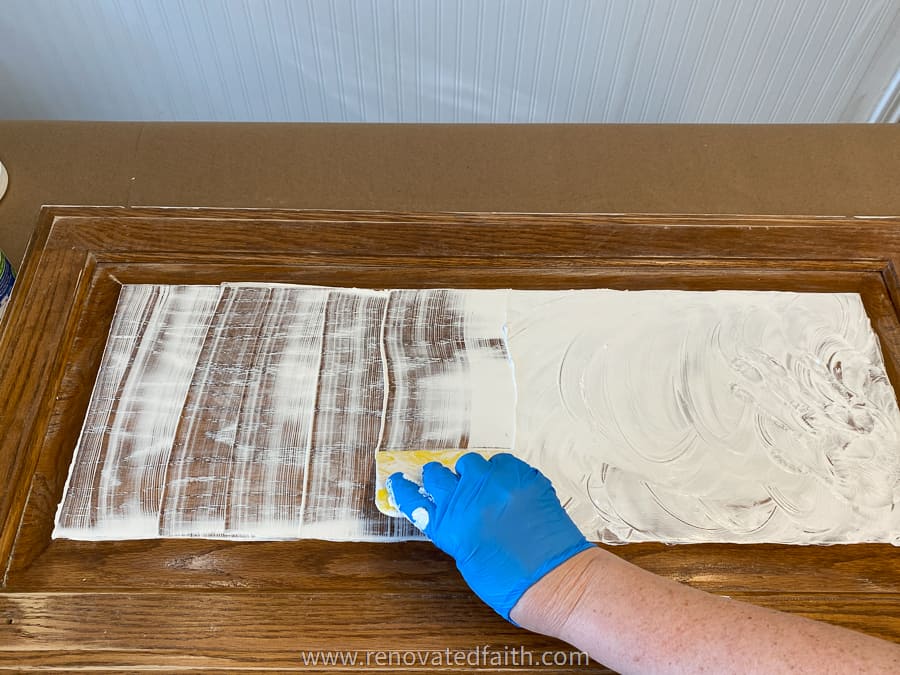
Notice how you still see a bit of the wood showing but the Aquacoat has nicely filled in the grooves, grain, and pores.
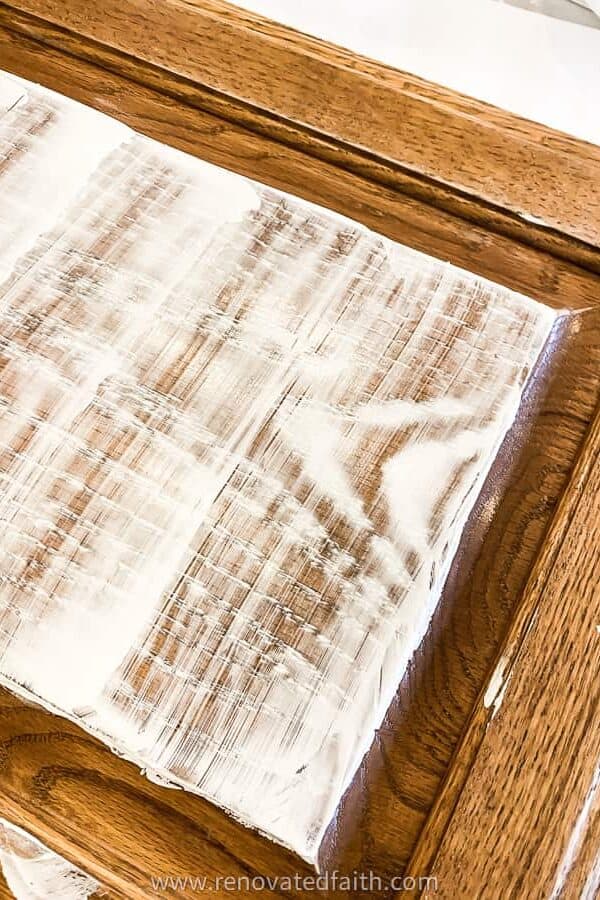
After spreading grain filler on the center panel, I like to use my index finger to remove more excess on the edge. You will have some ridges of grain filler left after you’ve removed the excess and that’s completely fine – we will sand those down after it dries.
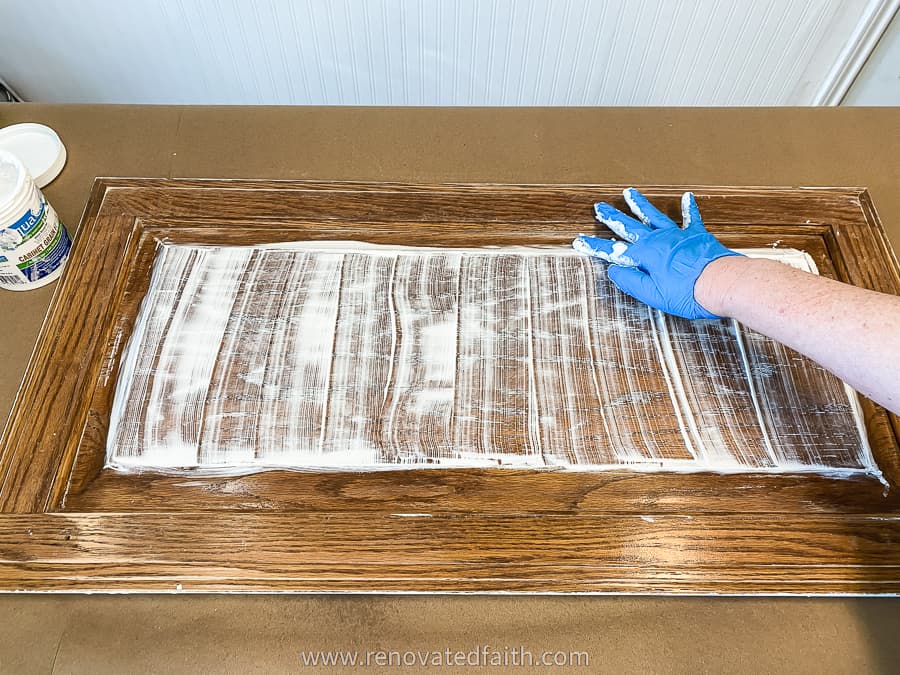
Using the same circular motion, wipe the grain filler into the groove. Use a spreader or a damp paper towel to very lightly remove the excess.
Pay attention to the corners especially to make sure that grain filler doesn’t settle in those areas.
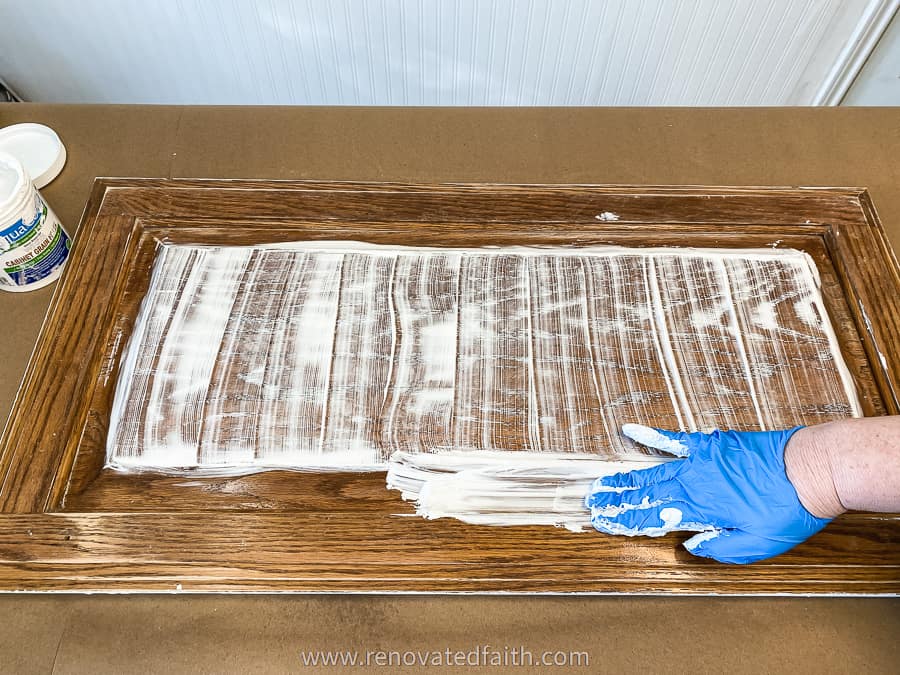
Finally, apply the Aqua Coat in the same way to the frame of the cabinet door. You can lightly wipe off any excess with the paper towel again.
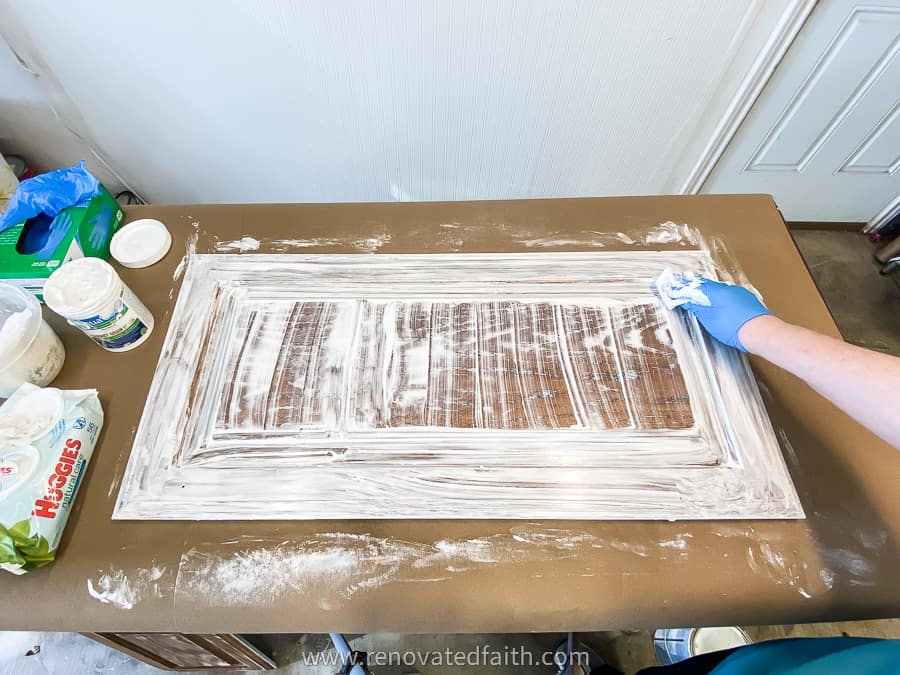
After you have added wood grain filler to every part and also removed the excess, do one last check. Make sure it’s as smooth as possible and that wood filler hasn’t settled into the corners. If it has, wipe it out with your finger so it doesn’t dry in place. You can better see how I did this in the video.
Step 4: Let The AquaCoat Dry
Let the Aquacoat dry for 2 hours. Soon after that window, you will want to go ahead and sand so you can get primer on.
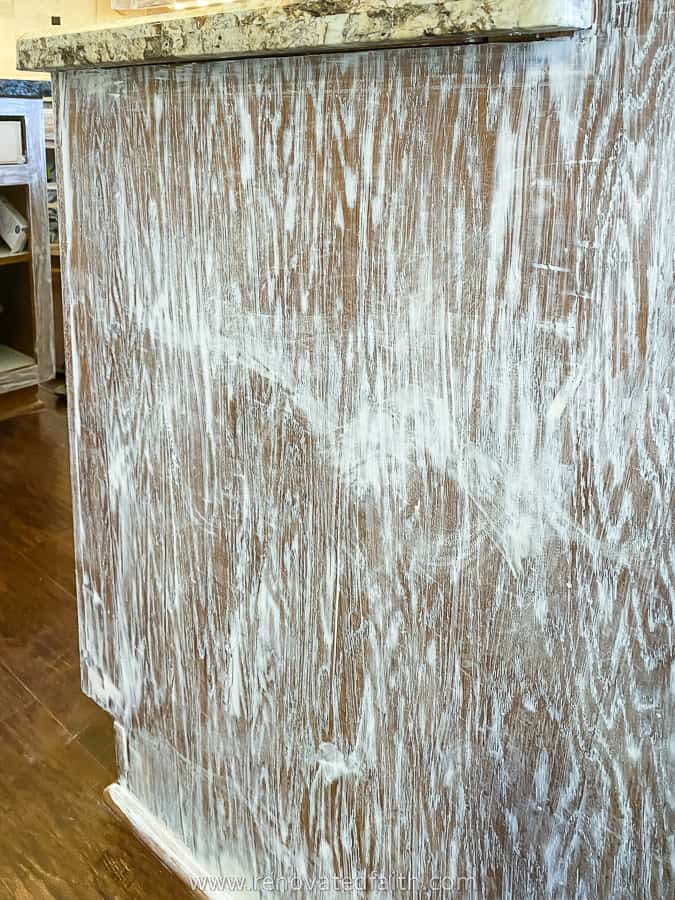
Does Aquacoat Shrink?
Getting a coat of primer on soon after the dry time will help to ensure there is no shrinkage. All products of this nature can shrink and Aqua Coat shrinks the least but we still want to minimize it as much as possible.
IMPORTANT TIP: When I was working on my doors, I split all of my doors into 3 different groups. I did the full process for each group before starting the next. This is not a must but it helped to minimize the time before applying primer.
The instructions say you can add additional coats of Aquacoat to get a perfectly smooth finish but to me, it just wasn’t worth it. I wanted to fill the pores of the grain but if you could still see a little of the grain’s texture, I was ok with that. Also, I didn’t want the surface to look so smooth that the cabinets looked like they were laminate.
How Do You Get A SUPER Smooth Surface on Wood?
If you do want a COMPLETELY smooth surface, you’ll want to add a coat or two more of grain filler as you might have noticed on the Aqua Coat grain filler instructions. If you want a really smooth surface but can still tell that it’s wood, you only need 1 coat. The primer and paint we are using help with smoothing the surface as well.
Step 5: Final Sanding

Once the surface of your cabinet doors or boxes has dried, you will lightly sand off the excess with a 320 sanding pad on your electric sander. Sand very lightly to remove those ridges or anywhere the grain filler isn’t completely smooth. You can use a sanding block for the inside of the grooves.
Sand until the surface is just smooth and then don’t sand anymore past that. I wouldn’t use an orbital sander for this step because it might sand the filler out of the grain but an electric sander is fine.
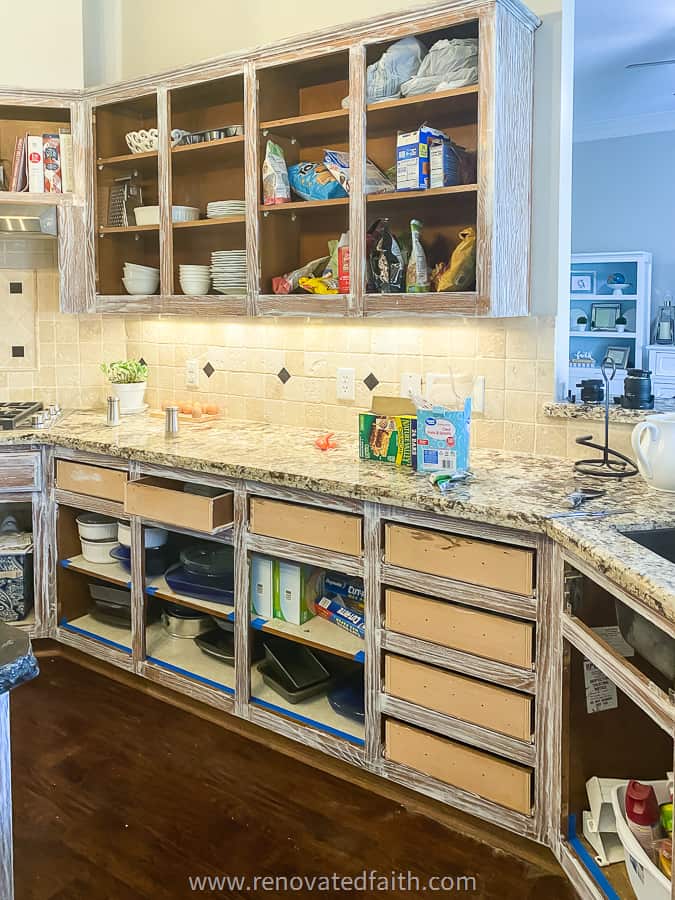
Step 6: Wipe The Cabinet Doors and Boxes
Now, wipe your door down with a damp cloth or paper towel to remove any sanding dust. I used a chalk paint brush to brush the dust out of the corners but any paintbrush will work. This is probably the only time I’ll ever use a chalk paintbrush.
Related: Why I Don’t Use Chalk Paint | The Best Paint for Cabinets (24 Brands Blind-Tested & Reviewed)
Step 7: How Do you Prime Oak Cabinets?
As soon as you have sanded and wiped the wood’s surface, you want to get a coat of primer on the wood to prevent shrinkage. The primer almost acts as a top coating or sealer for the grain.
I like to use a brush and roller to prime and paint my Alabaster white cabinets and you can see exactly how to prime cabinets here: How to Prime and Paint Oak Cabinets For a Smooth Finish
I chose Zinnser Cover Stain as the primer for my cabinets because the sandable texture is more conducive to filling in wood grain.
Step 8: Paint Your Cabinets
I like to use two coats of primer and two coats of paint. I’ll detail every detail of getting a professional finish on cabinets easily in my next post: How To Get a Smooth Finish On Oak Cabinets (COMING SOON)
Related Posts: Best Paint for Cabinets | The EASIEST Way to Install Cabinet Hardware

RENOVATE YOUR FAITH: GIVE YOURSELF A FREE PASS
One of my favorite chapters in Scripture is Colossians 3. In verse 17, it tells us, “And whatever you do, whether in word or deed, do it all in the name of the Lord Jesus, giving thanks to God the Father through Him.”
This verse used to seem like a huge responsibility – to serve God in “everything?” How do we even do that? And what if my performance isn’t good enough? What if I fall on my face?
But thank God our lives in Christ have little to do with our actions and everything to do with what Christ did on the cross on our behalf.
I’m learning that for a lot of my life I have struggled with perfectionism – always trying to measure up as a way to feel good enough by my own high standards or to earn the approval of others.
But, relying on my strength, power and performance is a recipe for frustration, burnout and false shame.
Maybe your measuring stick of success is the approval of others. Or you find yourself trying to keep up with the cadence of your inner critic. No matter how you struggle, it’s time to take a step back and see how God sees you.
Colossians 3:23 tells us “Whatever you do, work at it with all your heart as working for the Lord, not for human masters, since you know that you will receive an inheritance from the Lord. It is the Lord Christ you are serving.”
There is unbelievable freedom in that, my friend! YOU SERVE THE LORD. As a child of Christ, do you know what the Lord thinks of you??? When He looks at you, He does not see your sin! When He looks at you, He sees the goodness of Christ. That means He absolutely adores you, His child in whom He is well pleased.
And how amazing it is to serve a master that looks at us as a loving father!
That means I am no longer earning someone’s approval. I already have His full approval through what Jesus did on the cross.
2 Timothy 2:15, says “Do your best to present yourself to God as one approved, a worker who does not need to be ashamed and who correctly handles the word of truth.”
There is tremendous freedom in serving Him. I can 100% be myself and not worry about seeking anyone’s approval or following the loud demands of my inner critic.
I don’t have to worry about how I look on a YouTube video, because my job is to serve Him.
My images don’t have to be picture-perfect, because my job is to serve HIm.
I can write and use the gifts He has given me to do this blog without oppressive standards from others or myself because my job is to serve Him.
I can honor Him and enjoy doing the work He has given me without fear of whether I’m performing well enough. I am already approved because of what Jesus did on the cross on my behalf and I never ever again have to worry about being good enough.
Each of us has the freedom to do everything way that is worshipful to Him. And God loves watching His children enjoying and using the gifts He has given them!
I actually wrote Col. 3:23 on an index card and at the top wrote “Free Pass”. This is just a little remember to me that I no longer have to be enough, do enough or look good enough. He has given me an eternal free pass to be the person He has made me to be!
For more spiritual encouragement, click here for the rest of my DIY projects that also include Renovate Your Faith devotionals.

FAQ’s: THe Best wood grain for oak cabinets
how do you use aqua coat grain filler on furniture?
I have several posts on furniture refinishing. Fortunately, Aqua coat is just as effective on furniture as it is on cabinets to smooth out the grain. Follow the instructions above applying and smooth the grain filler one surface at a time.
Can you paint aqua coat grain filler?
Aqua coat grain filler is in white is paintable but the clear formula is not. Make sure you get the white Aqua coat for cabinets and furniture here.
Can you put Aqua Coat over paint? Should I prime before wood filler?
Their website says you can put Aqua Coat on after priming and painting as long as you apply and sand before your last coat of paint. I recommend using it before priming and painting your cabinets.
Do you stain before grain filler? Is Aqua Coat Stainable?
The clear Aqua coat is for stained wood and the white is for painted wood. When using the clear Aqua coat, you should stain the raw wood first, let it dry completely, and then apply the clear filler.
What is Aqua Coat made of?
Aqua Coat is the lead producer of wood grain fillers and their products are environmentally friendly, safe for use (Non-Flammable and Non-Combustible), low odor, low VOC, and designed to dry fast, and sand easily with water cleanup. For more information, check out their website here: Aqua Coat
What is the easiest wood filler to use?
Not only is Aqua coat the grain filler that will give you the best results but it’s super easy to work with. It has a thinner texture than traditional grain filler without being drippy.
What paint finish shows wood grain less?
Now that you no longer have that high gloss finish of your orange oak cabinets, you can still lessen the subtle appearance of any remaining grain by using the right sheen. Satin sheen is less shiny than semi-gloss and is still durable enough for cabinets.
How can I update my oak cabinets without painting them?
If you want to bypass all the work of painting your cabinets you can try changing them to a darker, not-so-orange tone with gel stain. You can use this exact same process to get a darker tone on your cabinets: How to Gel Stain Wood
More Posts Related To The Best Wood Grain Filler For Cabinets
The Ultimate Guide & Video On How to Paint Oak Cabinets White
How to Install Cabinet Hardware (The Quick & Easy Way!)
The Best Faux Brick for A Backsplash (PVC Panels for Walls!)
How to Use Paint To Get The Look of Bare Wood
The Best Paint for Cabinets (24 Brands Blind-Tested and Reviewed)
How to Create a Faux Stain with Paint (7 Different Colors to Choose From)
How to Fix Damaged Wood Furniture
The Best White Paint Colors for Kitchen Cabinets (Sherwin Williams Colors)
How to Fill Wood Grain in Oak Cabinets, YOUTube Video

Final Thoughts on Filling Wood Grain
Don’t go to all the trouble of refinishing your cabinets without the most important step – using a grain filler! Oak cabinets are notorious for a deep wood grain that can’t be filled with just primer and paint. Unless you use a good grain filler, you’ll be distracted by the pockmarks left by the wood grain. But with this tutorial and step-by-step video, you’ll know all the best tips for filling wood grain while getting a professional look on your cabinets at a fraction of the cost! Don’t forget to see the full cabinet painting tutorial and get your FREE checklist here!

I love to hear your thoughts and questions! Scroll down to leave a comment and I WILL reply! ❤️
Blessings,

Be sure to follow the fun here!
Email Subscription | Instagram | Pinterest | Facebook | Twitter
HOw To Fill Wood Grain With Aqua Coat Grain Filler

Karin Peters is a DIY expert and the creator of Renovated Faith. She is a furniture painter, a home design consultant, and a tenacious problem solver determined to help you transform your house into a home. With 17 years of experience with DIY home improvement, she researches and analyses professional processes to adapt them to be easy and cost-effective for DIYers. She then tests every project and product before it appears on the site in a detailed, step-by-step format. After attending Texas A&M University, she received her Master of Divinity with Biblical Languages at Southwestern Baptist Theology Seminary. Her passions unite in Renovated Faith, which shows readers how to create a home that serves them so they can pursue their God-given purposes. About Renovated Faith | Editorial Policy | Facebook | Twitter | LinkedIn


First, I love your tutorial! On the Aquacoat website it says to let it dry overnight before applying primer/paint. Do you still only recommend a shorter time to reduce shrinkage? Thank you so much, Sarah
Great question Sarah. Waiting overnight is definitely fine. You just don’t want to wait an extended period of time like a couple days. As soon as you are sure it’s dry, it’s ready to paint so waiting overnight is great!
I used this tutorial and guide and it came out great! I also redid backsplash and outlets
How do I send pics?
So glad to hear it! Send them to karin@renovatedfaith.com
I’m just learning of this product and already have two coats of paint on my doors and drawer faces. I’m seeing wood grain more than I’d like on some areas. Do you think I can use this product on top of the paint, then sand, and apply another coat of paint?
I think it would be fine but I’m usually overcautious so get a small container, use it on one door and paint it and see how it looks. I don’t have any reservations though. Thanks Krista!