How to Sand Furniture Before Painting (In 5 Minutes!)
What Is The Fastest Way To Sand Furniture?
Sanding furniture is easier than you think! This post will show you how to sand furniture before painting in less than 5 minutes flat!
I totally get it. You’re not exactly excited about the idea of sanding furniture projects. But sanding is not nearly as messy or tiring as it is made out to be for one simple reason:
Sanding furniture the right way simply means scuffing it up to prepare the surface to accept paint. – You are not sanding off the old finish and it shouldn’t take more than 5 minutes!
Here are my BEST tips to make furniture sanding fast, easy and as mess-free as possible.
This step-by-step tutorial shows you how to use an electric sander, which grit of sandpaper to use & how to prep furniture before refinishing. I’ll also show you one simple hack to make sanding chair spindles easy!
No matter your furniture piece, these DIY tricks and tips will help you sand your furniture piece in less than 5 minutes!

Quick Links to Information in this Post
- 1 What Is The Fastest Way To Sand Furniture?
- 2 When to Sand Furniture
- 3 What Is The Easiest Way to Sand Furniture? Electric Sander or Sanding by Hand?
- 4 What Grit Sandpaper Is Best for Furniture?
- 5 Can you sand furniture indoors?
- 6 How to Sand Furniture with An Electric Sander – Supplies Needed:
- 7 How to Sand Furniture Before Painting
- 8 Renovate Your Faith: How Perfection Steals Your Joy
- 9 Sanding Furniture FAQs:
- 10 Related Posts to How To Sand Furniture For Painting
- 11 Final Thoughts on Sanding Furniture For Beginners
- 12 Be sure to follow the fun here!
- 13 Best Tips for Sanding Furniture Before Painting
When to Sand Furniture
With the introduction of chalk paint, sanding has gotten a bad wrap, but I don’t think it’s quite the headache many have made it out to be.
In my post, Why I Don’t Use Chalk Paint, I show you how to refinish furniture without the expense of chalk paint and the hassle of waxing. There, you can read multiple reader comments on their experiences with DIY projects where they didn’t sand. It’s not pretty.
Do You Have To Sand Furniture Before Painting?
It’s better to be safe than sorry when sanding furniture. Paint will not stick to slick surfaces and some paints adhere better than others.
It’s so much easier to go ahead and lightly sand the surface than it is to paint without sanding only to find out that your paint is peeling off and you have to start over again. This is one of those “an ounce of prevention is worth a pound of cure” situations as I discuss in my Beginner’s Guide to Furniture Refinishing.

How Much To Sand Before Painting
Sanding a piece of furniture shouldn’t take more than 5 minutes. When you picture yourself sanding a furniture piece, you might envision yourself sanding away with a small piece of sander for hours to get every bit of old stain or paint.
If that was the case, I can tell you I would want no part of refinishing furniture!
Sanding a furniture piece should never take more than 5 minutes.
Sanding Furniture Before Painting
When prepping a piece for paint, you are just roughing up the surface slightly so that the paint will “stick”.
If the existing surface is shiny, the paint won’t have anything to grab onto. Therefore, you are giving the surface some “tooth”, as they say, so the new paint will adhere.
How to Sand Wood Furniture For Staining
What if you want to sand stained wood to re-stain a piece? Using a traditional stain means you need to use furniture stripper to strip the piece or completely sand off the finish. However, faux stains using latex paint are so much easier than traditional stains
In my posts How to Faux Stain with Paint (9 Shade Options) and How To Gel Stain Furniture, I give you step-by-step instructions on how to re-stain furniture without having to use a furniture stripper and only minimal sanding. (You can visit Renovated Faith’s YouTube channel here).
What Is The Easiest Way to Sand Furniture? Electric Sander or Sanding by Hand?
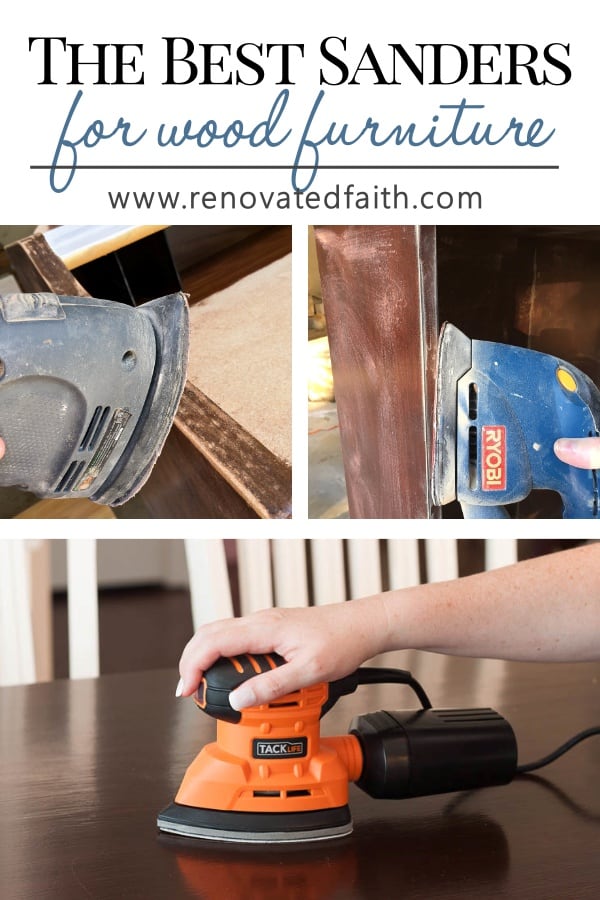
You can use an electric mouse or palm sander on the vast majority of furniture pieces. I highly recommend using an electric sander as they are surprisingly inexpensive and make sanding go incredibly fast. (See my Sander Buying Guide to see my top pic for a Low-Cost Sander)
There are times when you have to sand by hand with a piece of sandpaper and we will discuss that more below, as well as how to sand wood furniture with spindles.
What Grit Sandpaper Is Best for Furniture?
Whether you use an electric sander or sand by hand, you want to use the correct grit for your project. This sandpaper grit chart goes into detail about which grit is best for what kind of surface.
The rougher sandpaper is to be used on rougher surfaces and the smoother sandpaper is for smoother surfaces.
Sandpaper 101 – Sandpaper Grit Chart
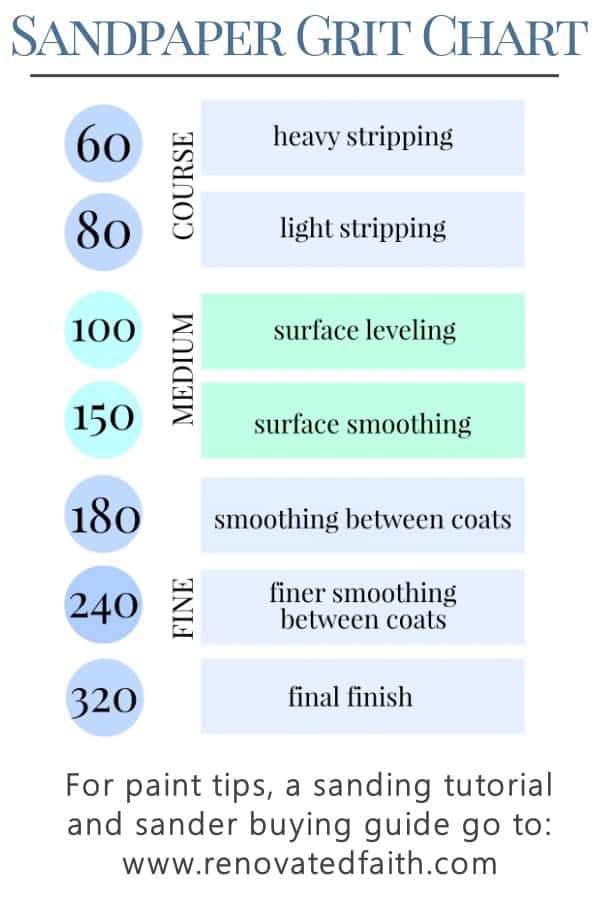
The vast majority of the time I will use a 100 grit sanding pad first to prep the entire surface and will finish with a 240 grit. As you can see from the chart above, finer-grit papers have higher numbers than course sandpapers.
Can you sand furniture indoors?
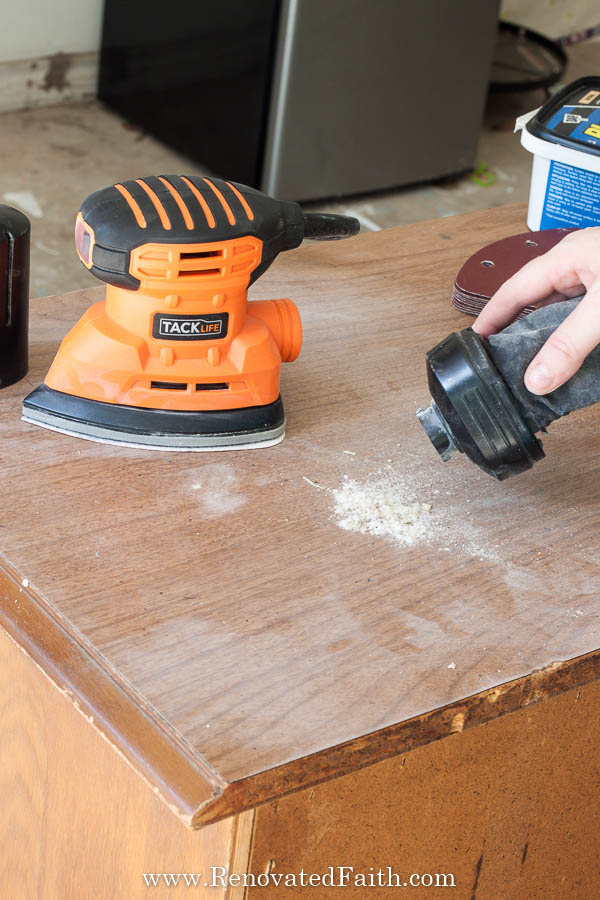
When sanding indoors, dust is always going to be a factor but you can minimize dust with a dust catcher on your electric sander.
In most circumstances, I’d recommend sanding outdoors or in your garage. But if you have to sand indoors, it’s very doable.
In fact, I have refinished most of my projects indoors because I’m in Texas and our garage is like an oven in the summer.
HOw Can I Sand Without Getting Dust Everywhere?
If you are using an electric sander indoors, use one with a dust catcher which will catch and trap most of the dust. After a couple days you might have some residual dust on surfaces with that you can wipe with a damp cloth or vacuum.
For big projects you can attach your sander to a shop vac as I did when painting my kitchen cabinets.
SEE THE KITCHEN REVEAL HERE: How to Paint Kitchen Cabinets Like A Pro
You can see in the picture allow how much dust the dust catcher collects. It catches most of it but you can see there is still sanding residue on the surface of the dresser.
You will not have this much dust with solid wood furniture. The top of the dresser below is laminate which requires more sanding.
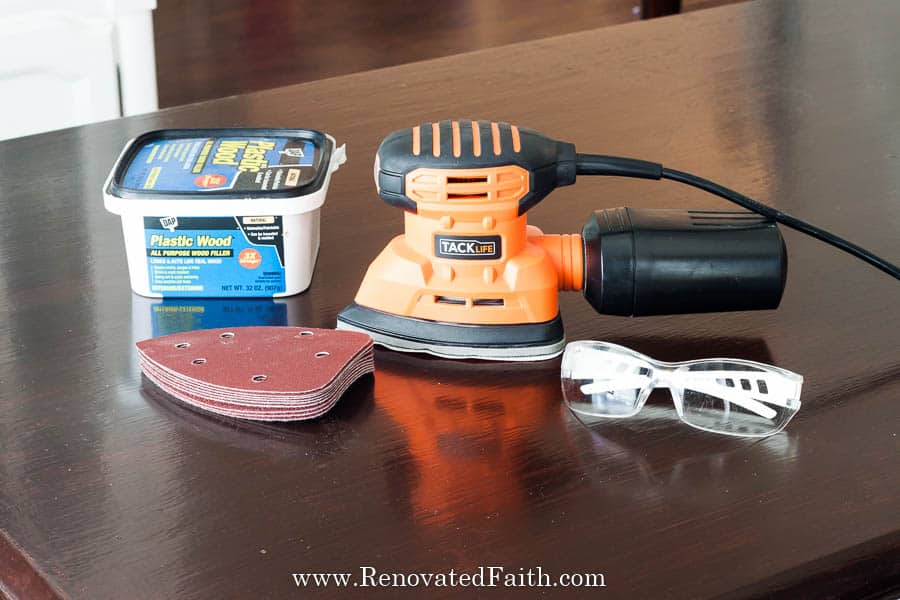
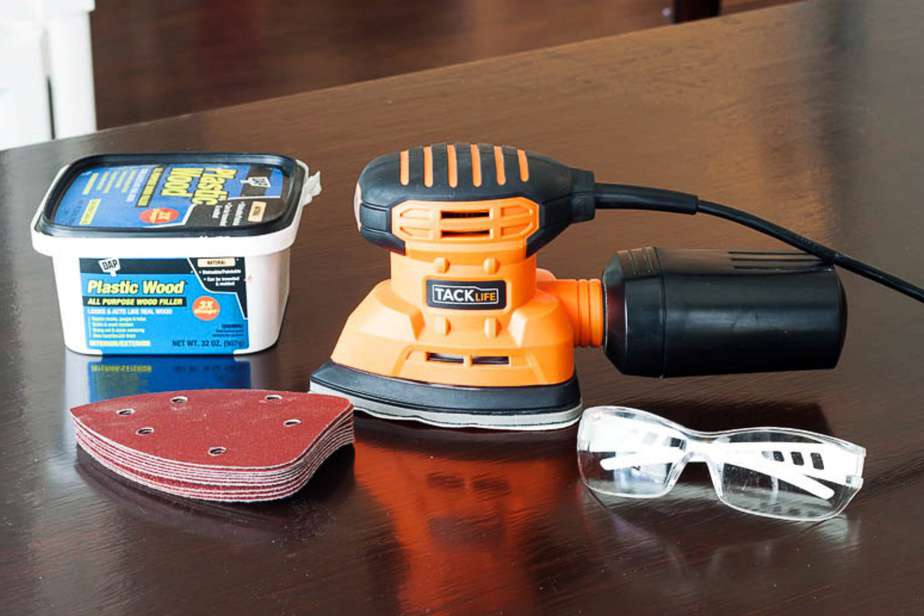
How to Sand Furniture with An Electric Sander – Supplies Needed:
Electric Sander – Don’t forget to click the link above for my favorite sander because the smaller sander head allows the sanding pads I use below to wrap around the edge. This makes it a great electric sander for grooves and other details in furniture without having to sand by hand. You can see how I sanded several sanders here: The Best Sander for Wood Furniture
Sanding Pads
Wood Filler (optional)
Safety Glasses
Tack Cloths or Clean Rags
Respirator or Disposable Mask
FREE Must-Have Painting Tips For Furniture – These are my all-time best tips that I’ve used on tons of furniture projects and you can download them for free by clicking here.
Before getting started, now is a great time to address any potential issues with the drawer. Often times I will rehab furniture and it can have a musty moldy smell, or even worse have the odor of cigarette smoke. Click here to find out how to get the smell out of stinky furniture and drawers.
How to Sand Furniture Before Painting
This blog post also includes a video and if it doesn’t pop up, you can also access it here: How to Sand Wood Furniture, YouTube Video
Step 1: How Do You Prepare Furniture Before Sanding?
Before sanding a furniture piece, check for any deep gouges, cracks, or dents. You want to fill those with wood filler to get the best finish possible. If your furniture piece, has lots of damage, check out this post: How to Repair Damaged Wooden Furniture Easily
If you need to add new hardware or fill old hardware holes, be sure to check out this post that explains why I like to drill new hardware holes BEFORE painting: The Pain-Free Guide to Hardware Installation
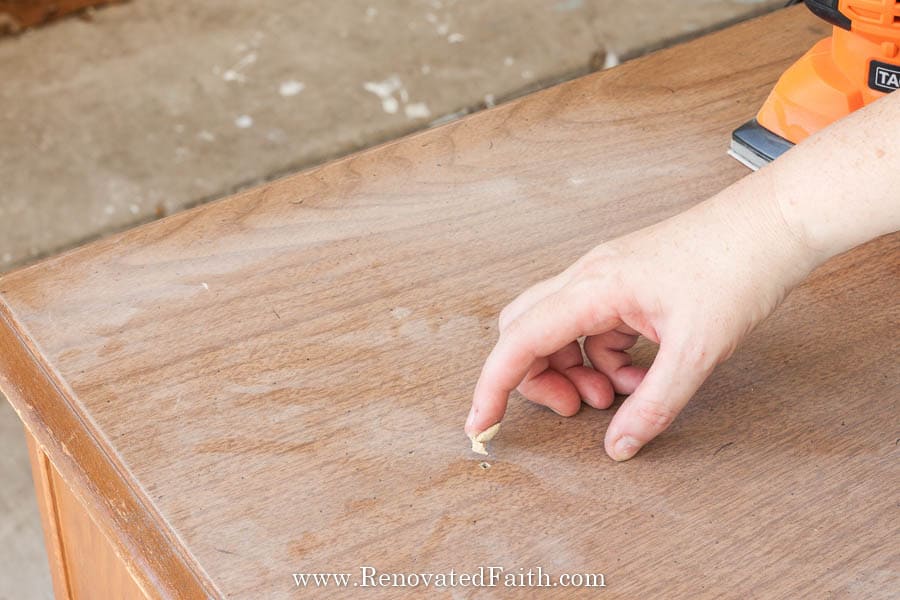
You want to add enough wood filler so the level of the filler is a little higher than the surface of the wood but not so much that it is globbed on and you have to sand a lot off later.
Let that dry 48 hours or for however long the directions say.

Renovated Faith: What’s In A Name?
God never leaves a project half-done…He continually works on each one of us, as a lavish expression of His amazing love and grace. So many DIY projects remind me of how God renovates our hearts. If you are a work-in-progress, just like I am, don’t miss the Renovate Your Faith Devotional at the bottom of this post. Click here to get a weekly reminder of new project posts by email.
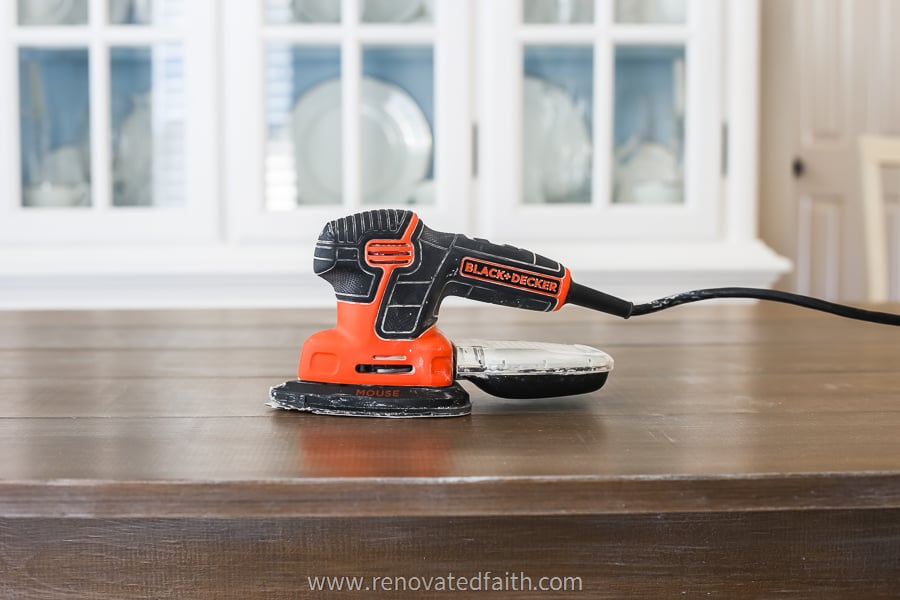
Step 2: How to sand Wood Furniture Before Painting
Now it’s time to sand! If you can use an iron, I PROMISE you can use an electric sander. It is by far the easiest and safest power tool you could use.
Be sure to put on your safety glasses and sanding mask to protect your eyes and lungs from dust particles.
OBLIGATORY DISCLAIMER – How To Use An Electric Sander
The viewer assumes all responsibility and liability associated with the hazards of woodworking. Renovated Faith is not responsible for any errors or omissions that may be present in this tutorial. She also assumes no liability for any action or inaction of a viewer.
Please use extreme caution when using power tools. Read your tool manual thoroughly and wear protective safety gear. Take your time familiarizing yourself with a tool before using it.
Please recognize that I have tried to put together a basic sander tutorial to get you started. I have tried my best to show the safest way to use it. That being said, I am not a professional (I only play one on this blog
.)
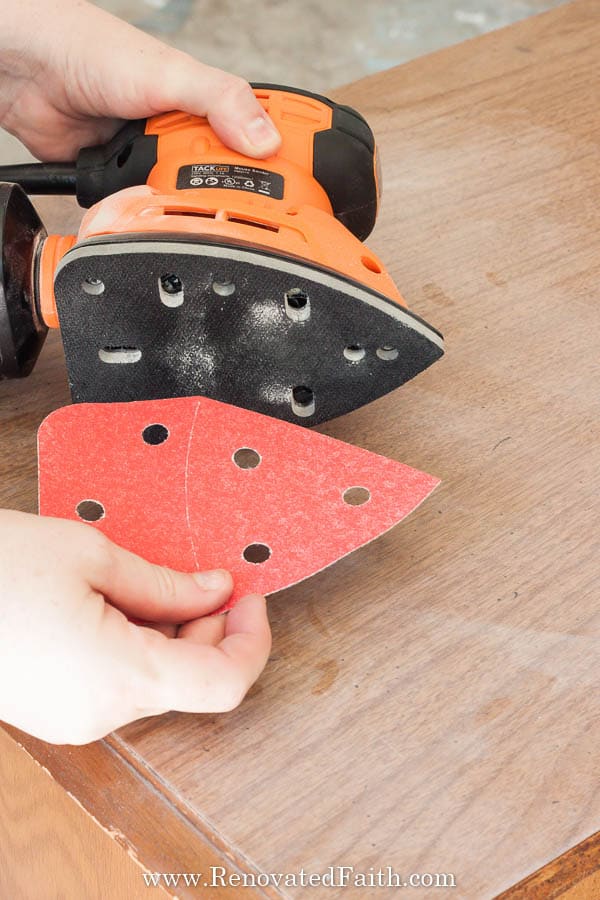
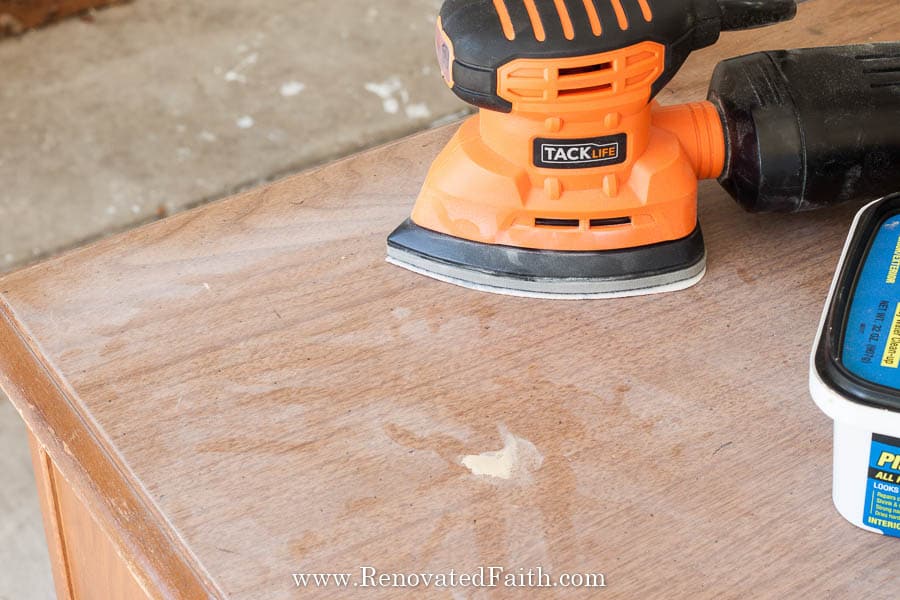
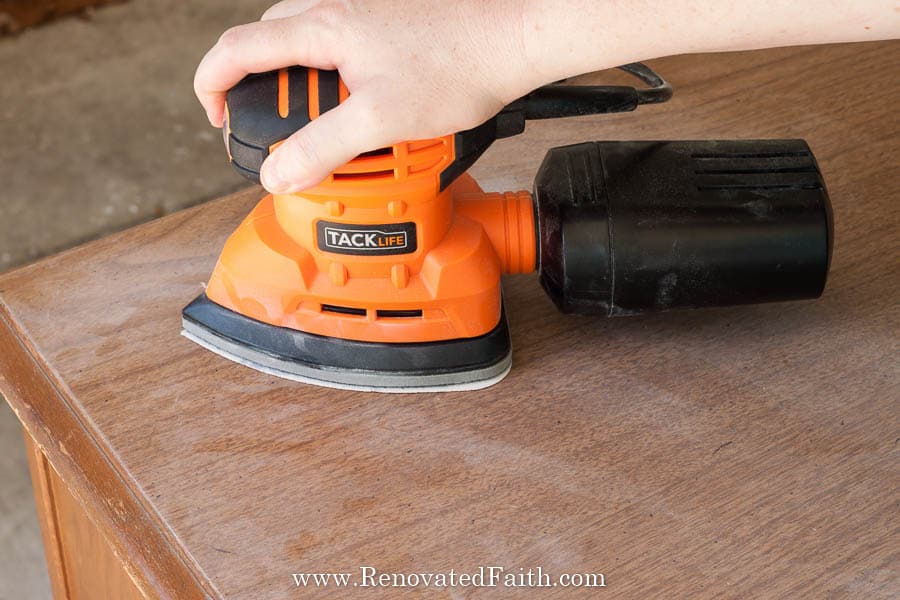
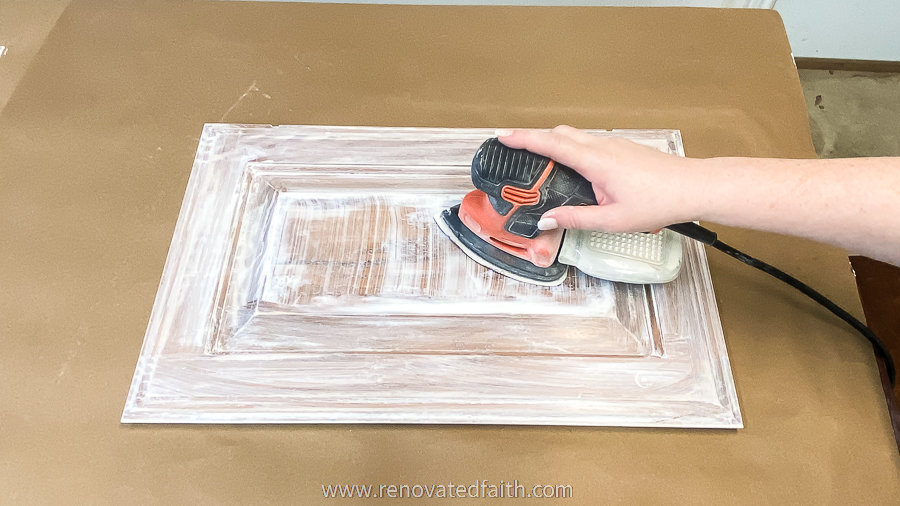
Using a rougher sanding pad, place it on the bottom of the sander as it just velcros on. I like to use a 60-100 grit sanding pad for my first pass. Remember the lower the number, the rougher the sandpaper and the surface.
Then, I use a circular motion and go over the whole surface to get out any irregularities in the surface and to sand off the excess wood filler.
Don’t apply much pressure. Just use the weight of the sander to apply pressure and guide it with your hand.
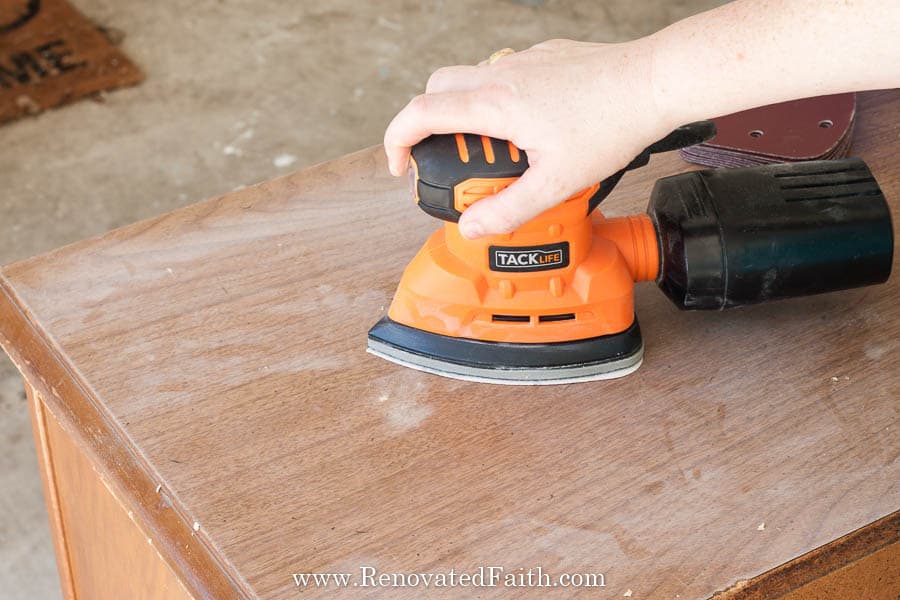
Sand the flat surfaces and don’t forget to pass over the edges of the furniture too to make them smooth. You don’t want to round them necessarily but just sand them slightly to remove any rough edges or burrs.
Check out this video that shows you how to sand wood with an electric sander when trying to smooth out rough spots and also how to sand with the grain
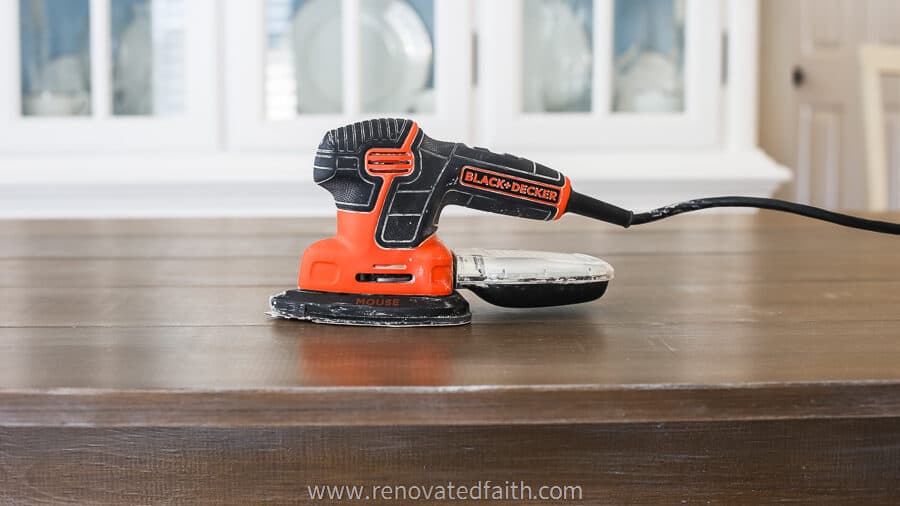
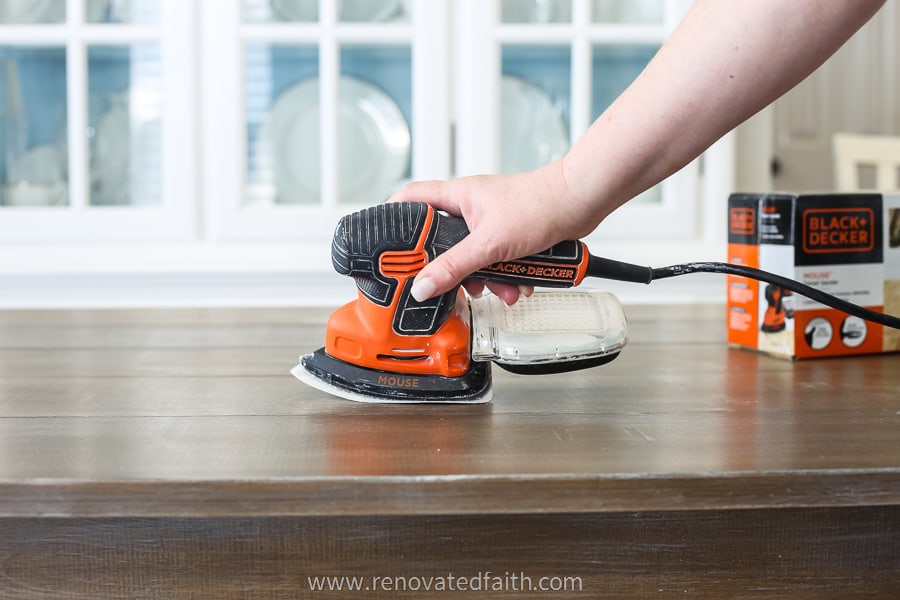
Step 3: Sand with Smoother Sandpaper
After the first pass with the rough sandpaper, you can replace the sanding pad with a smoother one. I like to use a 240-320 grit sanding pad for my final pass.
This time you want to go with the grain of the wood to leave a smooth surface that your paint or stain will adhere to.
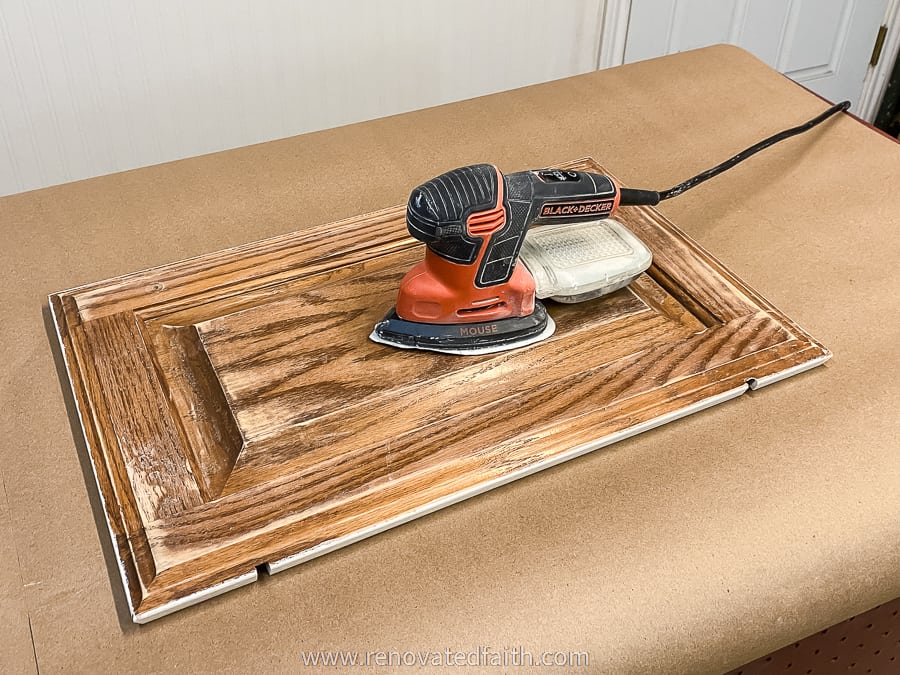
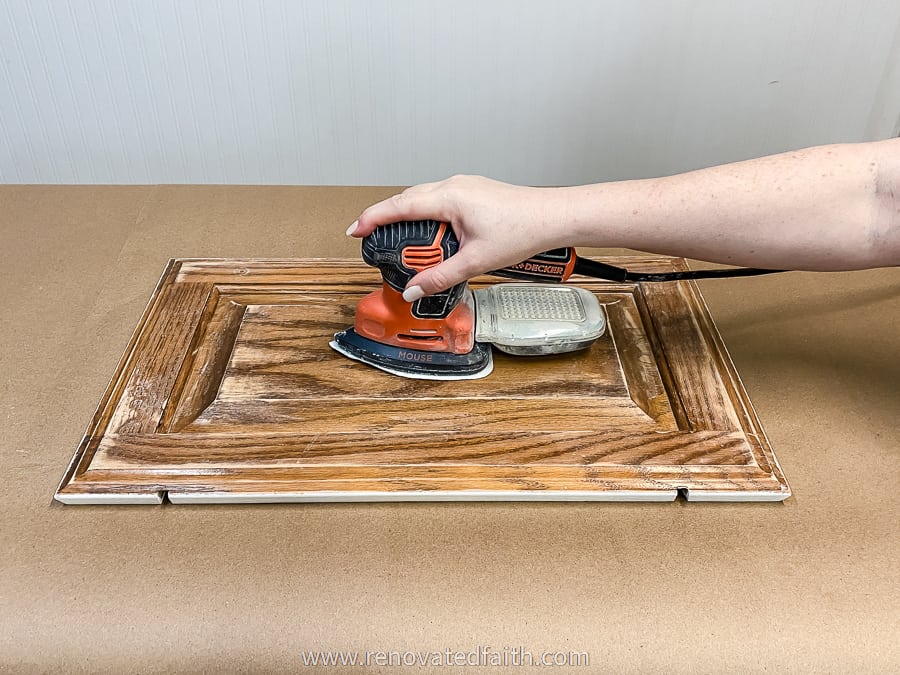
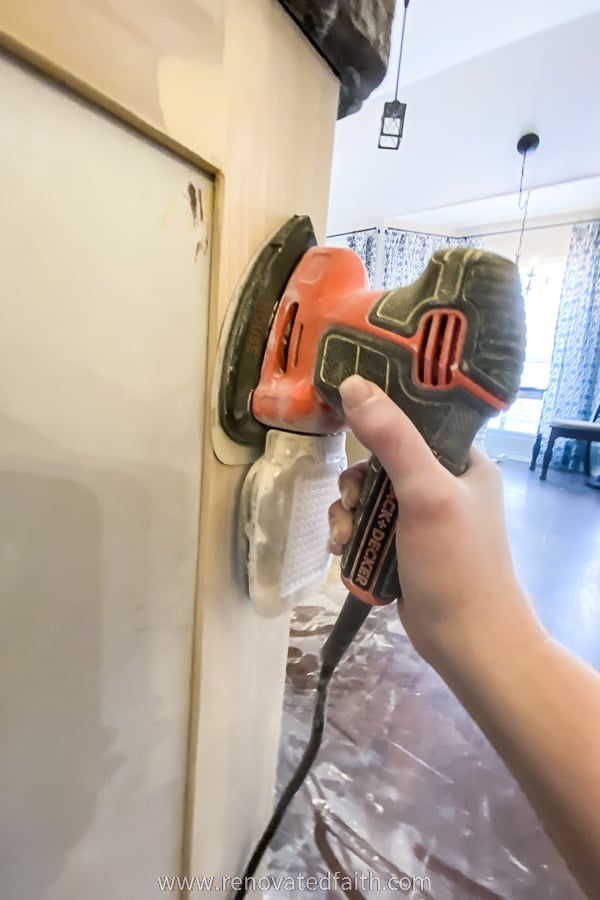
How to Sand Grooves and Details in Furniture With an Electric Sander
The power sander I prefer most for furniture restoration is a mouse sander as opposed to a random orbital sanders or belt sanders.
With an electric sander, you can have more control with detailed areas like grooves, details and trim. The good thing about this particular sander is the sander head is slightly smaller than the sander pads.
The smaller sander head allows the sander pad to wrap slightly around the edges of the sander so you can sand inside of grooves and other furniture details easier.
I used this sander for my cabinet painting project and it was not only really tough to keep up with that amount of sanding but it allowed me to sand in all the nooks and crannies of the trim work!
HOw Do You KNow WHEn You Have Sanded Enough?
You know you have sand your furniture piece enough when the surface is not longer slick or glossy. Your goal is to just scuff up the surface with the sander so paint can grip the wood’s surface.
Now that you have finished your final pass, wipe down the surface with a damp rag and you are ready for a coat of paint! If you are wondering how to refinish furniture,here are some posts to help:
The Best Paint For Furniture (24 Brands Blind-Tested & Reviewed) | A Beginner’s Guide to Furniture Painting | Why I Don’t Use Chalk Paint
Renovate Your Faith: How Perfection Steals Your Joy
As a recovering perfectionist, one of the reasons using a sander appeals to me is that I can make any surface perfectly smooth.
You can start with a table top with deep scratches and gouges and transform it to a flat perfect surface in minutes.
But through the years I’ve realized how much the voice of perfectionism is so quick to steal my joy. I believe our willingness to listen to that voice has a direct correlation with our level of contentment.
When I finish a project perfectionism says, “This table looks pretty good but it would look even better if you would have…”
Perfection always looks for the flaws. Nothing you can ever do is enough for her.
She’s always there to nitpick and criticize what are often your best expressions of creativity.
She’s like a mirage as every step towards her results in her disappearing further into the horizon.
Perfection is like a bottomless pit that will never be satisfied and always leaves you feeling like you aren’t enough.
The irony is that while the voice of perfectionism taunts us to be “better” it actually robs us of “good.”
One of my favorite quotes is “The best is the enemy of the good.” We get so consumed with an unattainable standard of perfect performance that we actually deprive the world of our best work.
But better a diamond with a few flaws than a rock with none.
I’ve had to learn the hard way that perfectionism is a mirage. It doesn’t exist. The only person who is perfect is Christ and by having a relationship with Him, He becomes our perfect so we don’t have to be.
No longer do we have to strive to reach an unattainable goal that will leave us tired, frustrated and discouraged. But in having a relationship with God we can rest in knowing that we don’t have to hustle toward an impossible standard.
Whether we are refinishing a table, hanging up curtains or painting a door, we don’t have to perform to be worthy of love and approval.
Since Christ is perfect on our behalf, we can rest from striving towards an impossible standard because we are already enough.
Through having a relationship with Him, we no longer empty ourselves of energy and resources trying to be worthy. Instead, we can enjoy life as God uses our beautifully imperfect efforts to shine His light into a dark world.
“Come to me, all you who are weary and burdened, and I will give you rest. Take my yoke upon you and learn from me, for I am gentle and humble in heart, and you will find rest for your souls. For my yoke is easy and my burden is light.” Matthew 11:28-30
For more DIY posts with Renovate Your Faith Devotionals, click here. You can also subscribe to the weekly email so you never miss a project: Weekly Email Sign-Up & Free Printable Library
☑️ My All-Time Best Furniture Painting Tips & Tricks (FREE PRINTABLE)
Don’t forget to download the FREE step-by-step printable checklist that shows you the entire process I’ve used on dozens of furniture pieces while saving you time and money!
Sanding Furniture FAQs:
How to Sand Furniture by Hand
You can use a sanding block or just fold the aluminum oxide sandpaper into a small square to sand furniture by hand. Gently sand in small circular motions. I like to use a coarse sandpaper first and then fine-grit sandpaper to get a good result on your finished product. If you find your sandpaper is gunked up or in bad shape, use a new piece so it doesn’t scratch up the surface.
How to Sand Grooves in Furniture
For sanding detailed furniture, you want to use a finer-grit sandpaper and lightly sand in the grooves and details.
Detailed furniture will not need as much sanding in the first place because the paint will naturally adhere to the details of the wood, which will hopefully make refinishing antique furniture easier.
The next step is to remove any dust in the grooves and this is easily done with a dry paint brush.
How To Sand A Table With An Electric Sander
Even if your table is in good condition, you want to give surfaces subjected to daily use a good sanding. Prepping a good surface for a couple of coats of paint will create good adhesion and better durability.
Using an electric sander to refinish a table makes the sanding process so much easier. I like to sand the top, top edges, and apron first. Just sand lightly in a circular motion to rough up each surface and then you can move onto the spindles.
Sanding a table but the legs can be a little tricky. Use a folded piece of sandpaper and wiggle back and forth as I show you in this post: The Easiest Way to Sand and Paint Table Legs
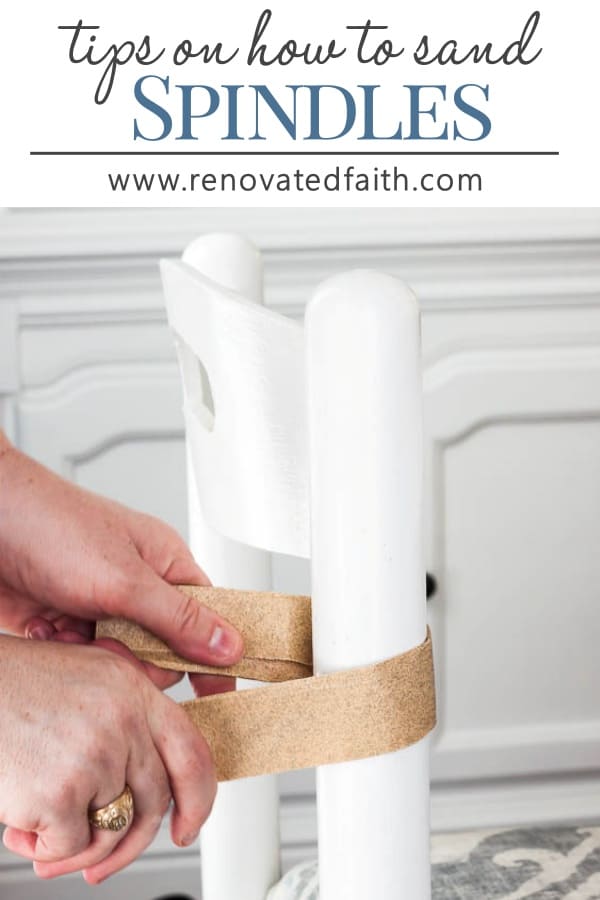
How to Sand Spindles
Oftentimes, I get asked how to sand chairs with spindles or how to sand spindle table legs. Unfortunately, you can’t use an electric sander on spindles but I do have a trick to make it go faster.
Fold over a sheet or piece of sandpaper until you have a long piece about the shape and length of a ruler.
Then, wrap it around the spindle and move it back and forth. Revolve the sandpaper around it once or twice. Remember you are not trying to take off paint, just rough up the surface.
Is it Better to Sand or Strip Furniture
To have a good surface to repaint, you only need to scuff sand. There’s no reason to remove the old paint by stripping it down or sanding it to the bare wood.
The only time you HAVE to completely remove the paint is if you want to use a traditional stain. You can use chemical strippers or mineral spirits from Home depot or your local hardware store. Use a clean cloth to remove the coats of paint and be sure to wear a dust mask or respirator and safety goggles.
The easiest way to get a stained look on furniture without the fuss of stripping off the paint is by using a faux stain:
Easy Faux Stains with Latex Paint (9 Options to Choose From) | Easy Raw Wood Finish with Latex Paint | Restoration Hardware Faux Finish | Dark Traditional Stain with Gel Stain
How To Sand Furniture For a Distressed Look
To get a distressed look on furniture apply paint so it’s not very thick on the areas you want to distress. Too much paint will cause the paint to be chippy when it sands off.
Let the furniture piece dry at least 48 hours after painting. Use a finer-grit sandpaper to very lightly sand the sharp edges of the entire piece.
When to Use A Clear Coat On Furniture
A clear coat is a great way to give your furniture piece some added durability but sometimes they aren’t needed. If you have a painted piece that needs extra durability like a kitchen table or coffee table, then add a clear finish for some extra protection.
However, If your furniture piece is not high use and you’ve used a high-quality paint, then skip the top coat. You can find the most durable paints here: The Best Paint for Furniture (24 Brands Blind-Tested and Reviewed)
Another reason to add a clear coat is if you want to add a different sheen. Maybe you want a super glossy finish or maybe you want something more matte. The best way I have found to apply clear coat is with a foam brush using long strokes.
Use several coats to get the most durable finish. The back of the can might suggest using sandpaper or steel wool to sand in between coats but I don’t recommend it.
There are several clear coats on the market and also natural options like linseed oil or teek oil but I have found that there are some water-based polyurethanes that perform better than oil-based options without the VOC’s: The Best Clear Coats for Furniture
How To Sand a Dresser With a Sander
A dresser is an ideal piece of furniture to sand with an electric sander. If you are wondering how to sand a dresser by hand, it’s definitely doable but so much faster with a mouse sander.
First,I like to get in my driveway with all the drawers and sand the drawer faces and drawer edges. Then, I sand the body of the piece starting with the top and then the sides. Be sure to use the edge of your sander for any trim or detailed portions.
What Sandpaper Do I Need to Sand Furniture?
Start sanding with the coarsest grit sandpaper first. Course grit papers are around 60-grit and are best for heavy duty sanding. Then you can move onto medium grit sandpapers (around 120-grit paper) and finer grit papers which are around 220-grit and up.
How Do You Sand Furniture for Beginners?
Sanding your own furniture projects is an important part of preparing them for that can of stain of paint. Always wear dust masks to protect your longs and give yourself enough time to sand your furniture properly. Remember that when sanding furniture, you are not removing all the old paint coats, you are just preparing the furniture for paint or stain. The use of sandpaper helps you to avoid using furniture stripper! However, if you have any peeling paint, use a putty knife to strip off only the parts that are actively peeling.
The first step is to make any repairs by using a crack filler: How to Fix Damaged Furniture Finishes
Now you are ready to use the simple process above for sanding your furniture piece.
After you have sanded, get all of the dust off the sanded surface and your work area with warm water and a lint free cloth or a tack cloth. Use a vacuum cleaner to remove any dust on the floor that could get into your finished surface.
How Do You Sand Furniture Evenly?
For a smoother surface, sand fine furniture evenly with these easy tips. The most experienced wood finishers sand furniture in the direction of the wood grain first with a lower grit sandpaper and then with a higher grit paper.
How Do You Sand Furniture Properly?
There is more than one way to sand furniture properly and several different types of sanders including random orbital sanders, belt sanders detail sander and mechanical sanders. For large flat surfaces, you can use a detail sander or random orbital sander but use caution with the sanding disc. For detailed furniture tight corners or tight spaces, a detail sander is your best bet. After sanding furniture, always wipe it with a clean rang. Now that you have sanded your furniture with the best sander for your wood project, you can apply various options of wood stains or a sanding sealer.
Best Power Tools for DIYers
Wondering what other tools you might need? Here is a list of the 7 Best Power Tools for DIYers and beginning woodworkers. This guide will give you low-cost options on quality tools that will grow with you as your skills advance: Essential Tools for Beginners (A Non-Intimidating Guide to Power Tools)
How to Sand Laminate Furniture
For laminate furniture, I’d sand over the piece a couple of times with very rough sandpaper, like a 60 or 80 grit. Laminate is very smooth and you want to make sure the paint sticks to it.
Then use a good primer before painting. In my post, How to Paint Laminate Furniture, I share the full process and some tips to make laminate look like painted wood.
You can also check out my BEST tips for painting laminate and solid wood furniture below. They will save you a ton of time and give your furniture piece a beautifully smooth finish.
See my favorite diy furniture makeovers HERE including before and after photos.

If you have any other questions about sanding furniture, feel free to ask in the comments question! I’d love to help in any way I can.
Related Posts to How To Sand Furniture For Painting
- The Best Paint for Furniture (24 Brands Blind-Tested and Reviewed)
- How to Restore Metal Outdoor Furniture with Spray Paint
- How to Paint Furniture White (The Right Way)
- The Best Way to Repair Old Furniture
- Tips for Painting Dark Furniture
- The Beginner’s Guide to Painting Furniture (Vintage Vanity Makeover)
- The Best Clear Coat for Furniture (Blind Tested and Reviewed)
- How to Paint Furniture Legs Easily
- The Best Wood Grain Filler for Oak Cabinets with Open Grain
- How to Paint Oak Cabinets Like A Pro
- Easy Raw, Natural Wood Stain Color on Furniture With Paint
- Best Spray Painting Tips and Tricks
- Chalk Paints Vs. Milk Paints for Furniture
- Farmhouse Wooden Table Tutorial For Beginners
- Get a Gorgeous Finish With Gel Stains
How to Sand Wood Furniture, YouTube Video
If you want to save this post on sanding wood furniture, pin it here:

Final Thoughts on Sanding Furniture For Beginners
The biggest mistake DIYers make when refinishing furniture is not sanding furniture before painting. It’s not just a general rule for restoring wood surfaces but it can save you from having to completely strip and redo a piece of wood furniture..
Fortunately, sanding doesn’t take much hard work and can be done in just a few minutes with the tips above. Also, by sanding the old paint finish you can ensure that the new paint job adheres well and you have a beautiful surface for a long time!
Good luck on your next project and be sure to let me know if you have any questions in the comment section below!
Blessings,

Be sure to follow the fun here!
Email Subscription | Instagram | Pinterest | Facebook | Twitter


Best Tips for Sanding Furniture Before Painting

Karin Peters is a DIY expert and the creator of Renovated Faith. She is a furniture painter, a home design consultant, and a tenacious problem solver determined to help you transform your house into a home. With 17 years of experience with DIY home improvement, she researches and analyses professional processes to adapt them to be easy and cost-effective for DIYers. She then tests every project and product before it appears on the site in a detailed, step-by-step format. After attending Texas A&M University, she received her Master of Divinity with Biblical Languages at Southwestern Baptist Theology Seminary. Her passions unite in Renovated Faith, which shows readers how to create a home that serves them so they can pursue their God-given purposes. About Renovated Faith | Editorial Policy | Facebook | Twitter | LinkedIn
I painted a chair using cabinet paint and it is peeling on the seat. The chair had been painted before so didn’t think it would need sanding. Did I use the wrong paint? What should I do?