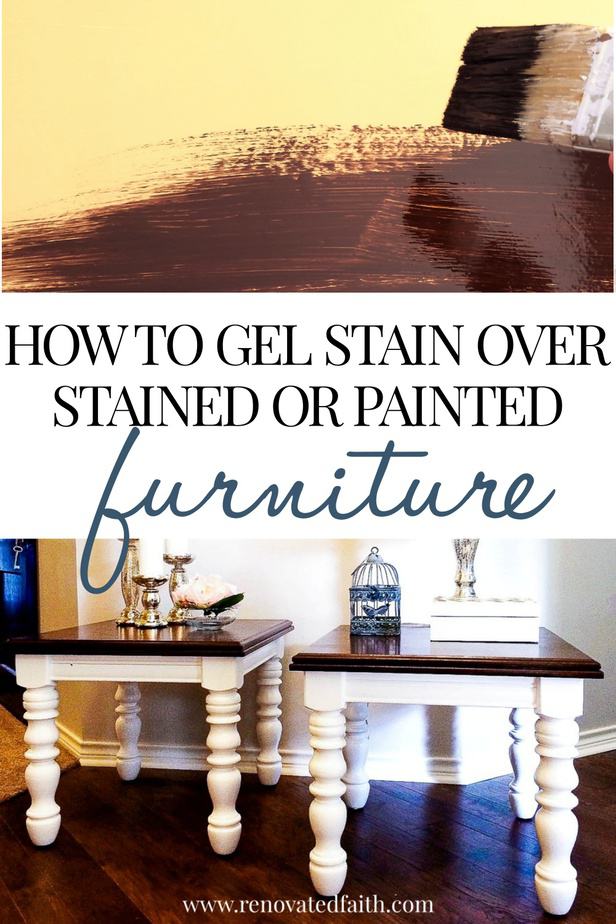
EASIEST Gel Stain Over Paint Tutorial (Ultimate DIY Guide!)
How to Gel Stain Over Existing Finishes
Can you stain over paint? With this easy gel stain over paint & stain technique, you can stain over any surface without a furniture stripper!
Imagine yourself walking down the aisle of a thrift store and seeing a piece with serious potential! It’s in great shape and you even have the perfect spot picked out. There’s one problem… You know that dated, orange stain would be a beast to get off with furniture stripper!
However, you don’t have to strip a piece of furniture to refinish it. Instead, you can easily gel stain wood with this stain-over-paint technique to make old furniture look new again!
“Paint Remover” is not in my DIY vocabulary.
I can think of few activities more miserable than applying a noxious chemical onto a piece of furniture in an effort to scrape off every bit of old paint or stain. Fortunately, you don’t have to!

What is Gel Stain?
Gel stain is an oil-based stain that is very thick and gooey, almost the consistency of jelly. But don’t let that deter you! That gel consistency takes a little extra time to dry and that’s a GOOD THING because it allows you to get the look you want before it dries.
WANT MORE STAIN OPTIONS? Don’t forget you can find more stain shade options here: How to Paint Furniture to Look Like Wood
What Type of Stain Is Best For Your Project?
Picking the right stain is so important to get the best results possible. Here is a break-down of each type of stain, when to use them, and how to get good results with each:
When To Use Traditional Stain
These are transparent stains that soak into the pores of the wood instead of sitting on the surface like paint. Use traditional stain when your entire surface has beautiful natural wood grain you would like to accentuate.
The transparent nature of the stain will bring out the natural beauty of the wood in its raw wood finish and gives you an unexpected but unique look. With traditional stains, it’s hard to know what your finished wood surface will look like exactly. Showing imperfections is a natural byproduct of the stain but that’s the last thing you want when refinishing imperfect raw wood, stained surfaces, or painted surfaces.
When To Use Gel Stain
Gel stain has some transparency but is mostly a solid stain that sits on the surface of the wood. This is a great option when you wanted your painted or stained wooden surface to be a dark color. Follow the basic steps of this tutorial for an easy way to get a dark stain.
Use a gel stain over paint or stain when you want a quick and easy way to get a dark stained look on painted wood and stained wood surfaces without much work. This tutorial will show you exactly how to use gel stain on any furniture piece.
When To Use a Faux Stain Made From Latex Paint
I have created several different shades of faux stain with latex paint including a raw wood (lighter stain), Restoration Hardware faux stain, driftwood finish, and 9 other stain colors.
Use a faux stain when you want to cover stained or painted wood but don’t want to be limited to the dark color options of gel stains. This process is more work than using a gel stain but gives you almost unlimited color choices: How To Faux Stain Furniture With Latex Paint
Gel Stain vs. Oil Stain
Unlike a regular oil stain that is thin and watery, the gel stain gives you time to work with it to get the exact finish you want before you let it dry. Another advantage of gel stain vs. oil stain is that traditional stain will penetrate the pores in the wood. This is great if you have a nice piece of wood or don’t have any wood filler in the holes.
However, gel stain is a solid stain so you can save money by using a lower grade of wood because its depth of color will cover any imperfections. The main similarity between traditional stain and milk paint is that they both have an oil base. However, gel stain is much thicker than traditional stains and covers a little more like paint.
Related Posts: How to Fix Damaged Furniture | The Easy Way to Install Hardware
Another nice aspect of gel stain’s consistency is the effect when a brush is dragged through it in one direction. The bristles automatically give the look of wood grain showing some of the warm tones of your base coat underneath.
So when you open that can of gel stain to reveal a jelly-like substance, no worries! It’s supposed to be like that and hasn’t gone bad. Also, a little goes a long way!
Applying Gel Stain: Can You Stain Over Paint?
This “gel stain over stain or paint technique” allows you to re-cover almost any painted surface (even laminate and metal!) without stripping or sanding off the original surface. It’s easy to get the look of a dark, rich stain on a painted piece of furniture as long as you know how to use gel stain as a faux finish.
![]() In this process, I’ll show you not only how to apply gel stain to finished wood, but more importantly how to give a faux wood finish to any surface.
In this process, I’ll show you not only how to apply gel stain to finished wood, but more importantly how to give a faux wood finish to any surface.

GEL STAIN IS NOT JUST FOR DIYERS – This is actually the same process many high-end furniture retailers use because different cuts of hardwood can have different shades. Once, they assemble the furniture, the furniture doesn’t match exactly. Therefore, to have continuity in their final product, a gel-stain is used.
How to Gel Stain Over Paint or Stain – Supplies:
MY FAVORITE PRODUCTS – CLICK HERE FOR MY TRIED AND TESTED BRANDS OF FURNITURE PAINTING PRODUCTS INCLUDING PAINT, BRUSHES, PRIMER AND SANDER
- Mouse Sander – Click above for my favorite sander. Here’s a quick and easy guide to using a sander: How To Sand Furniture in 5 Minutes If you don’t use a sander, you’ll need sanding sheets or steel wool.
- Sanding Pads.
- Primer – Check the link above for my favorite.
- Old Master’s Gel Stain in American Walnut– is my favorite gel stain (and I’ve experimented with a lot!) and there are several stain colors to choose from. They even have a black stain called Carbon.
- Cheap Paint Brushes – These are great and are cheap enough to throw away afterward or you can clean them with mineral spirits
- Tack Cloth (Optional) – This helps to remove dust particles from the top of the wood and your work area.
- Peanut Butter Shade of Latex Paint (I used Behr Glazed Pecan after lots of experimenting). Behr is at Home Depot but if you are at another store, just ask if they can match it. They usually have the codes for other brands in their computer system. I like to use a satin or flat paint for my base coat.
- White Latex Paint for the Legs *Since writing this post, I tested the best furniture paints. See the results here: The Best Paint for Furniture (24 Paints Tested & Reviewed
- Minwax Wipe-On Polyurethane in Clear Satin
- Must-Have Painting Tips for Furniture – To access my time-saving checklist and the rest of my free resource library, fill in the form at the bottom of this post or CLICK HERE.
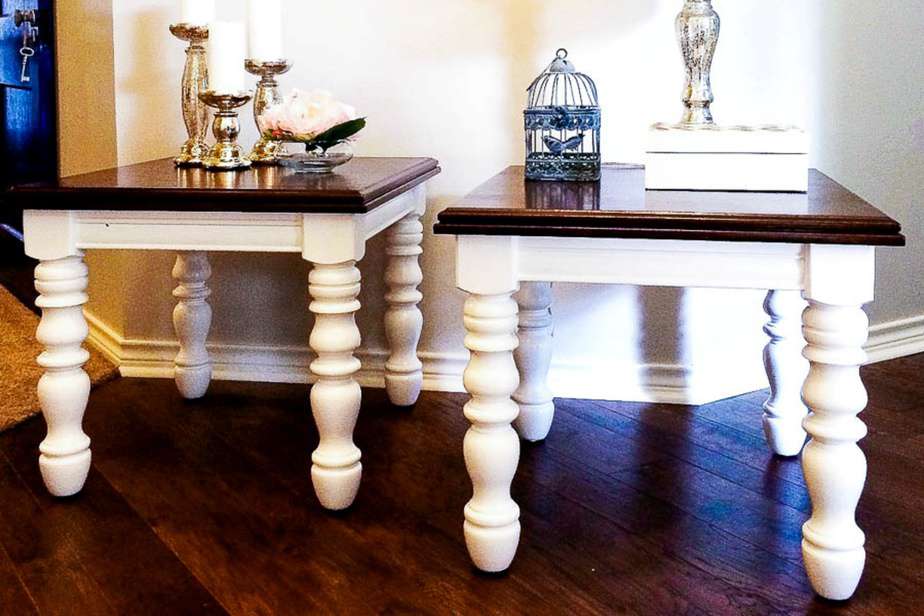
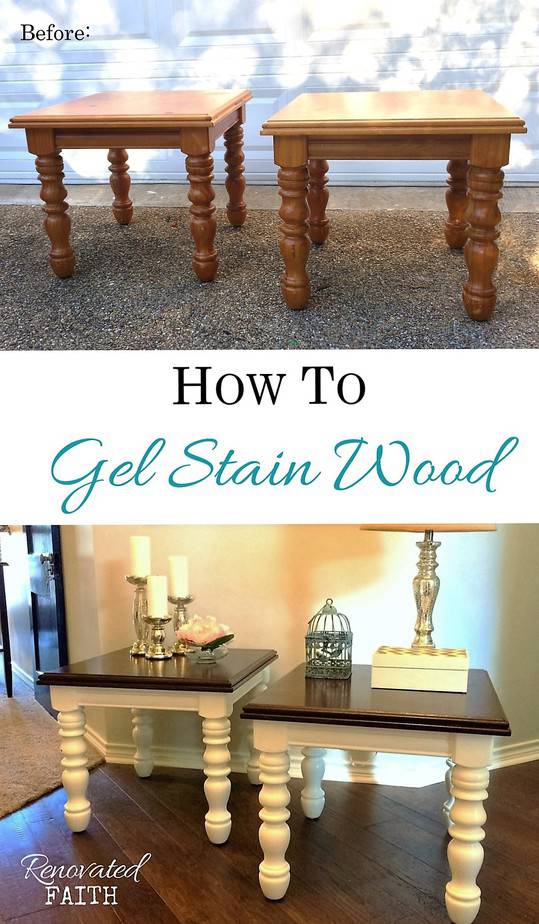
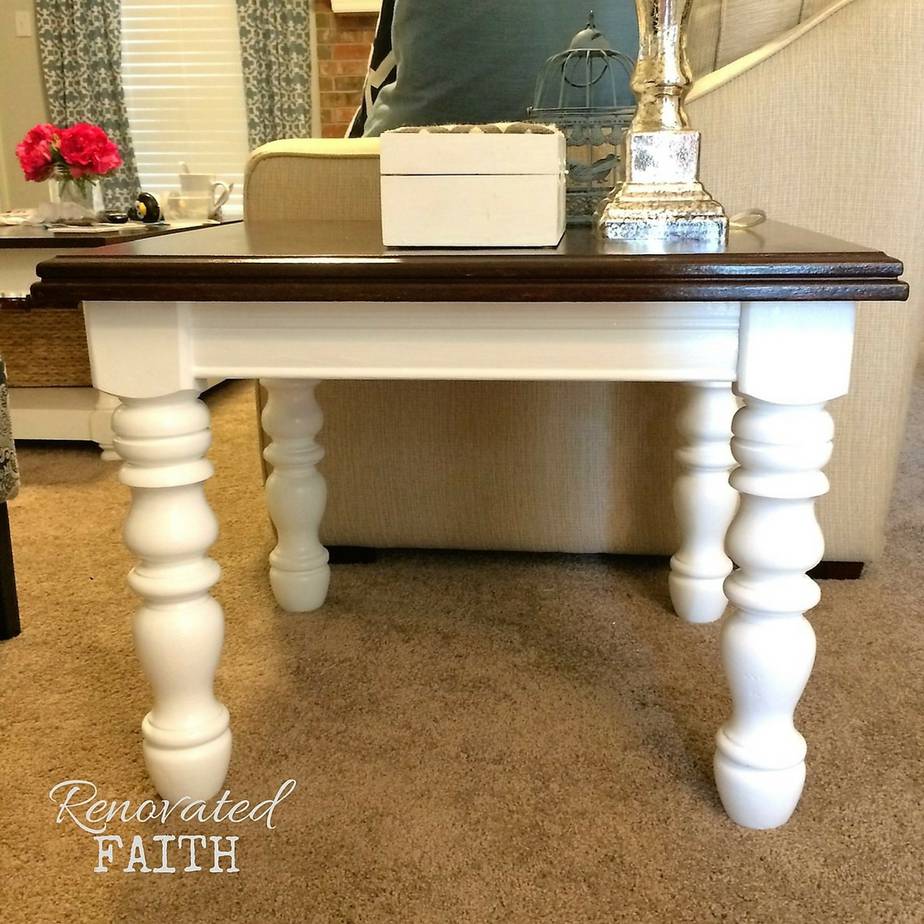
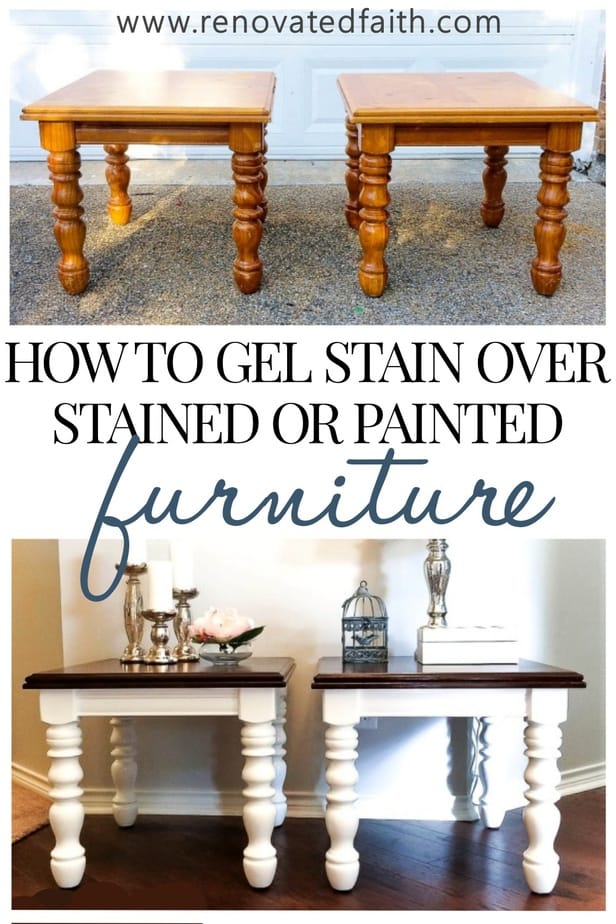
I eyed these two “beauties” on a Facebook page and thought they would be perfect for this “gel stain over stain technique”. Realizing they were solid wood and in good shape, I knew they would look like new by using gel stain to refinish the surface.

You can see a funky inlay pattern and also some deep-set water stains. I decided to do my favorite combination of a dark stained top and white apron and legs.

Tips for Applying Gel Stain Over Stained Wood: Can You Add Gel Stain to Existing Finishes?
A reader recently asked if she could apply Minwax Gel Stain over an existing finish. The process described below involves painting on a base coat before the gel stain layer. If your existing surface is in rough shape, that’s the best way to go, especially as you’ll have the opportunity to fill in any holes, or sand out any scratches before the base coat goes on.
However, if your existing stain is in pretty good shape, even if the shade isn’t your favorite, you can add the gel stain over the existing stain. For example, if these two side tables didn’t have the big scratches or knot holes, I would have put the gel stain over the stained wood. It doesn’t matter if it is an orangey-stain as only a little will show through and the orange that does show through will give the new finish some warmth.
How to Apply Gel Stain to Finished Wood:
To apply the gel stain over wood, follow the instructions below. You will still sand lightly in the direction of the wood. Wipe off any sanding dust and skip the base coat. Directly apply the gel stain in the same direction as the wood grain.
Applying Gel Stain Over Paint? How To Apply Gel Stain To Finished Wood
Some people refer to gel stain as “gel paint” because of its thick jelly-like consistency. Also, it acts more like a thick paint than a stain because of how well it covers. Also, you can be sure of how the stain will turn out because with a normal stain, a lot depends on the shade of the wood you start with.
If you are wanting to apply gel stain over a painted furniture piece, you will use the same process as below for applying gel stain over stain.
If you need some ideas on what shade of stain, click here: Stained Furniture Ideas.
1. Prep Work Before Using Gel Stain on Furniture
Stop! Before you do anything…take a before pic. When you are done, post the before and after pics here, so I can see the amazing work you’ve done! ❤️
Before learning how to gel stain wood, the first step of any project is to make sure your piece is structurally sound. I tightened all the bolts underneath and would have added wood glue or wood epoxy if needed. Nobody likes wobbly furniture.
Also, prep your work area and put down drop cloths or an old sheet.
2. Lightly Sand Before Using this Stain Over Paint Technique
Next, I sanded with my electric sander and a rougher sanding pad. Don’t sand to remove the old stain, you are just going over the surface to degloss it so it accepts the paint. The only reason you’d have to sand off layers of paint is if the surface was peeling. You can see my post and video on how to sand furniture with an electric sander here.
I wanted to get rid of any trace of the water damage and inlay design. I then wiped the table with a slightly damp rag to remove the sanding dust.
3. Prime with the Gel Paint Base
You’ll want to do every step with the direction of the grain. Any brush strokes in the primer, paint or grain will imitate the texture of wood grain. For this reason, we aren’t using a paint roller on any of these steps because the brush strokes work in our favor.
To prime, I used Zinsser Bullseye 123 and painted a THICK coat onto the tables. I’m a big fan of this product. It settles very well for a primer, leaving very few brush strokes, and it dries fast with little odor.
Although it is water-based, it still blocks out the old stain and makes a good foundation for the gel stain to look like stained wood.

4. Paint the Legs and Apron Before You Gel Stain Table Top
I like to get the most difficult painting tasks out of the way first, so I decided to work on the legs next. Milled furniture legs are notoriously difficult to paint but I found some shortcuts I share here: How to Paint Furniture Legs the Easy Way
I added Floetrol to my paint (according to the directions on the back) which makes the paint settle better, leaving fewer brush strokes. Normally, this isn’t a big deal because you can sand out obvious brush strokes but any kind of woodwork with spindles is not easy to sand.
Because Floetrol also thins the paint some, it took me 2 coats of paint on the legs. If you aren’t a stickler about brush strokes, the Floetrol is not a must. Now that the rest of the painting is out of the way, I can focus my efforts on gel staining the tabletop.

5. Add the Base Coat of Latex Paint
At this point, I have primed the entire piece and painted the apron and legs white. Since I’m ready to refinish the top, I decided to tape off the bottom with trash bags so I won’t get any base paint or gel stain on the bottom portion of the tables. (This is the point that you would fill holes on the top. Always prime first before filling holes because you can see them better.)

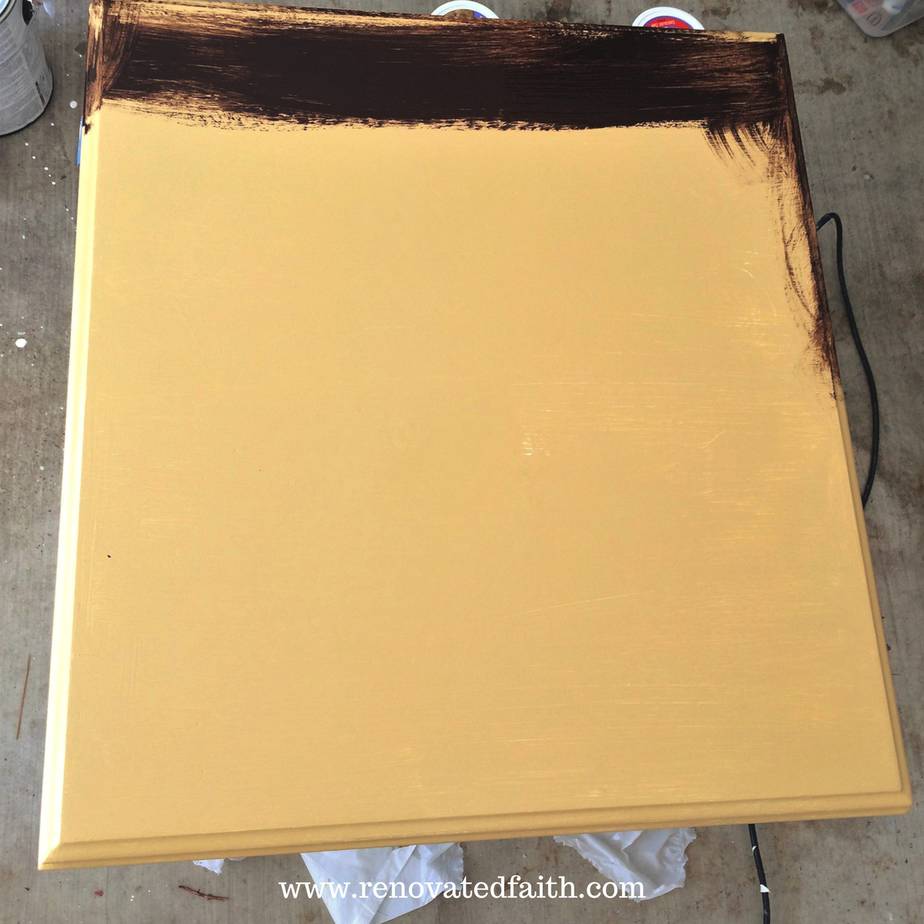
Now you can apply a layer of paint. Brush on the coat of paint in long strokes from one side to the other in the same direction. I used Behr Glazed Pecan in Latex Satin. This shade, although hideous, will serve as the base for your stain.
Where part of the brush strokes in the gel stain is slightly translucent (like the grain pattern in stained wood), you will see a little of this shade peek through. It took one thick coat of this.
You don’t need to use much paint for this step. Notice I didn’t cover the old color of previous stains very well but that’s ok; the surface will take on a completely different look, regardless.
Can You Use Gel Stain Over White Paint?
Some readers have asked me if I can put wood stain over white paint or primer instead of the base coat. I’ve found that the base coat gives the final finish a more realistic look but if you want to do some experimenting to see if you can skip the step, you can.
To see how your gel stain will look over white paint, simply prime the piece as normal. When the primer is dry, paint some gel stain over that spot and let it dry. That will give you a good idea of how it will look to paint gel stain over white paint instead of the orange-y base coat. This can also come in handy if you are trying to get a stained look on a white piece of furniture!
Where to Buy Gel Stain for Furniture
You have several colors and brands to choose from and below are links of where to buy gel stain in different sizes depending on your project. I personally like the consistency of the Old Master’s brand and used the color American Walnut that you can find here.
Old Masters Gel Stain Colors – CLICK HERE
General Finishes Gel Stain Colors – CLICK HERE
Varathane Gel Stain Colors – CLICK HERE
Minwax Gel Stain Colors – CLICK HERE
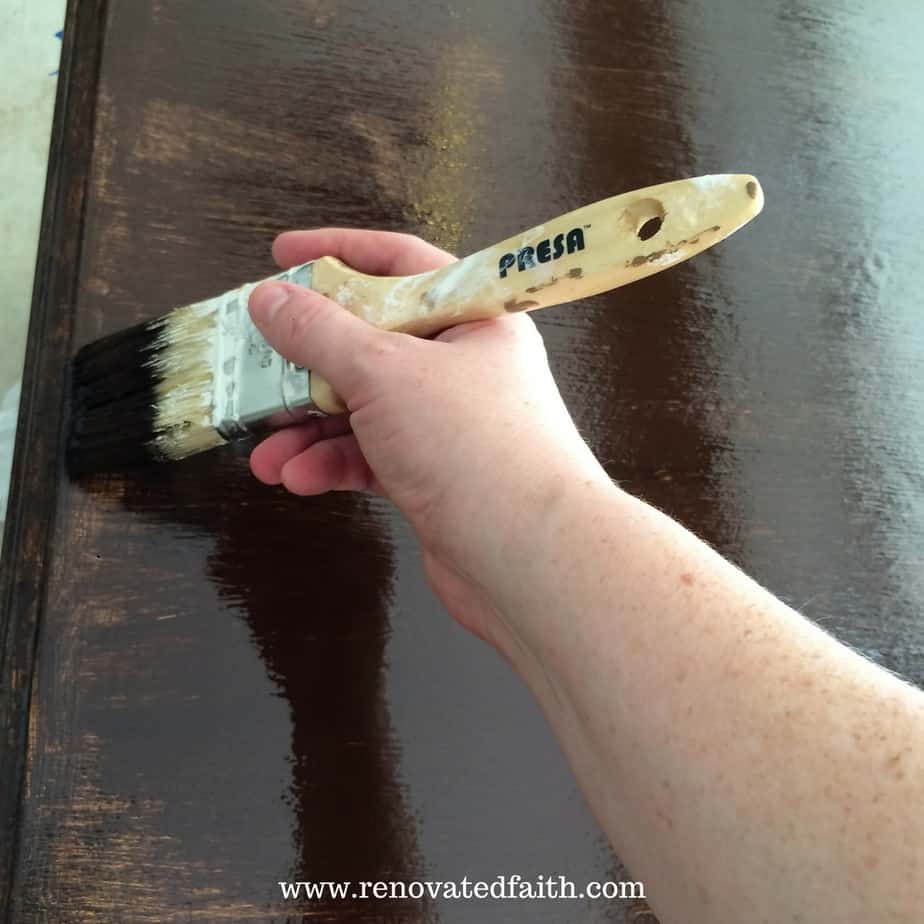
6. Applying Gel Stain Over Paint
Now is the fun part! Brush on the first coat of stain in long strokes. Your goal at this point is to cover every bit of the top with a good first coat of gel stain over the entire surface. It doesn’t dry very fast so you have a few minutes to work with it. gel step – coats of stain, first time, thick coat
Also, it is best practice to wipe in the direction of the grain. With each side table, I had wood inlays to gel stain over so I had multiple grain directions. Fortunately, it didn’t matter because the gel stain covers the old finish so well.

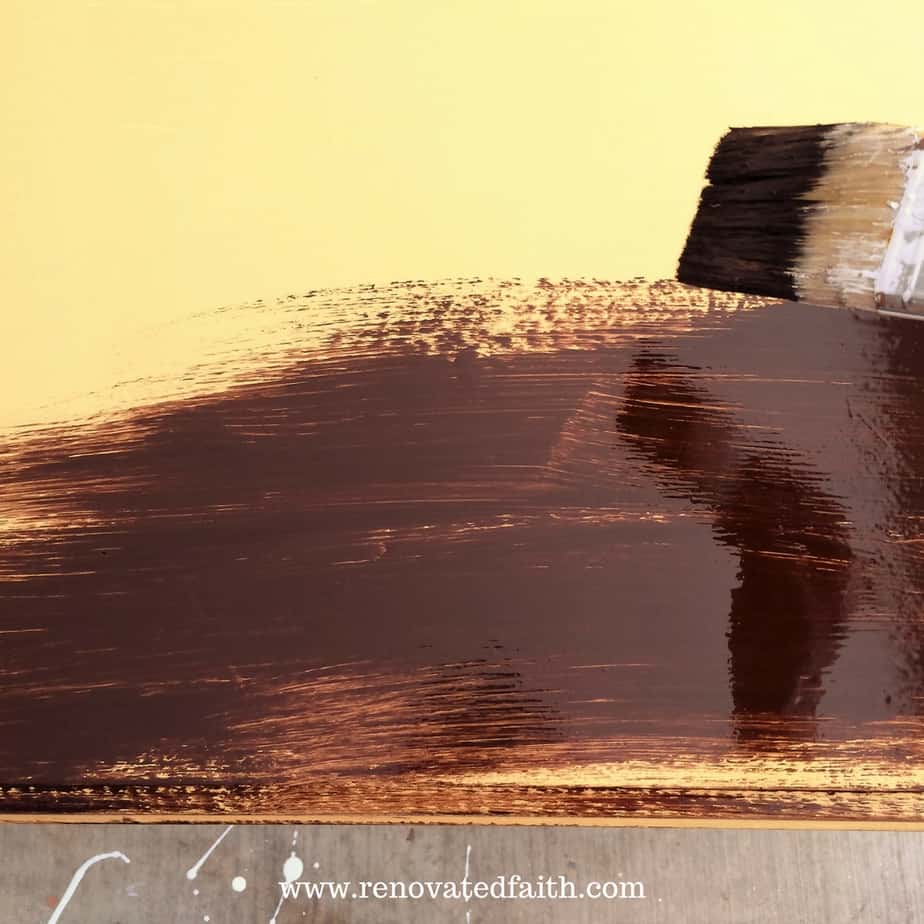
Now that the top is covered in gel stain, wipe some of the excess stain OFF your brush with paper towels and apply long even strokes in the same direction. You cannot screw up this “gel stain over stain” technique! (Again, you are wiping some of the gel stain off your brush with a paper towel, not wiping the surface of the table.)
The key is to work in the same direction to resemble wood grain. After removing excess gel stain, you might have some areas that are a little sparse. That’s ok, because we are going to add another thick coat of gel stain in the exact same way.
Let the first coat dry completely until it is no longer tacky. Then add the second coat of gel stain just like the first. Again, take off any extra stain off with your brush.
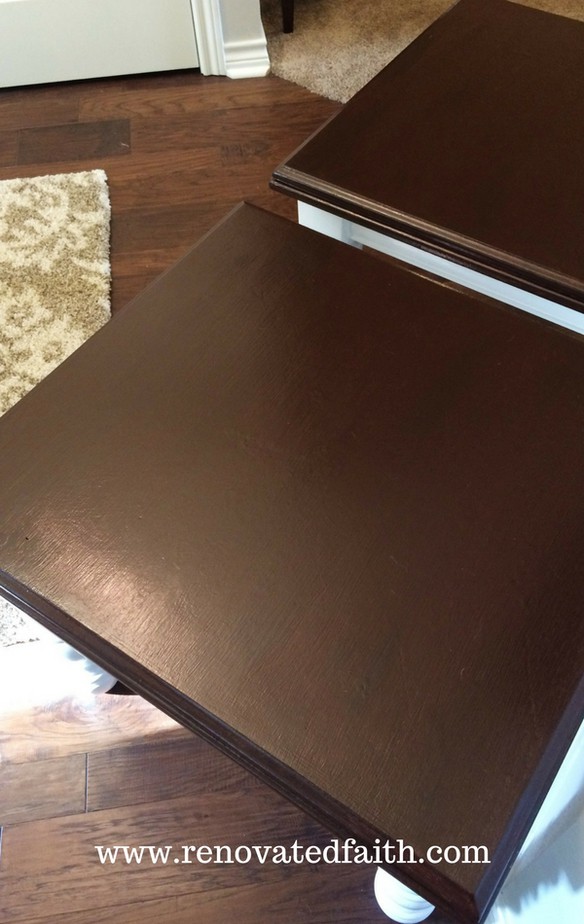
Once your gel stain starts to dry, you can see the final product. What do you think???
DON’T FORGET TO TAKE A PICTURE!
Now that you are done, I’d love to see how it turned out! Post your before and after photos here!

How Long Does it Take Gel Stain to Dry?
Give your gel stain 24-72 hours to dry depending on how humid it is. The rule of thumb is that it needs to not feel tacky, but I would not touch it until after 48 hours.
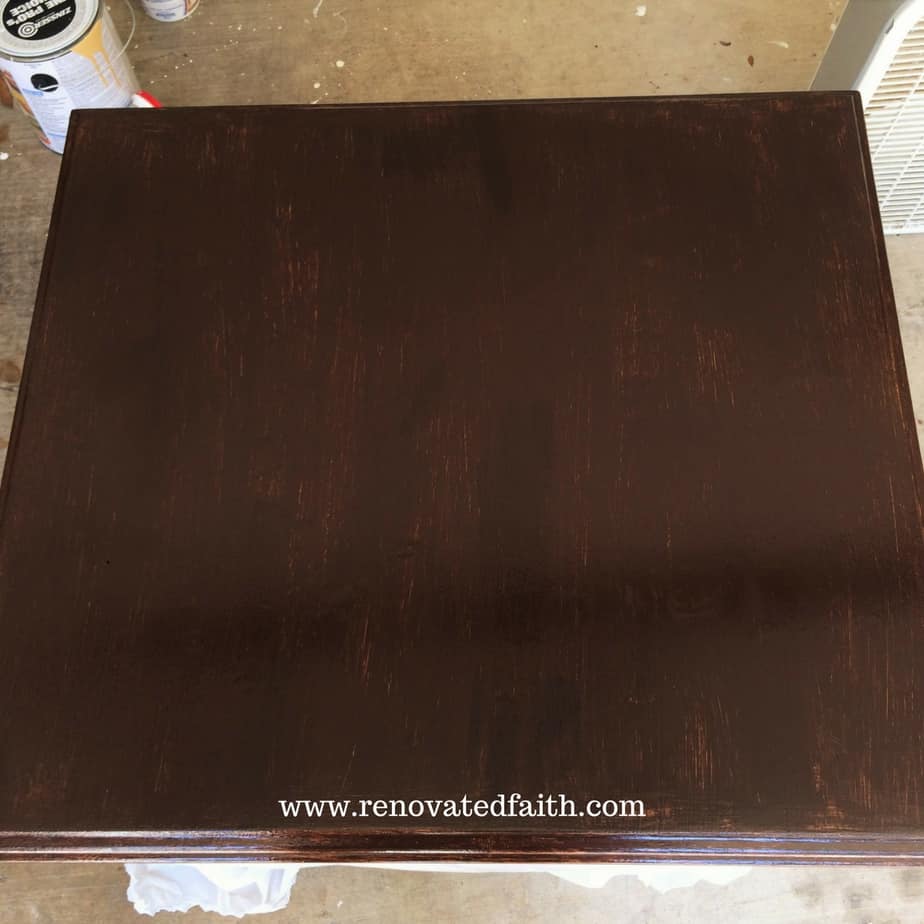
Here is how one thick coat of gel stain looks. If I would have wiped more off my brush, you would be able to see the “grain” a little more. It’s all personal preference and the gel stain gives you plenty of time to get the finish just how you want it!
You can also do a second coat of gel stain after the first has dried for a darker look.

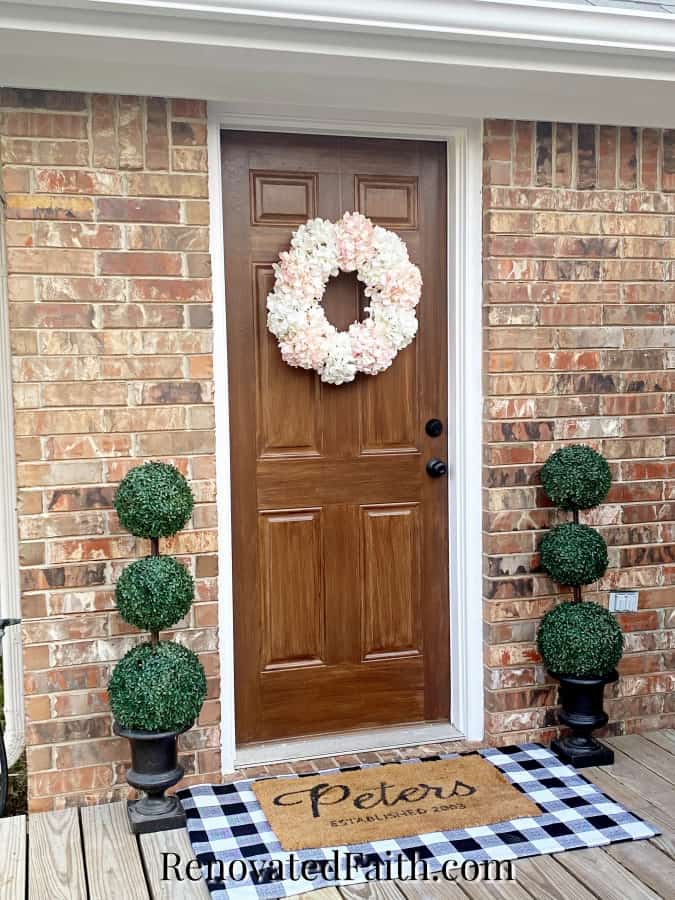
Painting A Door to Look Like Wood
Did you know you can use latex paint or gel stain on a metal or fiberglass door to make it look like it’s made out of real hardwood? To see how I painted my metal back door, click here: How To Paint Exterior Doors to Look Like Wood
Can you Polyurethane Over Gel Stain?
I get this question a lot and it depends on the amount of use that your piece of furniture will get.
Gel stain has a lot of the same properties as a top coat like polyurethane so if it won’t get heavy use with LOTS of cold drinks sitting on it, I wouldn’t worry about a topcoat.
For furniture that is heavily used, I would apply a couple of layers of Varathane’s Water-Based Polyurethane Top Coat.
How to Apply a Clear Coat to Gel Stain
A few months ago I tested the Best Clear Coats for Furniture to find out which top coats provide the best protection. For most furniture pieces I’d tell you to brush on a water-based polyurethane with a foam brush. BUT since I haven’t tested a water-based poly over gel stain, let’s stick with what I know works as a good gel stain clear coat. When going over gel stain, use Minwax’s Wipe-On Polyurethane.
The instructions say to sand first but don’t do that because that can scratch the new finish. Use a soft rag and wipe on a layer at a time in thin coats so you get a desired uniform look.. Let it dry and then wipe on another coat. For a really durable finish, I like to add three coats of a clear coat.
Examples of Furniture Makeovers with a Gel Stain Finish:
I used this same process in my post about how to refinish a roll top desk.

I love that finish! You could even use this process to gel stain kitchen cabinets but make sure you use the right primer for kitchen cabinets beforehand.
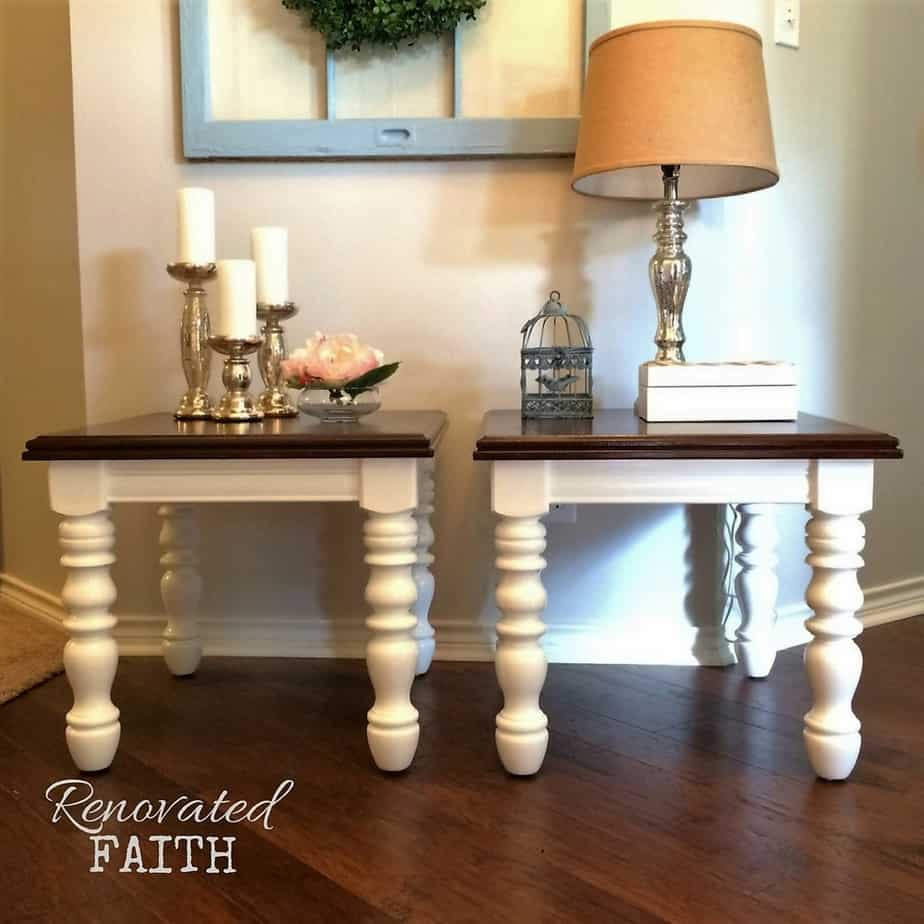
These tables underwent a major transformation and I’m happy with the results!


RENOVATE YOUR FAITH: Our Restoration Process
I love my “project time” as it is restful and recharging in so many ways. As a time for me to zone out from the chaos that life brings.[spacer height=”20px”]
As I brushed the gel stain onto each table, I noticed how effortlessly the new stain covered, making a new surface instantaneously. The thick stain seeped into every nook and cranny embracing and covering every bit of the old raw surface. I watched as it restored the dated, worn-out wood to something fresh and new.
I often find myself reflecting on how God has transformed me just like whatever furniture piece I am working on. [spacer height=”20px”]
This is a beautiful picture of how God restores us to become who He always meant for us to be. When we come to accept Christ as our Savior, He wraps us in a robe of righteousness so we will no longer see the old stain of sin.[spacer height=”20px”]
Looking at the new surface, I no longer saw water stains and scuff marks, I saw a pristine reflection of myself in the surface. God is always faithful to make us into something beautiful, transformed and useful for His purposes when we seek Him. We often long to fix our broken places but in reality His grace fully covers them, like they never existed in the first place.[spacer height=”20px”]
Every DIY or Home Decor post with spiritual encouragement has a Renovated Thinking section. You can see more of those posts by clicking here.
☑️ My All-Time Best Furniture Painting Tips & Tricks (FREE PRINTABLE)
Don’t forget to download the FREE step-by-step printable checklist that shows you the entire process I’ve used on dozens of furniture pieces while saving you time and money!
FAQ’s – Can You Put Stain Over Paint?
Can you gel stain without sanding?
Several have asked me if they can apply gel stain without sanding furniture. As long as the furniture surface is smooth enough, you can get away without sanding. Gel stain is oil-based and adheres really well with long-term durability.
Does gel stain cover wood putty?
This paint-over-stain technique, gel stain will cover over wood putty and you won’t be able to tell it’s there. If you were to only use gel stain and not this process, you would see some of the wood putty’s color and texture through the gel stain.
Can you gel stain over a painted garage door?
You can gel stain over a painted garage door whether it is metal, wood or fiberglass as long as you use this technique with gel stain as other stains will not work. Also, be sure you are using the appropriate exterior primer for your work surface.
Can you Use Gel Stain Over Polyurethane?
In most cases, I’d say that most products would not adhere to an existing finish with polyurethane. But since gel stain is oil based and
How to gel stain raw wood:
For raw wood, with no imperfections you want to hide, just sand lightly to smooth out the surface and then apply the wood stain. You don’t have to add the paint because you aren’t hiding anything.
Can You Stain Over White Paint?
A few have asked me if you can add dark stain over white paint. In other words, they are wondering if they can skip the peanut butter color of paint and go right to the gel stain from a white primer or previously painted white surface. You could try it on the underside of the furniture. It might work if you are going for a very dark gel stain look but I wouldn’t recommend it otherwise. The peanut butter base coat gives it the look of wood as a white base might look odd.
Can you Paint Over Gel Stain?
If you try to paint over gel stain without prepping or priming the surface, the paint will be very likely to peel. Use the same prep process as described about where you lightly sand and then use a primer before adding paint. One thing Jennifer Allwood always says is “primer sticks to things and paint sticks to primer”. In other words, paint will not always stick to every surface so be safe and use a primer.
Can You Stain Over Painted Cabinets?
You can absolutely gel stain kitchen cabinets using the process described above. This process also works well for painted bathroom cabinets as well. I would only suggest that when you stain the boxes, work in sections. in other words, pick a 4 x 4 foot section and do the gel stain process on it to ensure you get the look you want before it dries up on you. Then go onto the next section.
Why Did My Wood Stain Turn to Jelly?
After gel stain has been stored for some time, the contents can separate leaving most of it in a very jelly-like consistency. If this happens, you can easily restore the can by mixing it well with a paint stirrer. I was once able to use a 5-year-old can of gel stain after just stirring it up well.
How to Gel Stain Cabinets Gray
Gel stain for cabinets doesn’t just come in wood tones but they give you a lot of options if you want to try gray or black. The method would be different than described above but would involve using gel stain in more of a traditional sense. You would just paint on the gel stain and then wipe it off with a rag so you can still seen the wood grain underneath. What you’d end up with is a beautiful gray finish that still retains the natural grains of the wood. To see how to do this process you can check out this post: How to Gel Stain Cabinets Gray
What happens if you put stain over paint?
If you want to stain painted wood, you can’t just use any stain. Traditional stains are designed to absorb into the pores of the wood. Putting a traditional stain over paint will leave you with an oily mess. But by gel staining over paint, you can create a faux finish easily.
What happens if you apply gel stain over paint?
When you apply gel stain over paint, you just have to make sure the paint is dry first. Then, you can apply the gel stain as normal to create a faux grain look with your paint brush.
Can You Use Gel Stain Over Paint Without Sanding?
The short answer is no. The full answer is because the cost is too great – you could potentially end up having to redo the process if your gel stain doesn’t adhere. Also, the most effective way to sand is with an electric sander which will take less than 5 minutes and is no harder than ironing.The best reason I don’t suggest that you use gel stain without sanding is because lightly sanding the surface ahead of time will give you the best finish possible for the final product.
Can You Create a Raw, Unfinished Look with Gel Stain?
Gel stain works best for projects where you want a darker stain but if you want a lighter color, you can get the authentic stained wood-grain look with this tutorial: How To Get The Look Of Unfinished Wood
What If I want To Create Custom Stains?
Gel stains don’t come in a huge variety of stain colors but latex paints do! In this post, you can turn any color of latex paint into a stain. It’s a great way to get the look you want while covering even stubborn wood surfaces in a variety of different colors: How To Apply Paint That Looks Like Stain
How To Distress Wood With Paint
There are different ways to create this look but the best option for getting a distressed look on the bottom portion of your gel-painted furniture is by dry brushing. Lightly dry brush the edges with dark gray or black paint until you get the look you want.
Can You Gel Stain Over MDF?
You can absolutely gel stain over MDF. As long as it has a laminate top, you can get the same look. For tips on painting laminate furniture, click here.
Can You Stain OVer Paint on a Deck?
Whether you are staining outdoor furniture, or deck boards, I recommend using the Behr line of deck stains at Home Depot. The solid stains are almost like deck paints as you can’t see the old finish underneath. Be sure to give your deck a good cleaning with a deck cleaner before you apply the deck stain: Behr Solid and Semi-Transparent Deck Stains
Have you used GF java gel stain?
I have used General Finish gel stains but I prefer the Old Masters gel stains because of their ease of use and the beauty of the finished product.
Can You Stain Over Paint on a House?
When it comes to exterior features of your home like doors or garage doors, try this technique: How To Stain A Metal Door To Look Like Wood
Can I Stain Over Paint? Using stain to stain over paint will allow you to stain any material whether it’s metal, wood, or fiberglass without stripping. It’s such a great way to make any surface look like hardwood. Fortunately, it’s a process any beginner DIYer can do with this detailed tutorial.
Gel Stain Problems:
There are very few problems with gel stain as it is a very easy product to use but I wanted to make you aware of a couple things. When you first open the can, it might look like some dark brown jelly that was left in the fridge WAY too long. The good thing is that is completely normal. Just get a paint stirrer and slowly stir it until it is all the same consistency.
Also, gel stain can take a long time to dry if you are in a humid environment, but be patient. It is not unusual for it to be tacky after a couple of days but resist the urge to add the clear coat too soon. This is the only thing I don’t love about gel stain but I promise it WILL dry!
Gel stain gives you has a thick consistency that is not very translucent. If you want a look that is not quite as a traditional and a little more farmhouse or rustic, you might check out these posts for water-based options. Also, the posts below have less fumes and aren’t quite as messy as they are water-based products:
Alternatives to the Gel Stain Over Paint Technique
How to Make a Driftwood Finish with Latex
How To Apply Paint That Looks Like Stain
Restoration Hardware Finish With Paint
Related Posts to Applying Gel Stain Over Paint or Stain:
A Beginner’s Guide to Furniture Painting
How To Paint a Door to Look Like Wood Stain {12 Shade Options}
How to Paint Furniture to Look Like Wood (12 Shade Options!)
The Secret To A Restoration Hardware Finish (On ANY Furniture Surface!)
How to Apply Paint that Looks Like Stain (9 Shade Options!)
How to Paint Laminate Furniture to Look Like Wood (Easy Beginner Guide)
DIY Faux Pottery Barn Seadrift Finish With Paint (Easiest Technique!)
How To Paint a Door to Look Like Wood Stain {12 Shade Options}
Easiest Raw Wood Finish with Paint (No Stripping Needed!)
Painting Metal to Look Like Wood Is Easier Than You Think (My Foolproof Method!)
How to Paint Plastic to Look Like Wood (The Ugly Fountain Makeover You Have to See)
If you like this post, you might also like my faux stain technique to get the look of wood with latex paint and glaze:
Gel Stain Over Paint Technique – Final Thoughts
Gel stain is one of my favorite products in my DIY arsenal. I have gotten to the point where I no longer use regular stain even on raw wood. With gel stain, it’s easy to work with and I know how it will turn out every single time. Now that you know about all the benefits of gel stain, I hope you feel empowered to refinish ANY piece of painted or stained piece of furniture you come across! Good luck and let me know if you have any questions below!
If you want to save this post for later, pin it here:
What are your thoughts, my friend? Do you think the makeover was worth it? Do you have more options now for refinishing furniture? I love to hear your thoughts and questions! Scroll down to leave a comment and I WILL reply! ❤️
Gel stain gives you so many more options with painted furniture. You don’t have to scrape or use paint remover to remove the paint and then stain it again. Instead, this process allows you to go over the existing surface to give you a rich, deep stain every single time. Be sure to let me know if you have any questions at all!
Blessings,

Gel Stain Over Paint, YouTube Video
Be sure to follow the fun here!
Email Subscription | Instagram | Pinterest | Facebook | Twitter
Quick Links to Information in this Post
- 1 How to Gel Stain Over Existing Finishes
- 2 What Type of Stain Is Best For Your Project?
- 3 Applying Gel Stain: Can You Stain Over Paint?
- 4 How to Gel Stain Over Paint or Stain – Supplies:
- 5 Tips for Applying Gel Stain Over Stained Wood: Can You Add Gel Stain to Existing Finishes?
- 6 Applying Gel Stain Over Paint? How To Apply Gel Stain To Finished Wood
- 7
- 8 Can You Use Gel Stain Over White Paint?
- 9 Where to Buy Gel Stain for Furniture
- 10
- 11
- 12 Painting A Door to Look Like Wood
- 13 Can you Polyurethane Over Gel Stain?
- 14
- 15 How to Apply a Clear Coat to Gel Stain
- 16 Examples of Furniture Makeovers with a Gel Stain Finish:
- 17
- 18 RENOVATE YOUR FAITH: Our Restoration Process
- 19
- 20 FAQ’s – Can You Put Stain Over Paint?
- 21 Gel Stain Problems:
- 22 Related Posts to Applying Gel Stain Over Paint or Stain:
- 23 Gel Stain Over Paint Technique – Final Thoughts
- 24 Stain Over Stain Technique for Furniture

Stain Over Stain Technique for Furniture

Karin Peters is a DIY expert and the creator of Renovated Faith. She is a furniture painter, a home design consultant, and a tenacious problem solver determined to help you transform your house into a home. With 17 years of experience with DIY home improvement, she researches and analyses professional processes to adapt them to be easy and cost-effective for DIYers. She then tests every project and product before it appears on the site in a detailed, step-by-step format. After attending Texas A&M University, she received her Master of Divinity with Biblical Languages at Southwestern Baptist Theology Seminary. Her passions unite in Renovated Faith, which shows readers how to create a home that serves them so they can pursue their God-given purposes. About Renovated Faith | Editorial Policy | Facebook | Twitter | LinkedIn

I would like to have my laminate bathroom countertop have a wood look. Would you suggest that gel paint would last on a bathroom countertop?
I probably wouldn’t try to do this technique to a bathroom countertop. I have used Rustoleum Countertop transformations and had a really good experience. I hope this helps Elizabeth! – Karin
I did send you the pics to the address you provided. Please advise if you received.
Thanks,
Nettie
Hi Karin,
You did inspire me to use the gel stain to restore two sewing cabinets that were my mother’s. I have had them both for 20+ years but just didn’t know what to do with them. I finished them but can’t figure out how to post the pictures as your link does not take me there. But thanks for pushing me to get them done.
Hey Nettie! I’m so glad to hear that! I bet they look amazing. Sorry that link is broken. You can send the pics to me at karin@renovatedfaith.com. I’d love to see them!
Karin
I’ve used gel stain over white-painted porch columns to give them the appearance of raw/natural wood and they came out amazing. You CAN paint over white and these columns fool everyone!
That is so great to know. THank you so much Brittany!
I’m new to your site and love it. I have a cherry wood buffet that I’d like the top piece to match my new dining room table in the oak family color. Then I was going to paint the body of the buffet a Navy blue. My question is for the top of the buffet would I choose a gel paint color and just apply that after lightly sanding and brushing on primer? Then for the body, I’d lightly sand, prime and paint with a Behr paint in navy? Would I apply anything on top of the navy paint after it drys.
Can’t wait to hear your response. Trying to not spend a lot of money since hubby laid off due to COVID but I’d like to update our furniture in dining room.
Thank you so much for the information. I can really use the input and tips and tricks to go with it. One other question, I have a table that I put some wax on- what is the best way to remove that for painting. Would one just sand it?
Thanks again.