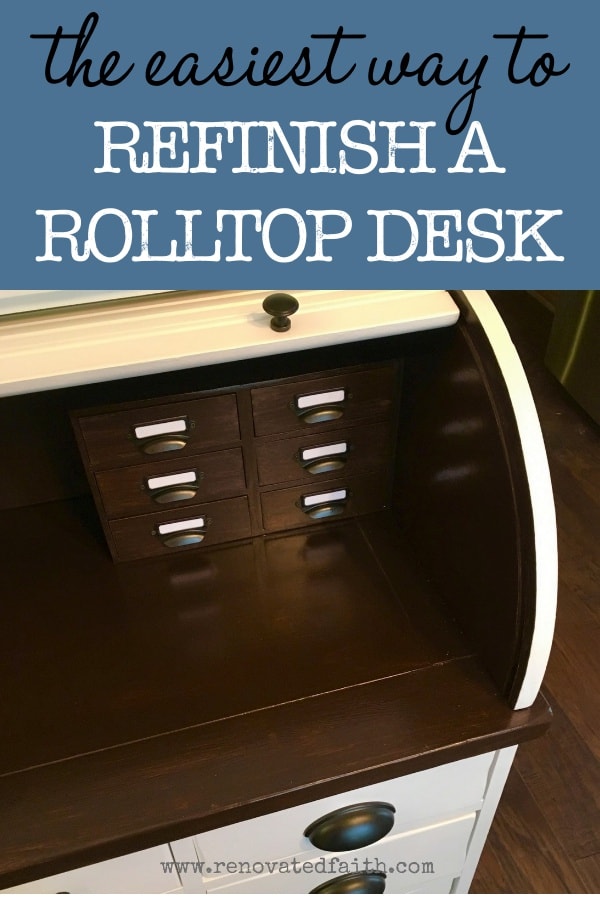
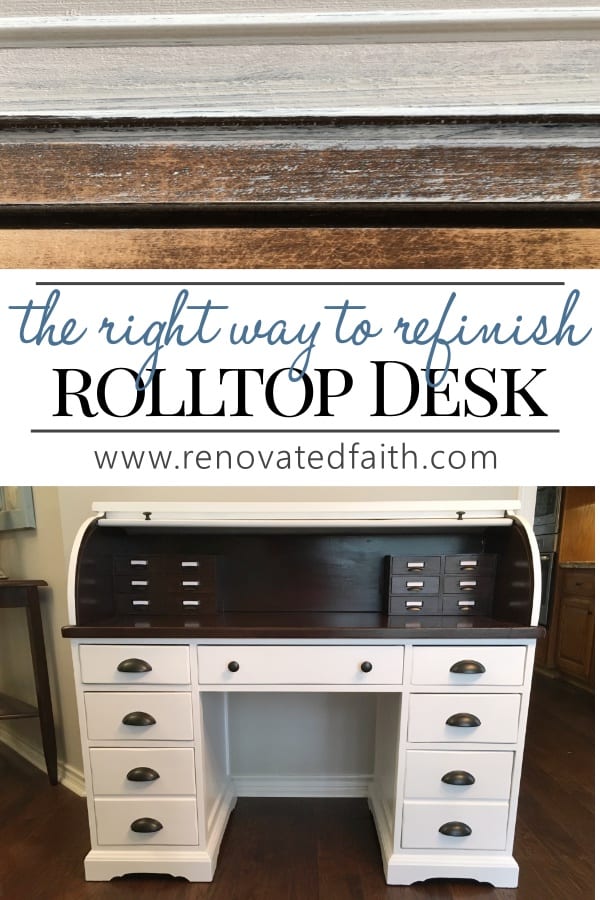
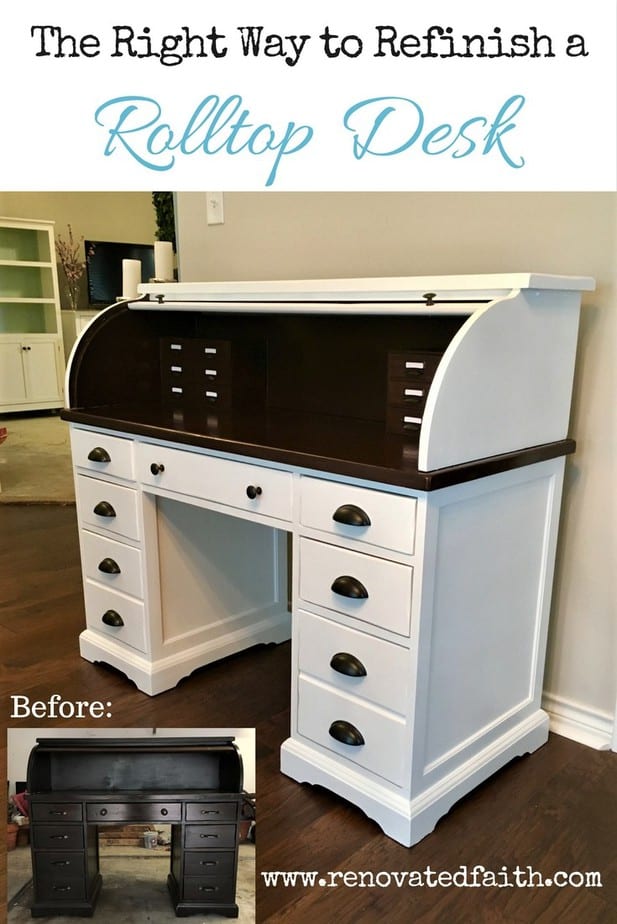
Easy Roll Top Desk Makeover (Anyone Can Do!)
The Ultimate Guide to Painting a Roll Top Desk Like A Pro
Quick Links to Information in this Post
- 1 The Ultimate Guide to Painting a Roll Top Desk Like A Pro
- 2 Supply List for Your Roll Top Desk Makeover:
- 3 The Ultimate Guide to Painting A Roll Top Desk
- 4 Faqs on Roll Top Desk Makeover Ideas:
- 5 Related Blog Posts to the Rolltop Desk Makeover:
- 6 Final Thoughts on My Antique Roll Top Desk Makeover
- 7 Painted Rolltop Desk Makeover
Interested in painting a roll top desk but don’t know where to stop? Here are my best tips & tricks for a successful roll top desk makeover.
Roll-top desks are such classy statement pieces in any home. It’s so rare to find one in excellent condition. They are notorious for being difficult to paint because you can easily gunk up the tambour (rolling portion) with paint causing it not to roll at all.
How to Refurnish a Roll Top Desk
Fortunately, this tried and true method will walk you through the complete transformation so your newly refurbished roll top desk will be done in no time.
Whether you are an old pro or your first project ever, I’ll show you how to make an old unwanted desk look like a gorgeous custom piece. If you are lucky enough to come across one of these beauties, here are the best tips for a successful transformation.
Supply List for Your Roll Top Desk Makeover:
- A Good Paint Brush – See the link above.
- 4″ Rollers
- Wood Filler
- Electric sander with low (60) and higher (180) grit sandpaper pads. You can also use a hand sander.
- Zinsser 123 Primer
- White Paint – I used Behr Ultra in Old White Satin. UPDATE: Since this project, I’ve started using Benjamin Moore Advance
- Base Coat for Faux Stain – I used Behr Honey Butter Flat
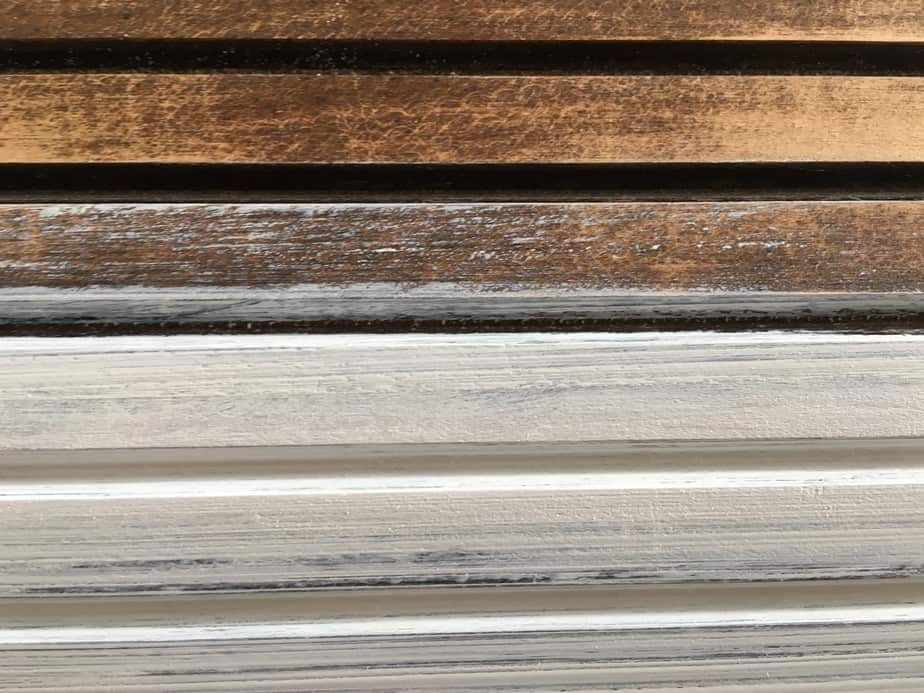
- Gel Stain – I used Minwax Gel Stain in Walnut. You can see how to use the gel stain method here: Easy Gel Stain Over Paint Technique
- New Hardware or you can give the original hardware a fresh coat of paint
- Minwax Wipe-on Polyurethane for the desk top
- Unfinished Jewelry Boxes with Drawers – Optional.
- Must-Have Painting Tips for Furniture – FREE Checklist
For ideas on different colors, you can check out my favorite furniture makeovers: Painted Furniture Makeovers (Before and After Reveals)
The Ultimate Guide to Painting A Roll Top Desk
I stumbled upon this desk on a Facebook page that a friend was selling last year. This desk was perfect to redo because the top portion comes off and the tambour just slides out making it so much easier to refinish. The desk was structurally in great shape but the surface needed some love.
Step 1: Prep Work for Refinishing A Roll Top Desk
The first thing in refinishing any furniture piece is prep work to make sure the paint adheres for a long time to come.
However, the challenge with painting roll top desks is how to paint the top pieces in such a way that the new paint still allows the tambour to slide up and down without sticking.

I knew I was going to sell this piece so I decided to do the surface a dark stain using my gel stain method and would paint the rest white.
The first thing I tried to address was the tambour. I realized that the plastic sleeve on both sides that the tambour slides into was already dark brown so I tried to spray paint it white to match what would be white. Let me save a little spray paint and a lot of frustration by telling you that was a horrible idea.
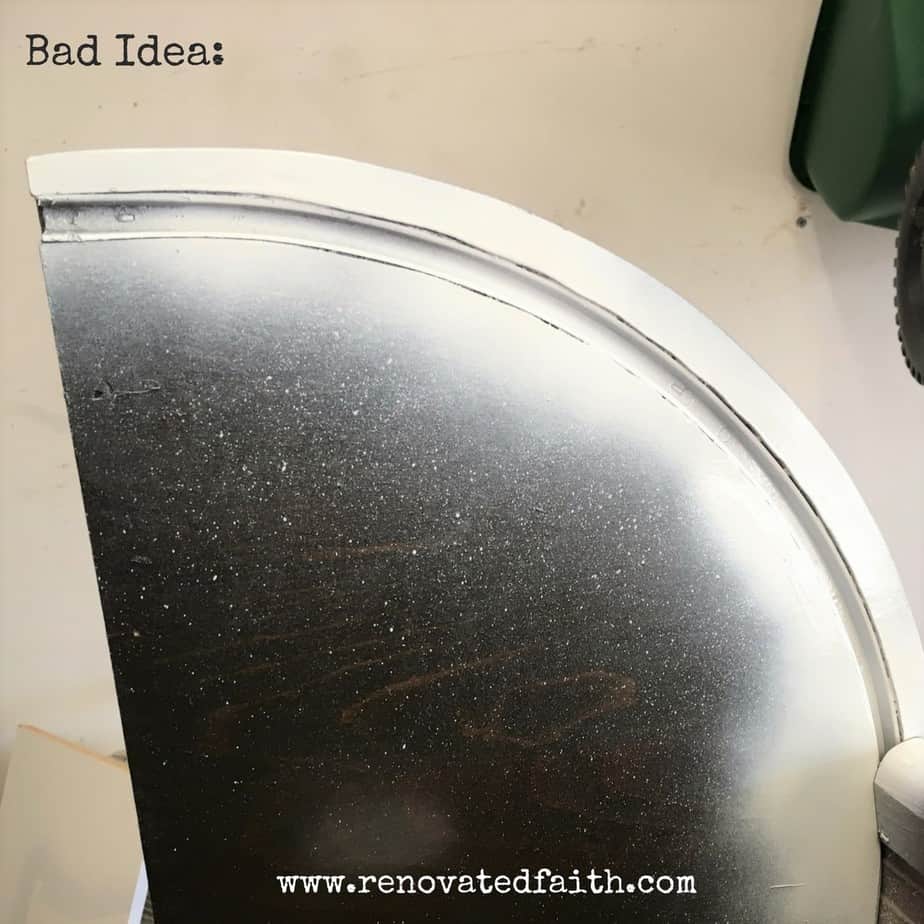
The spray paint started peeling away when I moved the tambour up and down. It looked horrible so I spent over an hour scraping the spray paint out with a putty knife. I decided to faux stain the interior of the top to better match the plastic sleeves as there was no easy way to change their color.
Spray painting the top part and tambour is also a horrible idea. Ask me how I know…
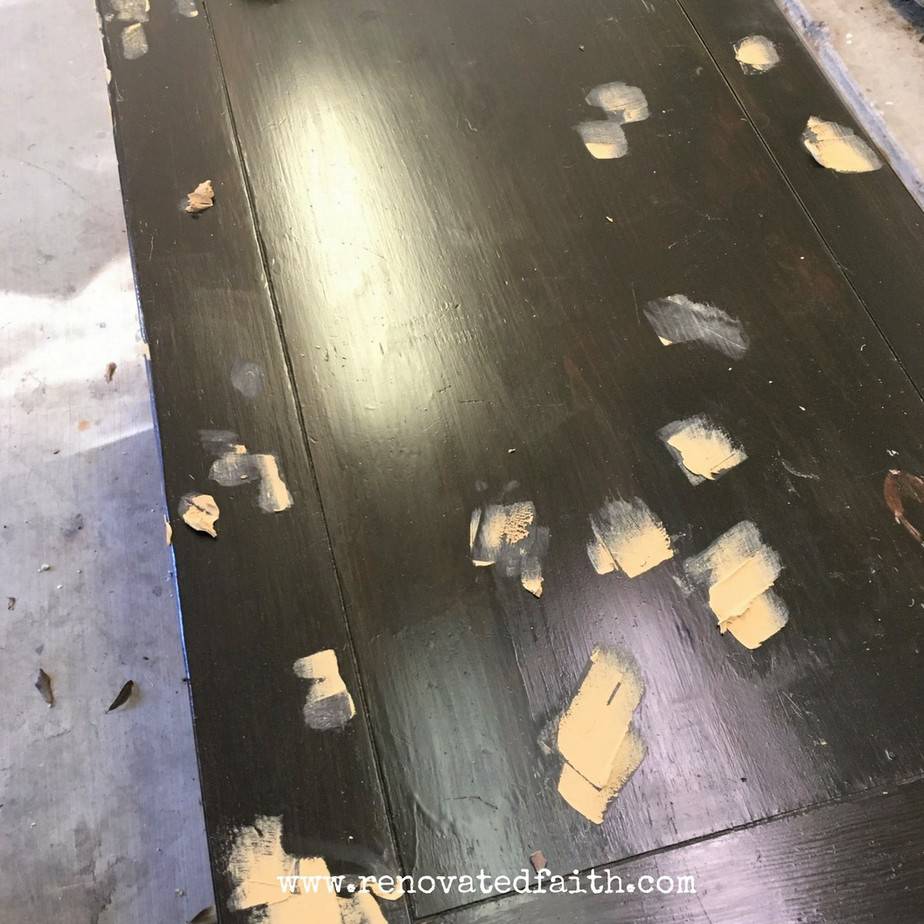
I took off the hardware and filled obvious holes, scratches, and dents on the desk with wood filler.
Step 2: How to Refinish a Roll Top Desk with An Electric Sander
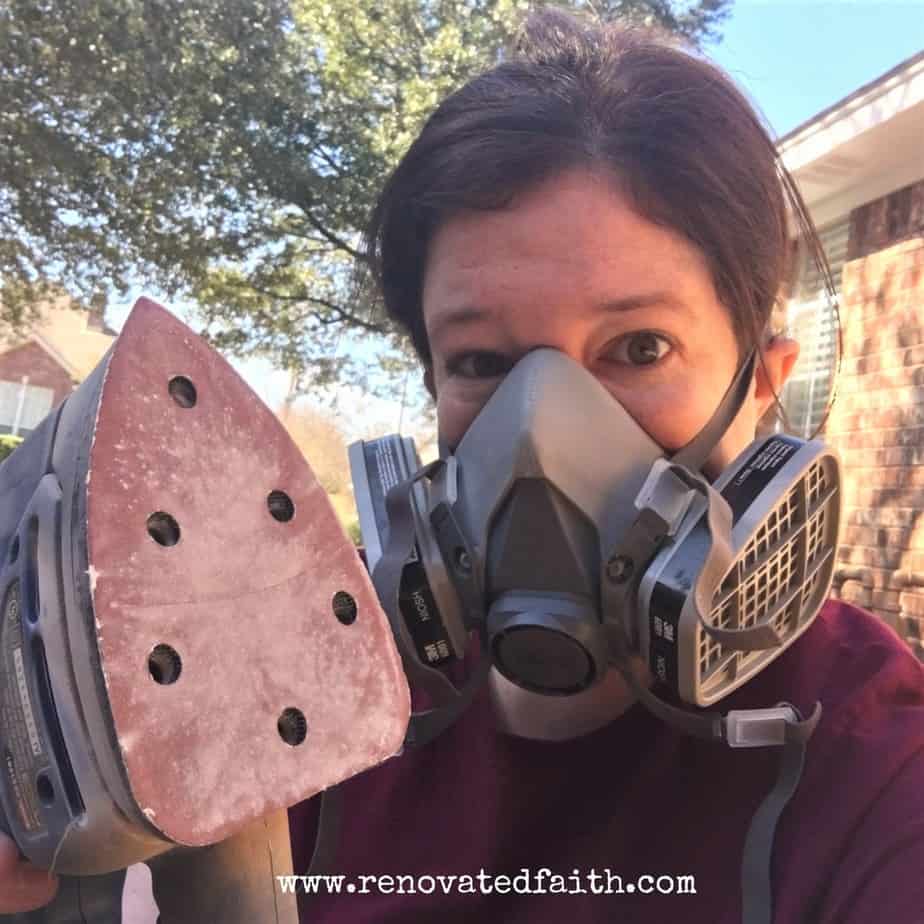
After 48 hours of drying, I sanded the entire desk with a rough sandpaper pad (60) with my mouse sander. Have I mentioned lately how much I love my sander?!? Below is a picture of the two of us! (Also, wear a respirator or mask when sanding the wood filler because those tiny particles can get in your lungs…No bueno!)
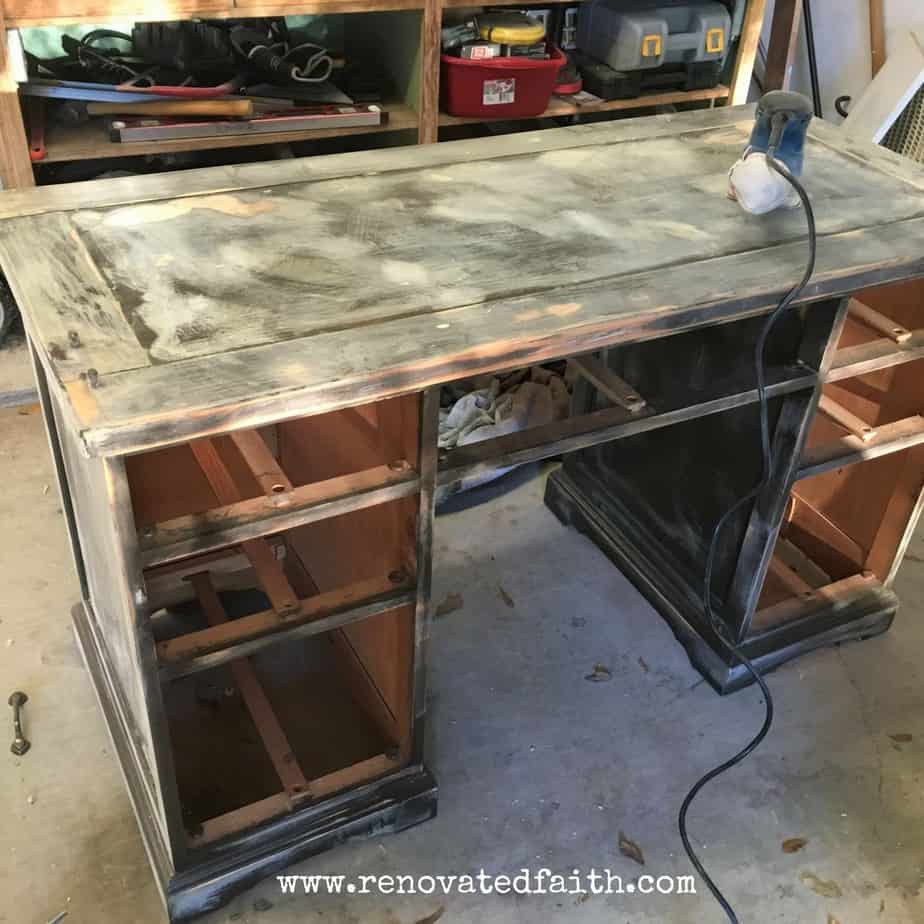
Sand the tambour by laying it out flat on the ground and sand it as you would the rest of the desk.

Step 3: How to Prime A Roll Top Antique Desk
After sanding, it was time to prime the whole thing including the back of the desk and drawer bottoms to block odors from it being in a storage unit for a while. Once again I used Zinsser 123 water-based primer. I just found out they made a spray paint version which I will have to try out on my next project.
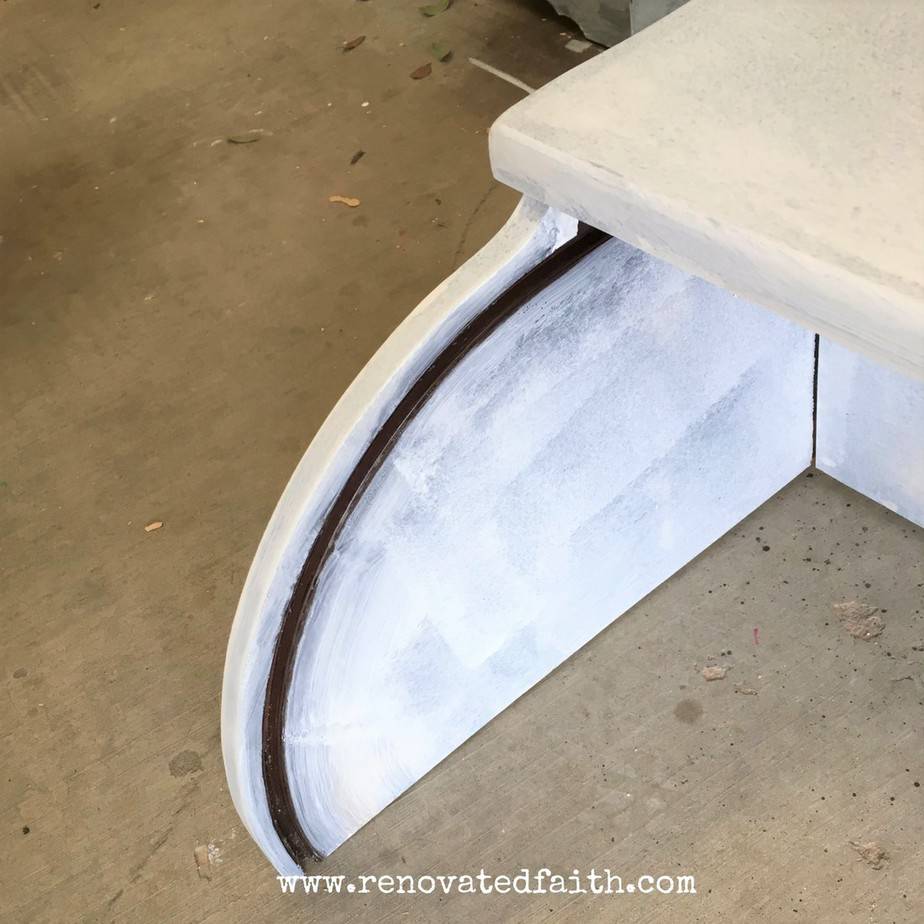
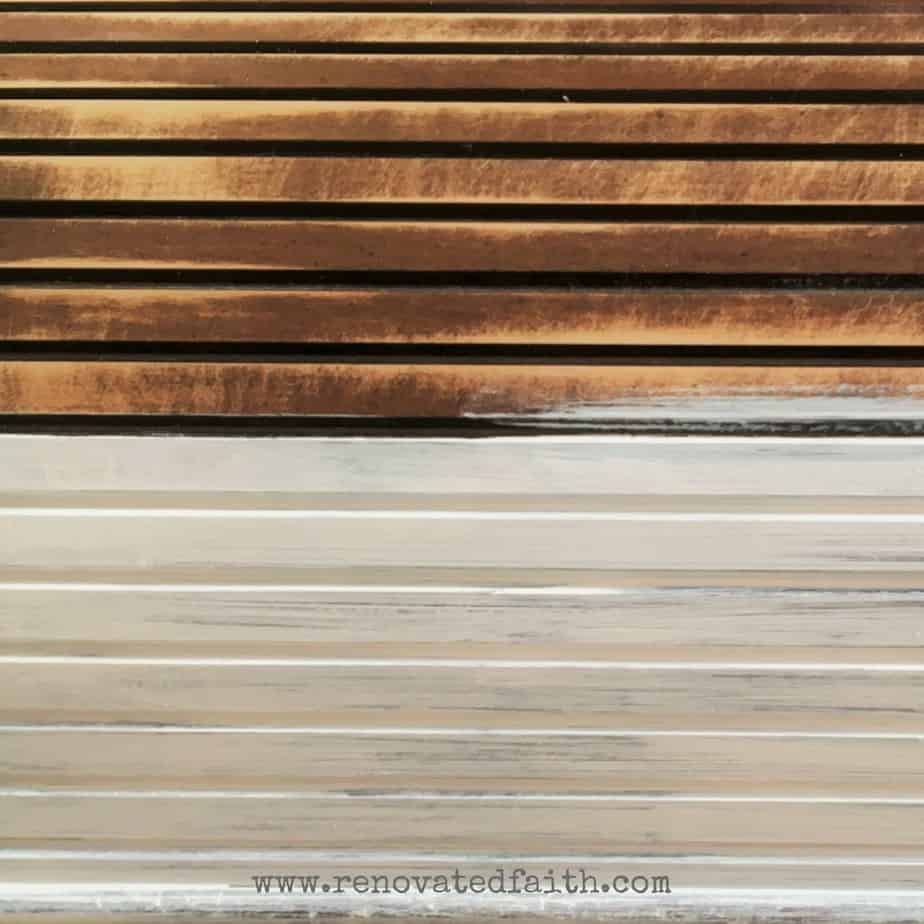
Get a nice thick coat of primer on your piece of furniture. You’ll notice that I didn’t get any primer on the groove the tambour slides into.
After priming the rest of the desk, I laid the tambour over a round kitchen garbage can that was on its side. I wanted to open up the creases so I could get primer in each crease between the wood slats. I was able to do this with a thin coat of primer.
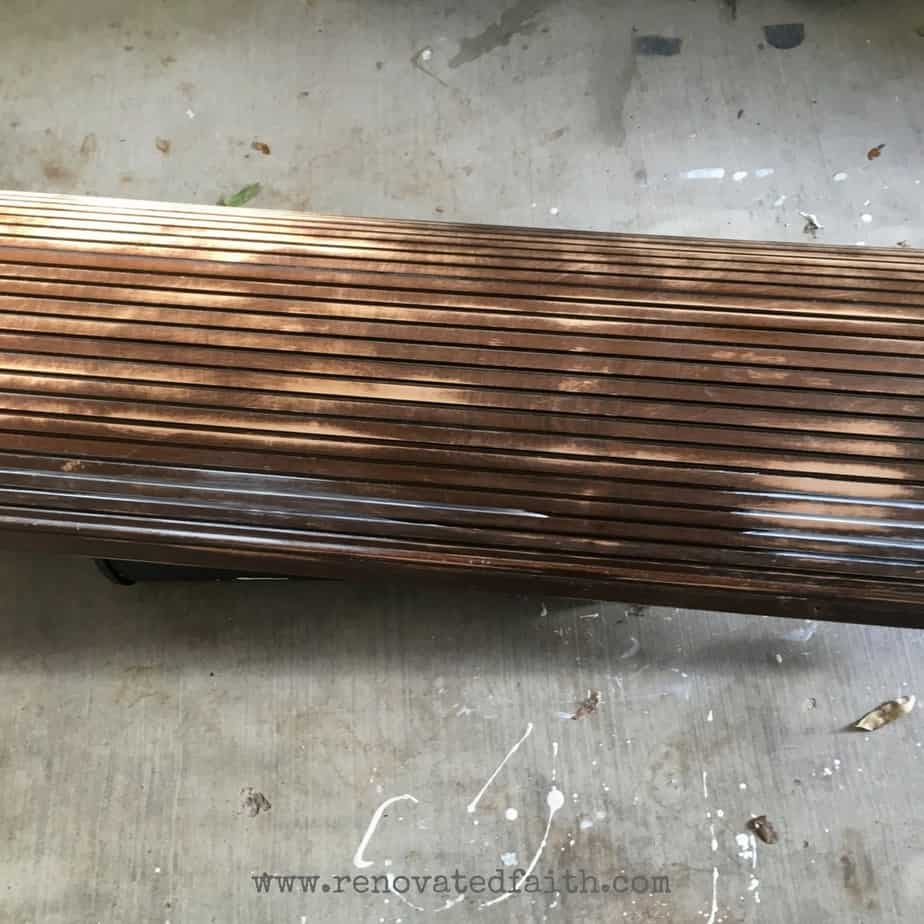
Get just enough primer to fill in the dark portion in between the wood slats. Use your brush to wipe off any excess and wipe your brush on some paper if you have too much paint on your brush. You have time to wipe off the excess before it dries. What you don’t want is a thick layer of wet, drippy paint on the tambour or the paint will crack once it dries. The Zinsser 123 Primer is perfect for this application because it is thin but clings well to the grooves while covering well.
At this point, fill any remaining holes, dents, or scratches on the rest of the desk. You should now be able to see them easier with the piece primed. Sand those parts after they are dry.
If your old desk has any gouges or scratches you can use wood putty and this post here to make it look like a brand new desk in no time: How to Repair Old Furniture
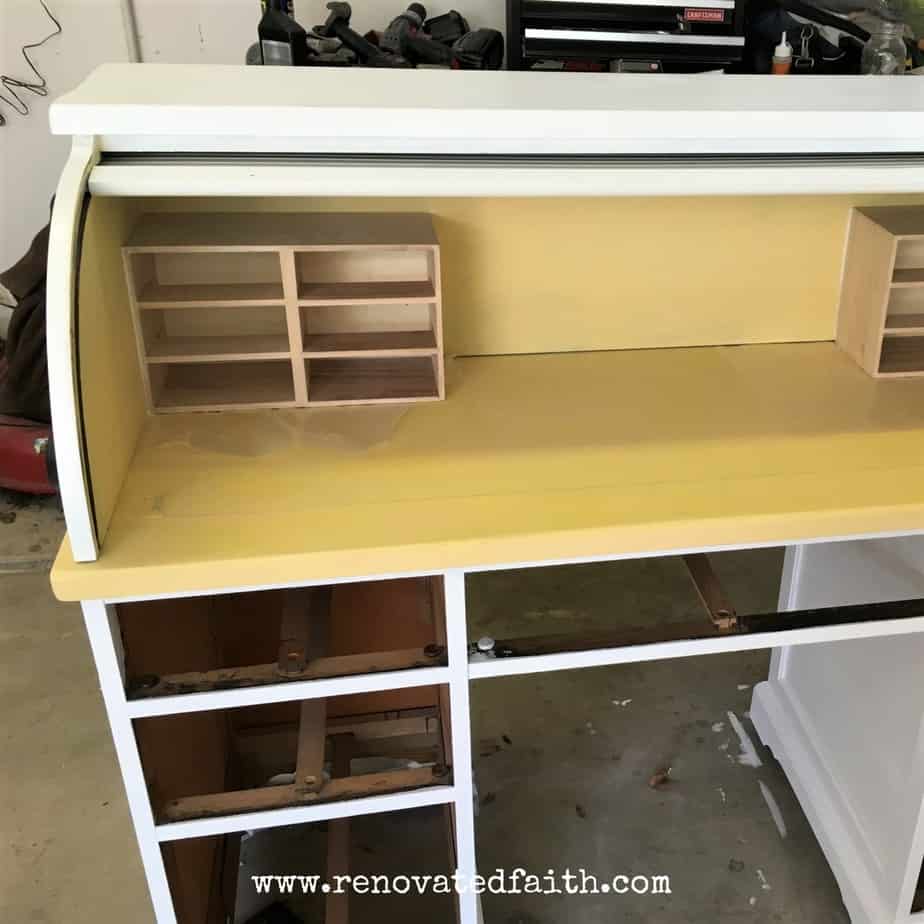
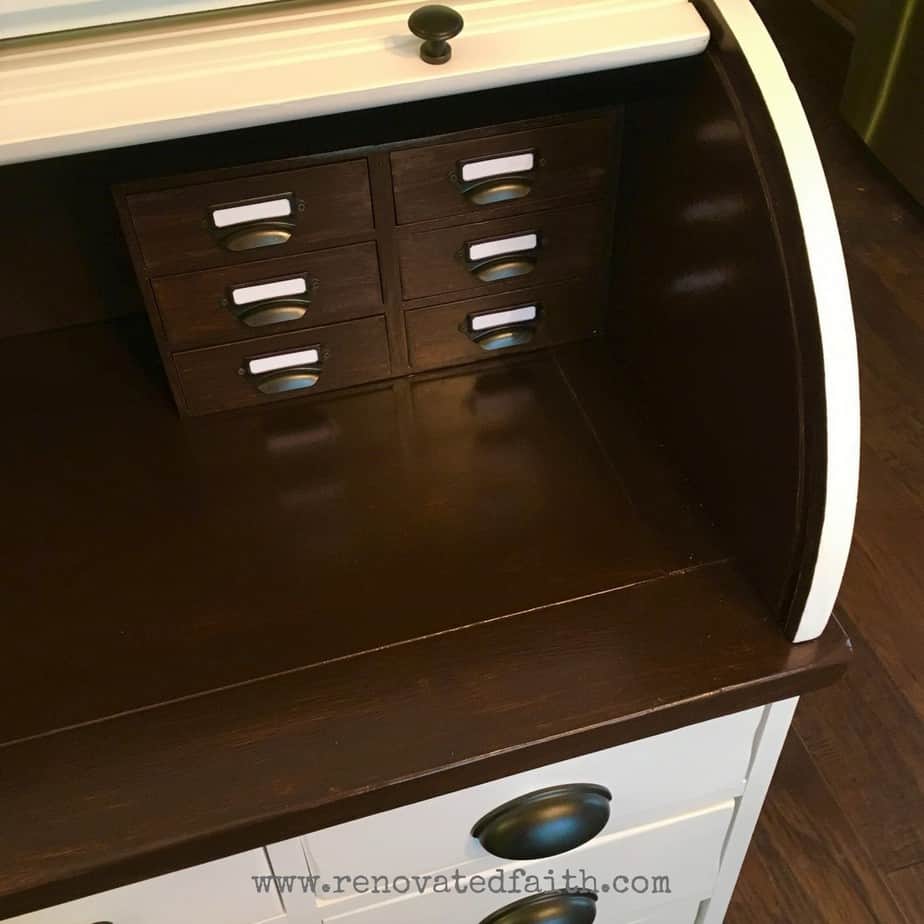
How to Add Small Drawers to an Antique Roll Top Desk
Halfway into the whole process, I realized that this desk didn’t have any of the cute ‘card catalog’ style drawers that you so often see on these desks. I decided to add some using some unfinished jewelry boxes I found online here.
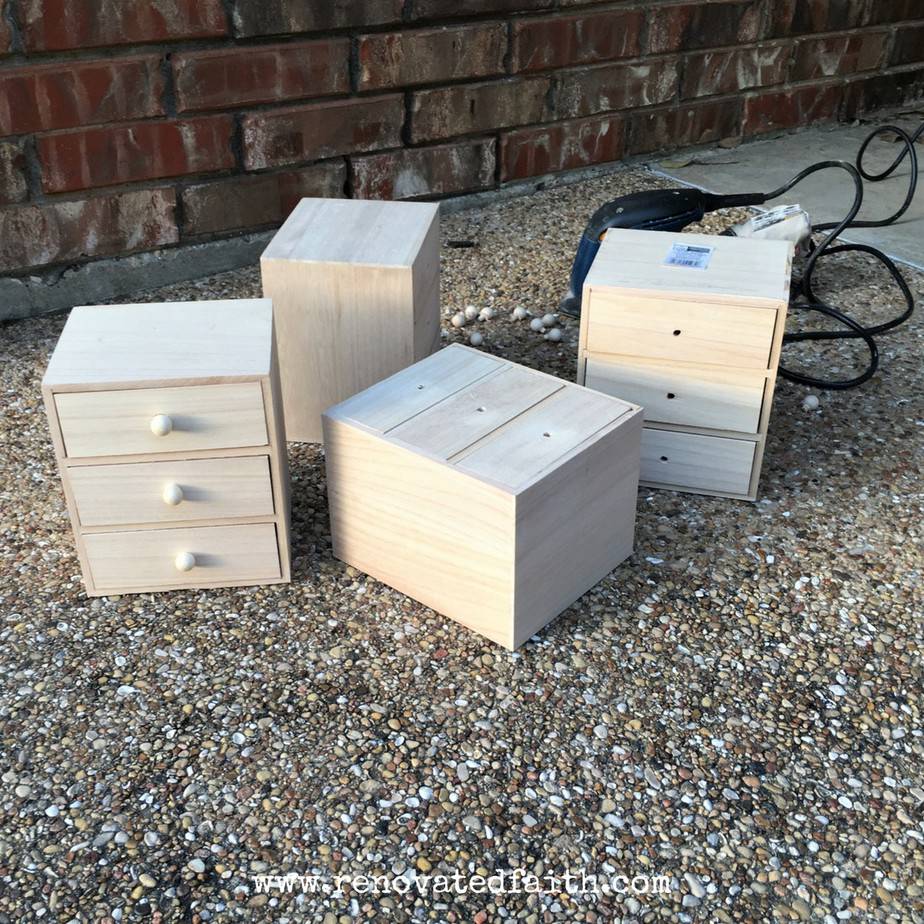
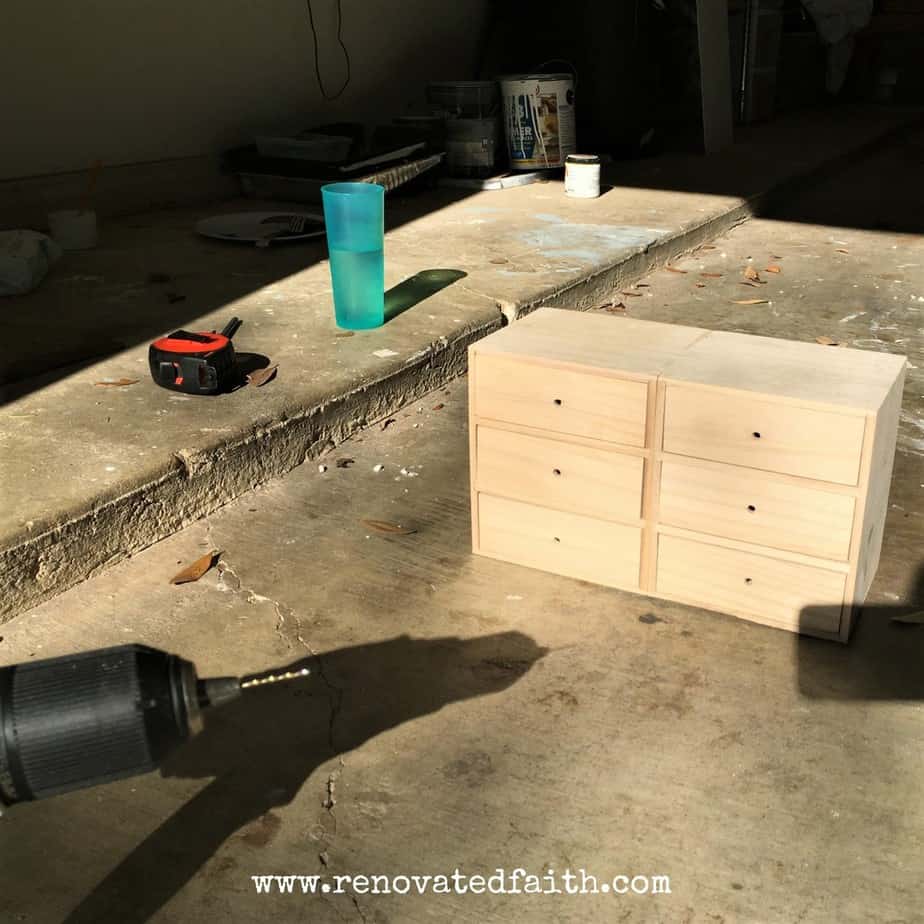
I bought two for each side and glued them together with the carpenter’s glue and clamped them overnight to dry. I also pulled off the wooden drawer knobs, filled the holes, and then made holes for some cute pulls.
Make your holes before you paint because you don’t want to risk screwing up the final finish. I then glued the drawers onto the inside of the desk using wax paper to ensure the glue didn’t seep onto the desktop.
Step 4: How to Paint a Roll Top Desk
Before you get started painting, wipe off any sanding dust with a damp cloth.
I started painting the desk with the yellowish base coat on the places I would faux stain and used white on the rest. It took a couple of coats of white paint because the desk was so dark.
I like to use a roller for flat surfaces and brush for detail areas. For the drawers, I just painted the drawer fronts and about and a few inches down the sides of the drawers.
The entire piece took 3 coats of paint because it takes more paint to get full coverage using white paint on dark furniture pieces.
What is the Best Paint for Furniture?
After testing over two dozen brands of paint for furniture including Annie Sloan chalk paint, Miss Mustard Seed Milk Paint, and several professional brands, I found that Benjamin Moore Advance gave me the most durable surface that showed the least amount of brush strokes. I like to use a satin finish on my furniture projects. You can see the full results here: The Best Paint for Furniture
What Kind of Paint Should I use on the Top of My Desk?
For the top of the desk, I used a gel stain to give me the look of wood grain using this process here: Faux Stain with Gel Stain
Step 5: How to Refinish a Roll Top Desk with Gel Stain
I used the same process on this desk as I did with the end tables in my post How To Gel Stain Wood Here is a pic of the first coat of gel stain. You want to leave some sections only partly covered in the first coat to make the second coat a little more translucent and “wood-grain-like” in those parts.
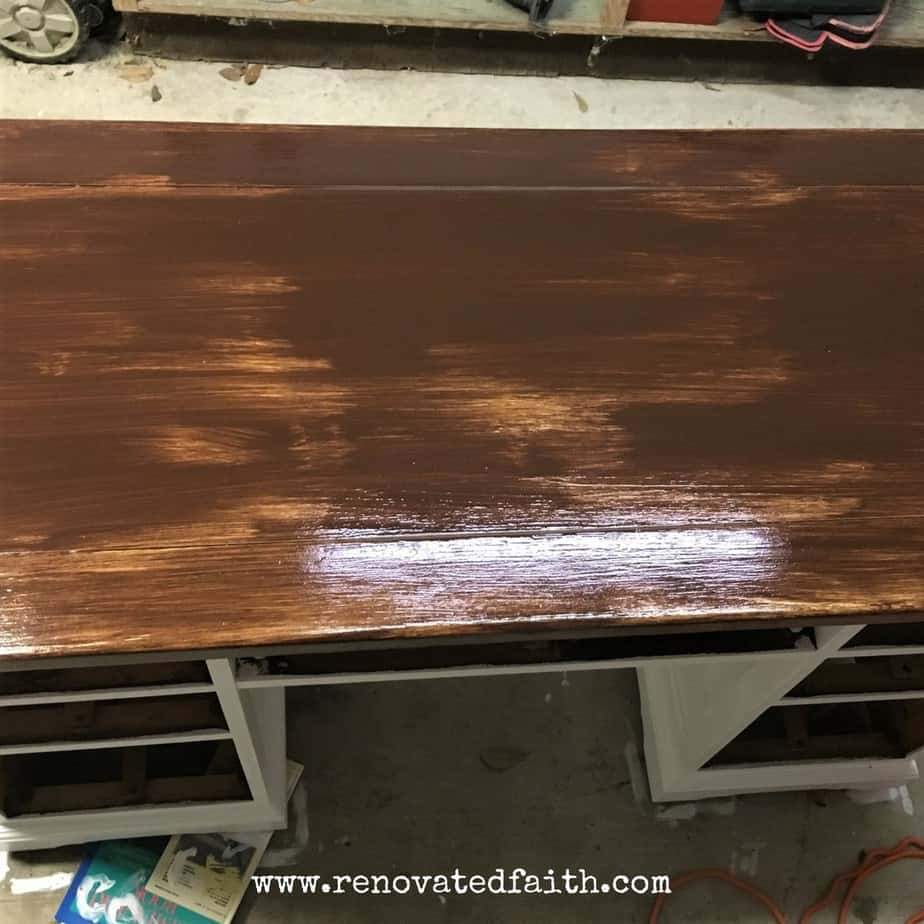
Back to the tambour…While I let each coat of gel stain dry for at least 24 hours, I laid the tambour flat on the concrete and added a thin coat of white. Again brush off any excess. It was still a little streaky at this point but you will touch that up toward the end
After the second and final gel stain coat, I added a coat of wipe-on polyurethane to the stained parts. The nice thing about latex paint and polyurethane is that you know that in 10 years the finish will look the same and be just as durable. Both finishes provide a clean, wipeable surface that will not hold dirt easily.
I have a friend that did her entire kitchen cabinets in chalk paint and wax. They looked fantastic but after only 6 months they looked awful because the porosity of the chalk paint held on to every speck of dirt and dust in her kitchen. She ended up redoing them in latex shortly after. (Getting off my soapbox now…)
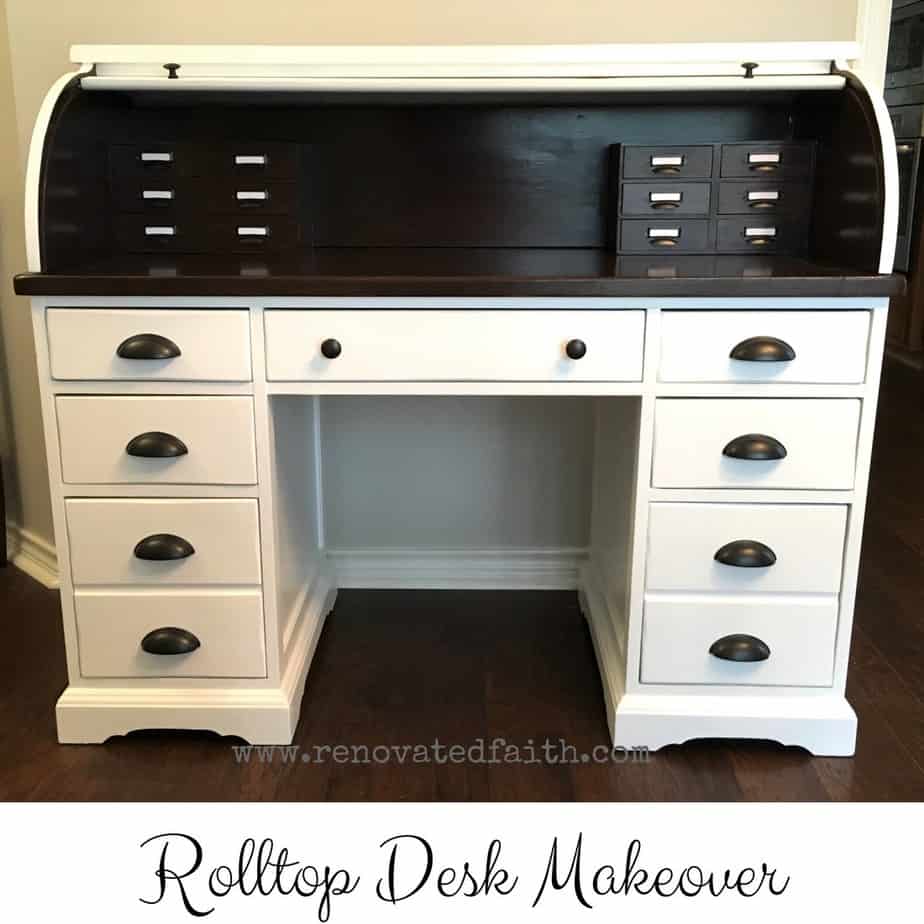
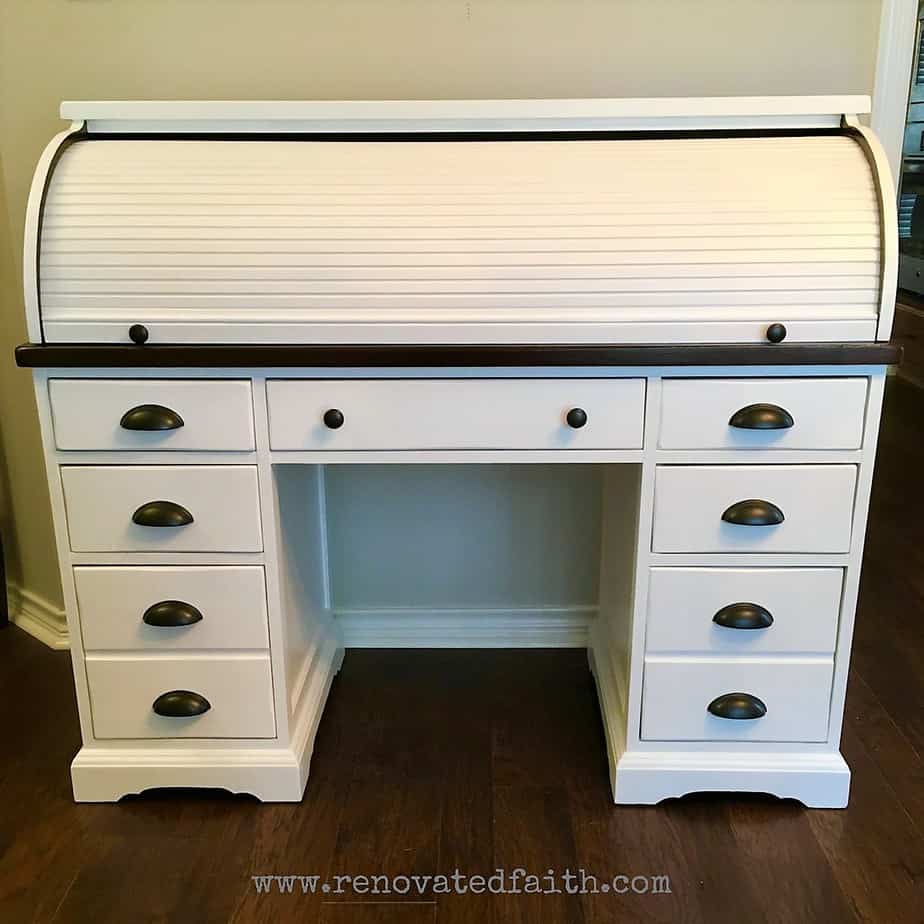
Step 6: Assembling the Refinished Roll Top Desk
After touching up the tambour one last time, the final step is to put the desk together including the main drawers, the top, and the tiny drawers. I also added new hardware to the whole desk including ‘card catalog’ style drawer pulls to the top drawers. Didn’t they turn out cute?

Notice the concrete floors in the background. We had a massive flood which I shared in my post Beauty From Chaos: How to Find Peace in Any Situation.
This desk was quite an undertaking but worth it to bring out the full potential of such a fabulous vintage piece. Thanks for stopping by and be sure to check out my other furniture transformations!
Faqs on Roll Top Desk Makeover Ideas:
What Era Are Roll Top Desks? When Did They Stop Making Roll Top Desks?
Roll top desks were a standard piece of office furniture after being introduced to England from France in the late eighteenth century. The hallmark of a rolltop desk is the tambor that slides over the desk’s workspace. They fell out of production in the early 1900’s when steel and glass desks became more popular.
Are Roll Top Desks Out of Style?
Roll top desks never go out of style because they are an antique that can be painted or updated to fit in with any style genre. This style of desk is a rare find today and their unique tambor is a novelty, which adds so much character and makes them a welcome addition to any modern design space.
What is the Point of a Roll Top Desk?
“A place for everything and everything in it’s place” was the motto when roll top desks were being produced in mass quantities. Their main purpose was to aid in correspondence with small spaces for storate that could contain stamps, envelopes, business cards, and any other small office supplies. The tambor allowed for extra privacy as most could be locked to enclose the work surface.
Can you Chalk Paint a Roll Top Desk?
After testing over 2 dozen different brands of furniture, chalk paint showed itself to be the least durable that also showed the most brush strokes. Because a solid oak roll top desk is quite a find, use the paint product that will give you the most longevity for your hard work in refinishing it. While products like Annie Sloan Chalk Paint are great if you want a distressed look, you can the results of my testing here: The Best Paint for Furniture
Can You Refinish a Table Top Without Stripping?
You can absolutely refinish a roll-top desk without stripping by very lightly sanding the surface and priming. This will actually result in a more durable and smoother surface on your refinished roll-top desk!
Related Blog Posts to the Rolltop Desk Makeover:
Agreeable Gray Color Review (My Favorite Living Room Paint Color!)
Easy Home Office Space Decor Tips for Any Budget
How to Build a Dining Room Table You Will Love!
A Great Way to Paint Any Furniture to Look Like Real Wood
Coffee Table Reveal and a Word About Transparency
The Best White Cabinet Color for Your Kitchen’s Color Palette
Made Over, Inside and Out – China Cabinet Transformation
How to Add a DIY Floating Desk To Any Closet
How to Sand Furniture with an Electric Sander in Less Than 5 Minutes
Final Thoughts on My Antique Roll Top Desk Makeover
Now that you have completed the whole process, you can transform any roll top desk antique from an old unwanted desk on the side of the road to a gorgeous finished desk you can be proud of. This desk went to a young couple that just got married. He wanted to surprise his new wife with a “new desk” for their new home.
Painted Rolltop Desk Makeover

Karin Peters is a DIY expert and the creator of Renovated Faith. She is a furniture painter, a home design consultant, and a tenacious problem solver determined to help you transform your house into a home. With 17 years of experience with DIY home improvement, she researches and analyses professional processes to adapt them to be easy and cost-effective for DIYers. She then tests every project and product before it appears on the site in a detailed, step-by-step format. After attending Texas A&M University, she received her Master of Divinity with Biblical Languages at Southwestern Baptist Theology Seminary. Her passions unite in Renovated Faith, which shows readers how to create a home that serves them so they can pursue their God-given purposes. About Renovated Faith | Editorial Policy | Facebook | Twitter | LinkedIn
Hi, awesome work and thank you for the step by step. Where did you find the unfinished jewelry boxes ?
Thanks Mike! I got them at Michael’s. Check hobbylobby.com and Amazon as well.
I think that looks great! I just re-did one similar but I am not loving mine. I cant figure out what I need to do to take it up a notch. Would love your opinion and maybe a suggestion? 🙂
Can you send me a pic to my email? karin@renovatedfaith.com
Hi Karin,
I came across your project here because I am currently doing a repair and makeover on a rolltop desk that belongs to my wife that she received when her grandpa passed, who had also been the one to build the desk. This desk means alot to my wife so I have searched the internet for tips on the best way to do the makeover. I already know what colors I’m going to paint the desk (White with Black accents and the desktop Black), and I already have it all disassembled. The legs are beat and broke from being in a tornado and I am about to place new legs on and sand it all down. Ok… now that the back story is all finished here is my question… in your step by step process you had brushed primer on the tambor as it lay over a round trash can to get in between the slats. But.. during your painting step you had it laid flat. Did you not paint in between the slats? If not what did you do? if you did how did you do it in a way that it wont stick or be an issue? I don’t want this to be an issue when i get to that step and wanted to ask before i get that far. Any help or tips for this process is appreciated.
Thank you, Jeff in Missouri
I can’t remember if I painted it in the tambour or laid flat but either way, I know I made sure it was stretched out. Also, when I painted it, I did a thin coat of paint so that there wouldn’t be any cracking later on. I hope this helps. Let me know if you have more questions. Thanks Jeff!
I have a large roll over desk from the 80’s, one of our big expenses when my husband started in corporate world. Now is time to update it and I’m a bit ( well worried) that could too big of a project for me… I’m in my 70’s and during the pandemic I did all my bedroom set, coffee table and a TV old corner hutch.
Somehow I kept delaying the desk, I guess the tambour is daunting ( how to remove , will it go back to roll ??) . Also is there a picture diary when doing this project ? I’m tempted to just sale it and do something simple..but the memories of this one are precious.
I can see the comments (Amanda Grimm) with the same concern but I don’t see a reply.
Thank you for using the your rehab passion with God’s perfect plan to restore us and not walking away from the daunting work of making us better !
Hey Sandra, Thank you so much for your kind comment. It is a big project but it is definitely something you can do in stages. You might see how hard it would be to access the tambour before starting the process. Send me pictures if you think that would help – karin@removatedfaith.com. Thanks Sandra!
I have a similar desk in my garage, I have been intimidated by the intricate details of the top, now you show how it can be done. Thank you!
Linda
So glad to hear this Linda! I’d love to see how it turns out.
Love the desk! Where did you get the card catalog drawer pulls for the mini drawers
Beautiful desk! I love the handles you used, can you share where you purchased them?
Hello, I have a desk almost EXACTLY like this one. It was my dad’s and I want to update it like this for my office. How did you get the top and tambor off without ruining it? Are there screws somewhere? Also, did you use spray paint or brush on paint for the main white portion? How did you keep paint out of the tambor rails?
Thanks
we have a roll top desk,but the inside of the top is canvas, is there a way to soften the canvas? we worry that rolling the top will crack the canvas
Great question! You might experience with adding Martha Stewart’s Fabric medium as I do in this post: https://renovatedfaith.com/acrylic-paint-on-fabric/
Hi, Thanks for this post. I have a roll top desk but I think it is just stained and has not top coat? If I open the draws thay are light wood and looks like someone just slapped stain on the outside. I can scratch the stain off easy with my fingernail. What do I do to make a good top coat? Thanks
Hey Danni – My favorite top coat is Varathane’s Water-based polyurethane. Just to be on the safe side, test the clear coat on the stain in an inconspicuous location to make sure it adheres well to the stain. Let me know if you have any other questions. Thanks! – Karin
I have this same exact desk except there are cubbies and two drawers where you put the jewelry boxes (great idea!). Love the white. Glad to know why you didn’t use chalk paint because I use my desk constantly and want the paint to not rub off. However I might keep the oak look for the writing part where I put my keyboard. You did a beautiful job.
Thank you so much Shirley! I appreciate your comment. I bet it would be pretty keeping the oak for the inside part.
I can’t seem to find any information on how to take the top off the desk. I want a flat desk to accommodate my laptop because the rolltop isn’t tall enough to keep my laptop open. How did you remove it?
We plan to store the top and put it back on when we’re ready to sell it. Thanks for your help.
You do beautiful work. You also have given me some courage to finish some of my projects. I did a table in chalk paint with wax over it and I do not like it. I would love to redo with a faux stain like you did on the top and white on bottom. How do I do that with wax already on the top? Maybe just chalk paint it again and then enamel paint over that? Love your website!
Yeah, you might just delete it for a time and see what you learn about yourself and any potential addiction. I have my facebook app back on my phone but the period of time I deleted it made me more aware of what tendencies are healthy and which aren’t. Thanks for reading Enid!
This is stunning! I love the step by step process! I would also love to have one of these desks!
I have a roll top desk if you are interested. We live in Seven Valleys, PA.
Wow! It’s gorgeous. I like the little boxes you added inside, too!
Selene
that desk looks absolutely amazing,i love the finish product
What a beautiful piece. I really enjoy looking at all the pictures of your makeovers. They are inspirational and make me want to refinish something.