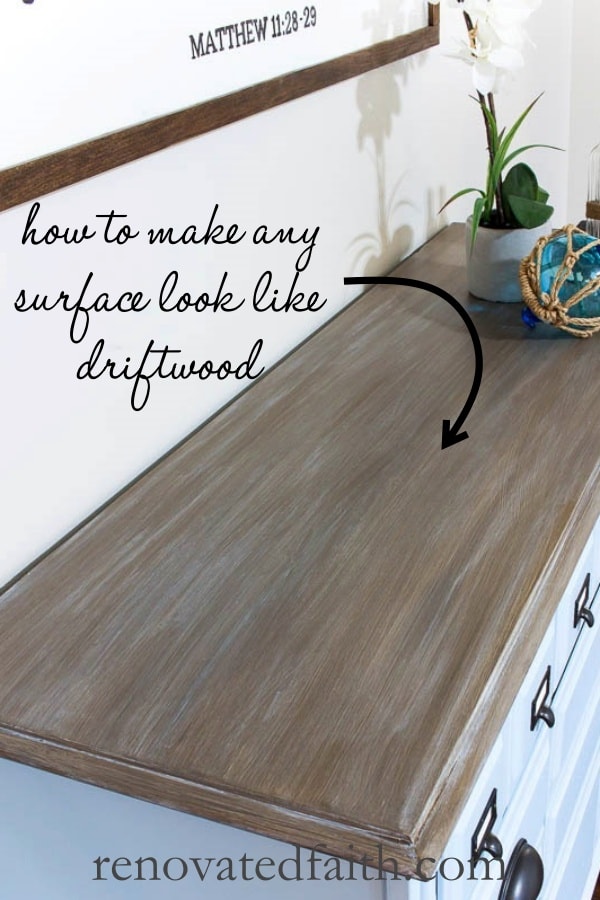
Easy Faux Driftwood Stain Finish with Paint (For ANY Surface!)
DIY Driftwood Paint Technique for Furniture
Getting a driftwood finish on furniture is easy with the right process! Here’s how to apply a driftwood stain with latex paint!
Ever wonder how to get the look of driftwood on your existing furniture? Many tutorials will show you how to get this weathered wood look on raw wood as a driftwood finish stain, but this process gives you the same look on ANY surface – even metal.
Do you love the weathered wood finish that you often see in Restoration Hardware or Pottery Barn? That dreamy finish is MUCH easier to replicate than you think!

Why This Faux Driftwood Paint Finish Is Better than a Driftwood Stain
Time and time again I’ve seen the same thing happen with traditional stain. I think it’s going to look one way and it never does. That’s because with traditional stain, it’s impossible to know how one coat of stain is going to look on raw wood.
Depending on how wet the wood is and the type, stains just absorb differently. That’s why I use faux stains for everything now. Your results are predictable every single time.
Also, with a faux stain, you have the luxury of being able to refinish a stained or painted piece of furniture without the hassle and mess of stripping. For a traditional stain, you have strip the piece down to the raw wood but with this faux finish you can just prime it and add the faux finish over the old stain.
More Faux Finish Options for Furniture
To see all my Faux Stain Shades, CLICK HERE.
Faux Driftwood Stain: DIY Tutorial
Reese Witherspoon once said, “My rule is: if it’s not moving, monogram it.” As a Southern girl myself, I definitely love her classy taste and desire to monogram ‘all the things’.
However, my own version of her quote would have a different spin: “My rule is: if it’s not moving, paint it!”

It’s true that some furniture in my house have been painted not once but twice or EVEN three different times. I’m not much of a pack-rat but I’m very sentimental about furniture for some reason.
Can You Paint Wood To Look Like Driftwood?
So what is driftwood finish? I’m sure you have noticed the driftwood or weathered wood finish on the pages of your latest Restoration Hardware or Pottery Barn catalog. Often times their stained furniture looks like distressed beach wood and goes well with farmhouse and coastal home decor. See my DIY farmhouse home decor here.
After some trial and error, I’ve figured out how to paint a driftwood finish on any surface, not just raw wood. In other words, whether it’s a dark stained coffee table, a laminate desk or a painted dresser, you can get a Restoration Hardware stain – DIY version!
Also, If you read my post Why I Don’t Use Chalk Paint, I’m a big fan of using good, old latex on furniture. You could probably get a driftwood finish with chalk paint but latex has been around for decades and I’m convinced you can get a more durable faux driftwood finish with less hassle and pay much less.
Supply List: How to Create a Faux Driftwood Paint Finish
MY FAVORITE PRODUCTS – CLICK HERE FOR MY TRIED AND TRUE BRANDS OF FURNITURE PAINTING PRODUCTS
Satin Latex Paint in Valspar Coastal Villa at Lowe’s*
Satin Latex in Sherwin Williams Van Dyke Brown at Lowe’s*
Valspar Clear Mixing Glaze at Lowe’s – I’ve tried others and this is the best.
Brushes
Zinsser Cover Stain Primer – I prefer this primer for faux finishes.
Sample Container of White Latex Paint*
Baby wipes (I recommend Huggies Natural Care)
Top Coat – Varathane Water-Based Polyurethane
Don’t forget to download my Best Furniture Painting Tips and Tricks Printable for FREE HERE.
*Cost-saving tip: If you are doing a small piece of furniture or just the top of a piece, you can get the sample sizes of these colors.

How to Apply a Faux Driftwood Stain With Paint
Before you get started it’s good to have a goal or look in mind. Here are some driftwood finish furniture inspiration so in case you want to refer back to it during the process.
Does your furniture piece have any damage like holes, deep scratches or chipped drawers? Then, read this post for an easy fix: The Ultimate Guide to Fix Furniture Damage
1. Prep Work for Your DIY Driftwood Stain
Stop! Before you do anything…take a before pic. When you are done, post the before and after pics here, so I can see the amazing work you’ve done! ❤️
I‘m a big proponent of sanding and priming furniture before painting because you want to make sure that your base coat sticks to the surface now and for years to come. In my post How to Sand Furniture in Less Than 5 Minutes, I share about how to prep your furniture surface easily.
Remember you are not sanding off the old finish. Just take a few minutes to scuff up the existing surface so it absorbs the new paint. Then, wipe with a damp rag.
After sanding, paint over the surface with a primer like Zinsser Cover Stain. (To save a step, you could even have your primer tinted the same color as the base coat and skip the base coat altogether.) Let the primer dry for 24 hours.
At this point I also painted the rest of my dresser in Behr Sonata, a really nice light blue.

Step 2: Apply a Base Coat for Your Driftwood Paint Finish
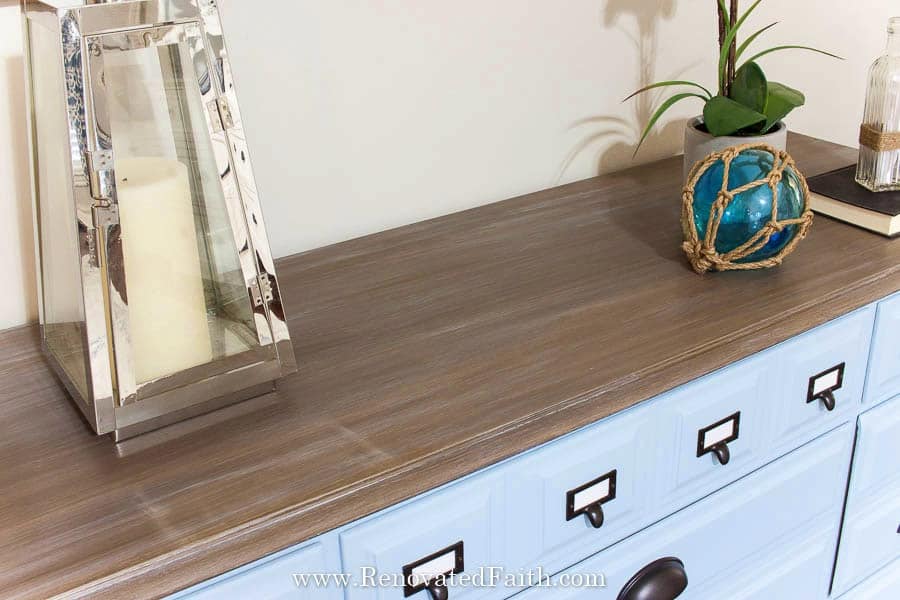
Perfect for a driftwood (weathered wood) finish, Valspar (at Lowe’s) carries a color called Coastal Villa that we will use as our base coat. You can get it in the Valspar brand or Sherwin Williams brand but just make sure to get the color Coastal Villa.
Paint it over your furniture surface with a brush, not a roller. This is the one time we actually don’t mind seeing brush strokes because they will mimic the texture of wood grain. Be sure to brush in long strokes from one side to the other.
Step 3: How to Make Wood Look Like Driftwood with Paint and Glaze
After your base coat has dried (check the re-coat time on the can), you can add your ‘wood grain color’ by mixing a 1:1 ratio of the SW Van Dyke Brown color with the clear mixing glaze. Stir it well and then paint that mixture on your piece.
The mixing glaze helps it to stay wet longer but I wouldn’t waste a lot of time during this part. Paint this mixture on your piece in long strokes, not picking up your brush until AFTER you have reached the edge.
For the same technique, you can see the video above where I show you how to do a stained wood look with latex paint. The only difference with the driftwood finish is that you add the whitewash in the next step
Again, this glaze mixture will naturally have long streak marks from your brush and that gives it the look of wood grain. Just keep making brush strokes from left to right until you get the look you want. If it’s getting too dark. Wipe off your brush with a paper towel between strokes. Getting too light? Add a little more of your paint/glaze mixture.
You can really determine how dark or light you want your finish with this process.
Just keep brushing in long strokes and you will start to see the glaze mimic the look of wood grains like in the picture below. When you get the look you want (and it will look AMAZING!), decide you are done with this part, and don’t touch it again until it’s dry.
Let it dry at least 24 hours. (I actually had to refinish the top of this piece because I got a little cocky and thought I could do the glaze and whitewash in one day. When I went to do the whitewash, the glaze began to come up because it wasn’t completely dry. I knew better and won’t make that mistake again!)
At this point, it should kind of look like this picture below and where I would stop this process if I was doing my regular faux stain. But on to whitewashing for a driftwood look!

Step 4: Dry Brush – The Final Step for a Faux Driftwood Paint Finish
IMPORTANT – For this step, my instructions previously said to whitewash but because the chemicals in some baby wipes vary, a few readers had trouble with the baby wipes removing some of the brown layer. The best solution is to dry brush instead of whitewash. Don’t worry; you will get the SAME look but with a slightly different technique. Here’s how to dry brush for the last step:
Now that we have the look of wood grain, we want to add that smokey finish to get the beachy, weathered look.
We are going to use the clear mixing glaze a second time. Mix a 1:1 ratio of white paint to your clear mixing glaze and paint it all over the piece.
Get a couple paper plates. On one plate put about a tsp of your white paint/glaze mixture. Add a little bit of white paint to your brush. On the other paper plate, wipe off as much as the paint as you can.
Now brush the paint on in long strokes in the direction of the grain. If the streaks of paint are too white, use your finger to smudge it but be sure to go in the direction of the grain. Keep doing this until you add enough white to get the look you want.

Step 5: Protecting Your Faux Driftwood Paint Finish
It’s not completely necessary but I like to add a topcoat for added durability, especially if you are refinishing a piece that will get regular use. After my post The Best Clear Coat for Furniture, I found the best option is Varathane’s Water-based Topcoat (check the current price here). This topcoat is nice because it is water-based meaning it’s easier to clean up brushes and also has little odor. It also will not yellow like some top coats will over time.
Just paint the top coat on and check for drips after a few minutes. If this is a high-use furniture piece, I would do three coats of top coat. Fortunately, it goes on fast and dries fast.
To save time on your furniture project, be sure to check out my best painting tips. I promise you will be happy you did.
How to Make Wood Look Like Driftwood: Before and After
Now that you are done, I’d love to see how it turned out! ❤️ Post your before and after photos here!

What’s nice about this process is that it’s so versatile as it can be used on any surface including painted furniture, stained furniture, metal, etc. I have a friend who wanted to know how to make sticks look like driftwood for a “bouquet” on her mantel. She tried this process for sticks in her backyard and it worked!
You can also check out this post for the big reveal of this dresser. It went from a horrific, stinky mess to one of my absolute favorite furniture pieces so far! Here is the before picture. Click here to see how it turned out!

Be sure to save this pin so you can comment on it later with your before and after pics! Pin it here:

How To Faux Finish A Metal Door To Look Like Wood
Did you know you can use any faux stain on a metal or fiberglass door to make it look like its made out of real hardwood? To see how I painted my metal back door, click here: The Easy Way To Paint Any Door To Look Like Wood
How to Create a Driftwood Paint Finish – Related Posts:
- Faux Stain with Latex Paint
- How To Create A Bare Wood FInish (No Bleaching or Stripping Required!)
- How to Gel Stain Furniture
- How to Pick the Right Clear Coat for Furniture
- Why I Don’t Use Chalk Paint
- Must-Have Furniture Painting Checklist
- Easy DIY Farmhouse Coffee Table
- The Best Wood for Furniture Builds
- How to Paint Your Kitchen Cabinets Like A Pro
- The Best Wood For Table Tops
- The Best Tools for Wood Projects
☑️ My All-Time Best Furniture Painting Tips & Tricks (FREE PRINTABLE)
Don’t forget to download the FREE step-by-step printable checklist that shows you the entire process I’ve used on dozens of furniture pieces while saving you time and money!
Driftwood Paint Technique with Latex – FAQ’s:
What color is driftwood furniture?
Driftwood is any kind of weathered wood finish and it is often used in coastal decor. Driftwood can have more of a gray tone or a brown tone. If you want to have a brown or taupe undertone, don’t use very much of the whitewash finish. If you want a grayer tone, you can use more of the whitewash. The nice thing about this process is that it can be easily customized and if you get to much whitewash on the surface, you can simply wipe it off.
Can you do a driftwood finish with chalk paint?
You absolutely can do a driftwood finish with chalk paint. I like using latex because it is much cheaper but also because the texture of latex allows the glaze to glide over it easier giving the look of wood grains underneath the white wash. You can read more about why I don’t use chalk paint here: Why I Don’t Use Chalk Paint: A Better Alternative
How to Make Driftwood
You can use this same process to make driftwood for decor purposes. Just find some branches that are thick and your length of choice. Let them dry out well in your garage or a covered area. Then, use this same finish as described above. I would not use the glaze step on the ends, only on the areas where there would be bark. Here are some fun ideas for driftwood crafts: 15 Driftwood Craft Ideas
Driftwood stain for raw wood:
If you are wondering how to get a driftwood stain on maple, pine or oak, you’d follow the exact same process as described. However, I wouldn’t worry about primer with raw wood; just sand over it if you want a smooth surface.
How to Bleach Wood to Look Like Driftwood
Using bleach to get a driftwood finish on furniture isn’t the best option. Even with the best paint products, you can’t always be sure you will get the desired effect. With the faux effect with paint, you can get the look of different wood species over the entire piece. Also, you can get exceptional durability with my favorite clear coat and a foam brush. Using a concentrated formula of bleach is dangerous even when applied outside and it’s not exactly eco-friendly.
Some people use a spray bottle of water and white vinegar or washing soda to get a similar look of bleach but again, you don’t have a lot of control over getting your desired results. With faux stains, you can do a more silvery driftwood finish or a warmer weathered driftwood finish.
Final Thoughts – How TO Make Wood Look Like Driftwood
Whether you are refinishing a brand-new piece of unfinished wood or a 50-year-old stained antique, this process will never let you down. I love that it is so easy to get a gorgeous faux driftwood stain with the same results every time. Not only is it simple, but it’s also inexpensive and can be easily customized to whatever tone or shade of driftwood stain you want.
What are your thoughts, my friend? Do you have a project in mind that could use a faux driftwood stain? I would love to hear your thoughts and questions! Scroll down to leave a comment and I WILL reply! ❤️
Blessings,

Be sure to follow the fun here!
Email Subscription | Instagram | Pinterest | Facebook | Twitter
Quick Links to Information in this Post
- 1 DIY Driftwood Paint Technique for Furniture
- 2 Faux Driftwood Stain: DIY Tutorial
- 3 Supply List: How to Create a Faux Driftwood Paint Finish
- 4
- 5 How to Apply a Faux Driftwood Stain With Paint
- 6 How to Make Wood Look Like Driftwood: Before and After
- 7 How To Faux Finish A Metal Door To Look Like Wood
- 8 How to Create a Driftwood Paint Finish – Related Posts:
- 9 Driftwood Paint Technique with Latex – FAQ’s:
- 10 Final Thoughts – How TO Make Wood Look Like Driftwood
- 11 How to Make Wood Look Like Driftwood Stain
How to Make Wood Look Like Driftwood Stain

Karin Peters is a DIY expert and the creator of Renovated Faith. She is a furniture painter, a home design consultant, and a tenacious problem solver determined to help you transform your house into a home. With 17 years of experience with DIY home improvement, she researches and analyses professional processes to adapt them to be easy and cost-effective for DIYers. She then tests every project and product before it appears on the site in a detailed, step-by-step format. After attending Texas A&M University, she received her Master of Divinity with Biblical Languages at Southwestern Baptist Theology Seminary. Her passions unite in Renovated Faith, which shows readers how to create a home that serves them so they can pursue their God-given purposes. About Renovated Faith | Editorial Policy | Facebook | Twitter | LinkedIn
I just stumbled upon this on Pinterest and love it! I have an oval table and chairs that I bought 3 years ago to refinish and sell and still have done nothing with it. Now my daughter and son-in-law are needing a new dining table and chairs, but with a 5 year old and a new puppy, she said she’s not spending ANYTHING on furniture at the moment. Well…recently two of their four chairs broke.
The table I have is what I call the precursor to the farmhouse look. It has the original yellowish unfinished pine wood on the top with a coat of varnish. The chair seats are that color also.
The chunky table legs, chair legs, and backs of chairs are painted white from factory.
The walls in their home are light gray, with white trim. The floors are very dark wood, like mahogany or darker.
Do you think the weathered barnwood look for the top of table would look good? I’ve really struggled with what colors to use that would complement their home, but seeing the grays and browns in that color makes me think it would match the floors and walls both? And I think I would go over the existing white on table legs and chairs with a fresh coat of white. What do you think? Please…I need some help lol!
Thanks for any suggestions!!
Angie W.
All of the colors would work with the wall because they are technically neutral but I would go with a medium brown like the weathered barnwood so as to contrast with the dark floors. So, any in the medium brown or light brown range would work. I just put a new post on the blog on how to get a Restoration Hardware Finish if you are interested:https://renovatedfaith.com/the-secret-to-a-restoration-hardware-finish-on-any-furniture-surface/ Let me know if you have any other questions Angie!
Have you found that this holds up on a table top that gets lots of use? I’ve looked at this over and over the last couple of years, but I’ve never taken the plunge and painted my kitchen tabletop because I’ve been told not to do that. My pastor used to be a professional painter and he told me that this would chip and not hold up to the use that kitchen table tops get. I see lots of information about how to do this, but nothing on a follow up of how it held up.
All you people, and definitely Karin, how did this hold up two years later, five years later with constant use?
Karin,
Thank you SO much for all the color “recipes” and for being so detailed in your explanations. I was wondering if you had thought of what you would use to make a faux finish for the brown/gray stain that is so popular today. I will try to think of the name of the furniture finish used on those pieces, but for now, if you have any tips I’d appreciate it. I have tried using your technique and substituting SW black fox (which is more of a gray brown) for the browns in your barn wood recipe but it comes out way too dark. I-have tried various grays for the base coat, and even swapped the base and finish coats. I really love the SW black fox and have a gallon of it in BM a
advance furniture paint (which is amazing paint). I want to do this finish on a fireplace mantle and sliding barn doors for my pantry. Any advice would be appreciated!
Hey Suzanne, I have one that has more gray in it called Driftwood. You can see if that’s what you are looking for here: https://renovatedfaith.com/diy-driftwood-finish/ Let me know if you have any questions! – Karin
Hi Karin
I am looking forward to Trying this finish! Do you think it would work on wicker/rattan?
I don’t know if it would work on wicker as I have only used it on smooth surfaces. Let me know if you have any other questions Shelley!
I’m in the middle of doing this to old oak. I just did the base coat. I didn’t anticipate to be able to see the old grain so much through it! I don’t know if I should finish with the glaze stage. How is the graining going to work with the oak graining still visible?
Hey Beth, If some of the original color is showing through, that’s fine. But if you see more of the old color than the new color, I’d add another coat. It definitely won’t hurt. Let me know if you have any other questions.
Hello,
It is the blog that is beneficial information is DIY driftwood finish is great. thankyou for share this blog
Just finished my dining room table with your wonderful step-by-step directions. I am thrilled with the results!
I’m so glad to hear that Wendy! Send me a picture at Karin@renovatedfaith.com. Can’t wait to see!
I got my piece unevenly white washed… do I need to reapply the brown/clear wax mix over it then reapply the white/clear wax?! I love it otherwise.
Hey Brianne – That’s an easy fix. Once your last white-wash layer is dry, go back and add a little whitewash in the areas that you need more. Let that dry and then clear coat it again. Let me know if you have ANY other questions. – Karin
I would love to try this technique to update my dining table with a wooden pedestal and apron. Unfortunately, the top is laminate. Would you do anything differently to be sure the top would hold up to daily use?
Hi Kimarie, Yes, you can still do this process. The only thing I might change is to use an oil based primer like Zinsser Cover Stain because it does a little better job of helping the paint to stick to the laminate. Be sure to sand it before applying the primer to really rough up the top so it’s not slick. Let me know if you have any other questions! – Karin
Hi Karin – I appreciate your clear, concise tutorials. I find your site enjoyable & very useful . I checked & double-checked for a link to the hardware you used on the small drawers on your dresser but could not find anything. I hope I didn’t overlook the information. Would you mind helping me, please. Thank you!
Hey Audrey, Thank you so much for your sweet words. These are the pulls I ordered and then spray painted them with Rustoleum Universal Metallic’s Oil-Rubbed-Bronze: https://amzn.to/2YYuxmq Thanks and have a great day!
I’m really excited to give this a try on my living room log furniture set that has a lot of damage from kids and basset hound claws, I thought I’d have to strip it all down and restain. I wasn’t crazy about its honey color though, driftwood is more inline with my decorating taste (and maybe some of the damage would give it more driftwood character). So thanks for breaking this down to not be so scary looking! Just to be sure, as I read this elsewhere, if you sand it like you have here then you don’t need to do any chemical removing of varnish right?
That’s exactly right. If you sand it enough to rough up the surface and use a primer, you don’t have to use a chemical stripper. Thanks for your comment!
Exactly the information I needed for my sofa table! Thanks! Quick question, I have a friend who has a latex allergy that does frequent my home. Would the clear coat be enough to seal it from activating her allergy or in this case opt for the chalk paint? Thanks!
Yes, it should be enough to seal in the latex and encapsulate it. Also, I’m not sure if the latex in the paint is the same kind that people are allergic to. But if it is, the sealant should encapsulate it.
I’m using your technique to do a redo a bed frame. On the base coat in Coastal Villa, do you do a couple of coats of paint to completely cover or is that not necessary since we’ll be adding two more coats in other colors?
For the base coat, just do one coat. it’s perfectly fine if it is steaky and might even add to the look. Thanks Misty!
If I am not able to get Valspar Clear Mixing Glaze – is there another product you recommend?
Find some clear furniture glaze. The problem with some is that they are too thick so add some water in it if the consistency is thicker than say paint. You want the glaze/paint mixture to be a little watery. I hope this helps. Thanks Keely!
Hi Karen! I love your driftwood finish! Your furniture is gorgeous. I’ve followed your directions exactly – using the same brands and colors you recommend, letting each coat dry 48 hrs before the next step. I’m having a problem getting the paint to stick. Twice now when I get to the last step (the white glaze mix), wiping with a baby wipe causes alllll the layers to peel off – all that’s left is the primer! I am not wiping very hard so I’m not sure why the paint won’t stick. Any ideas? Help!
Thanks – Tiffany
I’m so very sorry Tiffany. I know that must be super frustrating. What primer did you use? You might try the Zinsser Cover Stain and sand a little before applying it. I wish I could come help you!!!
I’m trying to get this look on a coffee table I am refinishing. I’m wanting to do a two tone, different color for top and bottom. The top has already been stained with Bombay mahogany. How can I get this look on the top of table without stripping the stain? Thank you!
It’s funny you say that but I’m actually working on a post now for some different shades of faux stain. It will be out in a couple weeks. How soon are you wanting to redo your coffee table?
Well it’s been an ongoing process for about 2 months now. I’d love to finish it soon but I’m being patient because I want it to look right. I’m just curious if I can use some technique to paint over the stain the make it look like your weathered piece. I have a goal picture in mind if I could send to you.
You can add a little gray paint into the whitewash. That will make it overall a little grayer. You can practice on a piece of cardboard to make sure you are getting the look you want.
I want to do a dresser with 4 drawers , but I want to do the whole piece not just the top, should it all come out about the same? Have you ever used this technique on a whole piece or only the top? Also if I get the nerve to do this, I would like to add a transfer *for wood* on the front, would putting this transfer on ruin the paint job? I guess I would do the transfer right before the sealer. Your opinion would be appreciated.
Just to be on the safe side, I would do the clear coat, then do the transfer and one last layer of clear coat. Let me know if you have any other questions!
Hi! I love this project. I am going to try this technique on an old hutch I have in my kitchen. I cannot find the harvest brown paint color, could it have been discontinued, and if so, have you tried with another color? Also, before you painted the the blue, did you sand and prime, and is that a latex paint? Thanks
Any dark brown will work. And yes, before I painted the blue I sanded and primed. That color is Behr Sonata. Let me know if you have any other questions!
Hi! This is my very first time at a painting project. I’m going to attempt to pain my fireplace in driftwood finish. Love all you easy but detailed instructions. Just one questions – for a surround wooden fire place piece, do my strokes go down on the sides (because that the long side) and across (because that’s is the long side) on the top of the attached mantle or do I do the whole piece in strokes that go from side to side?
So glad you are going to be able to use this finish for your fireplace. I would go in whatever direction the wood grain goes. If you don’t like it when you first brush it on you can always rebrush, changing directions. Let me know if you have any other questions!
I am going to repaint my bathroom cabinet. Currently the top is a laminate and I love the idea of painting it because I do not want the hassle of removing double sinks and replacing it, but there will be water present. Do you have a recommendation for how to proceed?
Definitely use a top coat and do several layers. My favorite is Varathane’s Waterbased BUT since you are going to be using this on a counter with lots of contact with water go to a site called Crystalac. I believe they have an oil-based clear coat that is great for restaurant tables which are constantly being wiped. If you ask them, they will respond quickly and steer you in the right direction. So, use the the process I detail in this post and then just add what they recommend and ask how many coats. I’m sorry I’m not more help but they are more knowledgable than I am. Thanks Lorena!
Hi, Can this process be used on pine stair treads?
Hi Linda. It definitely can. I would just make sure to use a good clear coat to protect them. Here is what I have had the BEST luck with. https://renovatedfaith.com/clear-coat-for-furniture/