Easy Faux Driftwood Stain Finish with Paint (For ANY Surface!)
DIY Driftwood Paint Technique for Furniture
Getting a driftwood finish on furniture is easy with the right process! Here’s how to apply a driftwood stain with latex paint!
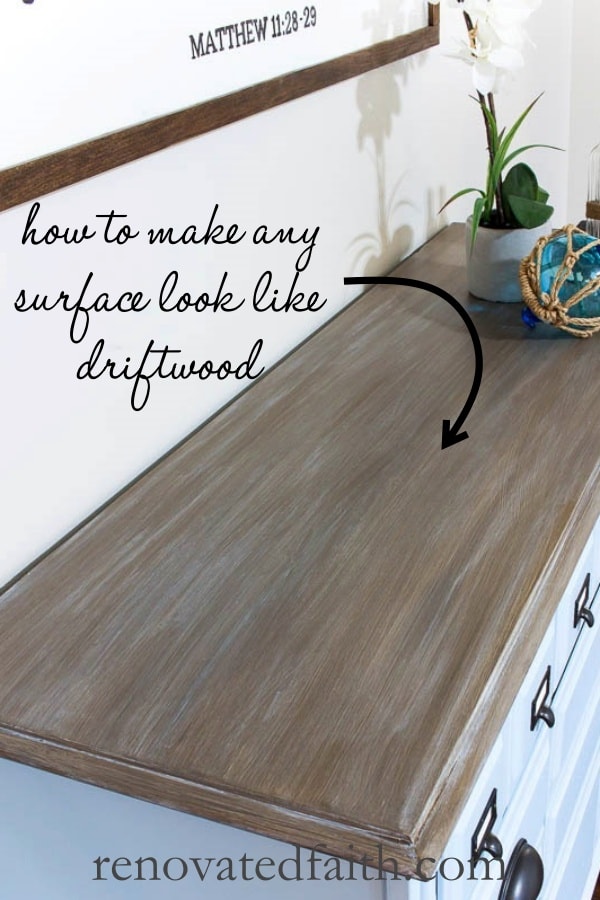
Ever wonder how to get the look of driftwood on your existing furniture? Many tutorials will show you how to get this weathered wood look on raw wood as a driftwood finish stain, but this process gives you the same look on ANY surface – even metal.
Do you love the weathered wood finish that you often see in Restoration Hardware or Pottery Barn? That dreamy finish is MUCH easier to replicate than you think!

Why This Faux Driftwood Paint Finish Is Better than a Driftwood Stain
Time and time again I’ve seen the same thing happen with traditional stain. I think it’s going to look one way and it never does. That’s because with traditional stain, it’s impossible to know how one coat of stain is going to look on raw wood.
Depending on how wet the wood is and the type, stains just absorb differently. That’s why I use faux stains for everything now. Your results are predictable every single time.
Also, with a faux stain, you have the luxury of being able to refinish a stained or painted piece of furniture without the hassle and mess of stripping. For a traditional stain, you have strip the piece down to the raw wood but with this faux finish you can just prime it and add the faux finish over the old stain.
More Faux Finish Options for Furniture
To see all my Faux Stain Shades, CLICK HERE.
Faux Driftwood Stain: DIY Tutorial
Reese Witherspoon once said, “My rule is: if it’s not moving, monogram it.” As a Southern girl myself, I definitely love her classy taste and desire to monogram ‘all the things’.
However, my own version of her quote would have a different spin: “My rule is: if it’s not moving, paint it!”

It’s true that some furniture in my house have been painted not once but twice or EVEN three different times. I’m not much of a pack-rat but I’m very sentimental about furniture for some reason.
Can You Paint Wood To Look Like Driftwood?
So what is driftwood finish? I’m sure you have noticed the driftwood or weathered wood finish on the pages of your latest Restoration Hardware or Pottery Barn catalog. Often times their stained furniture looks like distressed beach wood and goes well with farmhouse and coastal home decor. See my DIY farmhouse home decor here.
After some trial and error, I’ve figured out how to paint a driftwood finish on any surface, not just raw wood. In other words, whether it’s a dark stained coffee table, a laminate desk or a painted dresser, you can get a Restoration Hardware stain – DIY version!
Also, If you read my post Why I Don’t Use Chalk Paint, I’m a big fan of using good, old latex on furniture. You could probably get a driftwood finish with chalk paint but latex has been around for decades and I’m convinced you can get a more durable faux driftwood finish with less hassle and pay much less.
Supply List: How to Create a Faux Driftwood Paint Finish
MY FAVORITE PRODUCTS – CLICK HERE FOR MY TRIED AND TRUE BRANDS OF FURNITURE PAINTING PRODUCTS
Satin Latex Paint in Valspar Coastal Villa at Lowe’s*
Satin Latex in Sherwin Williams Van Dyke Brown at Lowe’s*
Valspar Clear Mixing Glaze at Lowe’s – I’ve tried others and this is the best.
Brushes
Zinsser Cover Stain Primer – I prefer this primer for faux finishes.
Sample Container of White Latex Paint*
Baby wipes (I recommend Huggies Natural Care)
Top Coat – Varathane Water-Based Polyurethane
Don’t forget to download my Best Furniture Painting Tips and Tricks Printable for FREE HERE.
*Cost-saving tip: If you are doing a small piece of furniture or just the top of a piece, you can get the sample sizes of these colors.

How to Apply a Faux Driftwood Stain With Paint
Before you get started it’s good to have a goal or look in mind. Here are some driftwood finish furniture inspiration so in case you want to refer back to it during the process.
Does your furniture piece have any damage like holes, deep scratches or chipped drawers? Then, read this post for an easy fix: The Ultimate Guide to Fix Furniture Damage
1. Prep Work for Your DIY Driftwood Stain
Stop! Before you do anything…take a before pic. When you are done, post the before and after pics here, so I can see the amazing work you’ve done! ❤️
I‘m a big proponent of sanding and priming furniture before painting because you want to make sure that your base coat sticks to the surface now and for years to come. In my post How to Sand Furniture in Less Than 5 Minutes, I share about how to prep your furniture surface easily.
Remember you are not sanding off the old finish. Just take a few minutes to scuff up the existing surface so it absorbs the new paint. Then, wipe with a damp rag.
After sanding, paint over the surface with a primer like Zinsser Cover Stain. (To save a step, you could even have your primer tinted the same color as the base coat and skip the base coat altogether.) Let the primer dry for 24 hours.
At this point I also painted the rest of my dresser in Behr Sonata, a really nice light blue.

Step 2: Apply a Base Coat for Your Driftwood Paint Finish
Perfect for a driftwood (weathered wood) finish, Valspar (at Lowe’s) carries a color called Coastal Villa that we will use as our base coat. You can get it in the Valspar brand or Sherwin Williams brand but just make sure to get the color Coastal Villa.
Paint it over your furniture surface with a brush, not a roller. This is the one time we actually don’t mind seeing brush strokes because they will mimic the texture of wood grain. Be sure to brush in long strokes from one side to the other.
Step 3: How to Make Wood Look Like Driftwood with Paint and Glaze
After your base coat has dried (check the re-coat time on the can), you can add your ‘wood grain color’ by mixing a 1:1 ratio of the SW Van Dyke Brown color with the clear mixing glaze. Stir it well and then paint that mixture on your piece.
The mixing glaze helps it to stay wet longer but I wouldn’t waste a lot of time during this part. Paint this mixture on your piece in long strokes, not picking up your brush until AFTER you have reached the edge.
For the same technique, you can see the video above where I show you how to do a stained wood look with latex paint. The only difference with the driftwood finish is that you add the whitewash in the next step
Again, this glaze mixture will naturally have long streak marks from your brush and that gives it the look of wood grain. Just keep making brush strokes from left to right until you get the look you want. If it’s getting too dark. Wipe off your brush with a paper towel between strokes. Getting too light? Add a little more of your paint/glaze mixture.
You can really determine how dark or light you want your finish with this process.
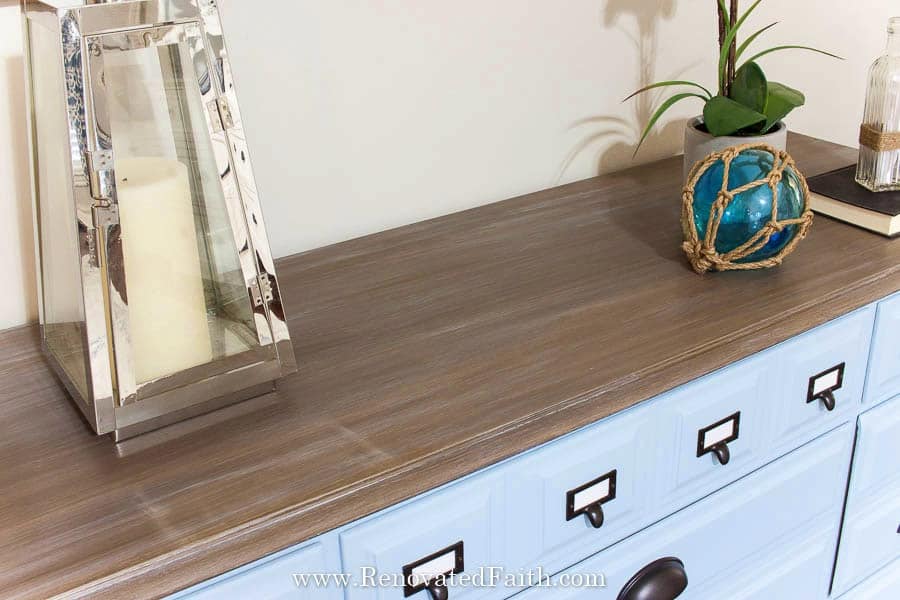
Just keep brushing in long strokes and you will start to see the glaze mimic the look of wood grains like in the picture below. When you get the look you want (and it will look AMAZING!), decide you are done with this part, and don’t touch it again until it’s dry.
Let it dry at least 24 hours. (I actually had to refinish the top of this piece because I got a little cocky and thought I could do the glaze and whitewash in one day. When I went to do the whitewash, the glaze began to come up because it wasn’t completely dry. I knew better and won’t make that mistake again!)
At this point, it should kind of look like this picture below and where I would stop this process if I was doing my regular faux stain. But on to whitewashing for a driftwood look!

Step 4: Dry Brush – The Final Step for a Faux Driftwood Paint Finish
IMPORTANT – For this step, my instructions previously said to whitewash but because the chemicals in some baby wipes vary, a few readers had trouble with the baby wipes removing some of the brown layer. The best solution is to dry brush instead of whitewash. Don’t worry; you will get the SAME look but with a slightly different technique. Here’s how to dry brush for the last step:
Now that we have the look of wood grain, we want to add that smokey finish to get the beachy, weathered look.
We are going to use the clear mixing glaze a second time. Mix a 1:1 ratio of white paint to your clear mixing glaze and paint it all over the piece.
Get a couple paper plates. On one plate put about a tsp of your white paint/glaze mixture. Add a little bit of white paint to your brush. On the other paper plate, wipe off as much as the paint as you can.
Now brush the paint on in long strokes in the direction of the grain. If the streaks of paint are too white, use your finger to smudge it but be sure to go in the direction of the grain. Keep doing this until you add enough white to get the look you want.

Step 5: Protecting Your Faux Driftwood Paint Finish
It’s not completely necessary but I like to add a topcoat for added durability, especially if you are refinishing a piece that will get regular use. After my post The Best Clear Coat for Furniture, I found the best option is Varathane’s Water-based Topcoat (check the current price here). This topcoat is nice because it is water-based meaning it’s easier to clean up brushes and also has little odor. It also will not yellow like some top coats will over time.
Just paint the top coat on and check for drips after a few minutes. If this is a high-use furniture piece, I would do three coats of top coat. Fortunately, it goes on fast and dries fast.
To save time on your furniture project, be sure to check out my best painting tips. I promise you will be happy you did.
How to Make Wood Look Like Driftwood: Before and After
Now that you are done, I’d love to see how it turned out! ❤️ Post your before and after photos here!

What’s nice about this process is that it’s so versatile as it can be used on any surface including painted furniture, stained furniture, metal, etc. I have a friend who wanted to know how to make sticks look like driftwood for a “bouquet” on her mantel. She tried this process for sticks in her backyard and it worked!
You can also check out this post for the big reveal of this dresser. It went from a horrific, stinky mess to one of my absolute favorite furniture pieces so far! Here is the before picture. Click here to see how it turned out!

Be sure to save this pin so you can comment on it later with your before and after pics! Pin it here:

How To Faux Finish A Metal Door To Look Like Wood
Did you know you can use any faux stain on a metal or fiberglass door to make it look like its made out of real hardwood? To see how I painted my metal back door, click here: The Easy Way To Paint Any Door To Look Like Wood
How to Create a Driftwood Paint Finish – Related Posts:
- Faux Stain with Latex Paint
- How To Create A Bare Wood FInish (No Bleaching or Stripping Required!)
- How to Gel Stain Furniture
- How to Pick the Right Clear Coat for Furniture
- Why I Don’t Use Chalk Paint
- Must-Have Furniture Painting Checklist
- Easy DIY Farmhouse Coffee Table
- The Best Wood for Furniture Builds
- How to Paint Your Kitchen Cabinets Like A Pro
- The Best Wood For Table Tops
- The Best Tools for Wood Projects
☑️ My All-Time Best Furniture Painting Tips & Tricks (FREE PRINTABLE)
Don’t forget to download the FREE step-by-step printable checklist that shows you the entire process I’ve used on dozens of furniture pieces while saving you time and money!
Driftwood Paint Technique with Latex – FAQ’s:
What color is driftwood furniture?
Driftwood is any kind of weathered wood finish and it is often used in coastal decor. Driftwood can have more of a gray tone or a brown tone. If you want to have a brown or taupe undertone, don’t use very much of the whitewash finish. If you want a grayer tone, you can use more of the whitewash. The nice thing about this process is that it can be easily customized and if you get to much whitewash on the surface, you can simply wipe it off.
Can you do a driftwood finish with chalk paint?
You absolutely can do a driftwood finish with chalk paint. I like using latex because it is much cheaper but also because the texture of latex allows the glaze to glide over it easier giving the look of wood grains underneath the white wash. You can read more about why I don’t use chalk paint here: Why I Don’t Use Chalk Paint: A Better Alternative
How to Make Driftwood
You can use this same process to make driftwood for decor purposes. Just find some branches that are thick and your length of choice. Let them dry out well in your garage or a covered area. Then, use this same finish as described above. I would not use the glaze step on the ends, only on the areas where there would be bark. Here are some fun ideas for driftwood crafts: 15 Driftwood Craft Ideas
Driftwood stain for raw wood:
If you are wondering how to get a driftwood stain on maple, pine or oak, you’d follow the exact same process as described. However, I wouldn’t worry about primer with raw wood; just sand over it if you want a smooth surface.
How to Bleach Wood to Look Like Driftwood
Using bleach to get a driftwood finish on furniture isn’t the best option. Even with the best paint products, you can’t always be sure you will get the desired effect. With the faux effect with paint, you can get the look of different wood species over the entire piece. Also, you can get exceptional durability with my favorite clear coat and a foam brush. Using a concentrated formula of bleach is dangerous even when applied outside and it’s not exactly eco-friendly.
Some people use a spray bottle of water and white vinegar or washing soda to get a similar look of bleach but again, you don’t have a lot of control over getting your desired results. With faux stains, you can do a more silvery driftwood finish or a warmer weathered driftwood finish.
Final Thoughts – How TO Make Wood Look Like Driftwood
Whether you are refinishing a brand-new piece of unfinished wood or a 50-year-old stained antique, this process will never let you down. I love that it is so easy to get a gorgeous faux driftwood stain with the same results every time. Not only is it simple, but it’s also inexpensive and can be easily customized to whatever tone or shade of driftwood stain you want.
What are your thoughts, my friend? Do you have a project in mind that could use a faux driftwood stain? I would love to hear your thoughts and questions! Scroll down to leave a comment and I WILL reply! ❤️
Blessings,

Be sure to follow the fun here!
Email Subscription | Instagram | Pinterest | Facebook | Twitter
Quick Links to Information in this Post
- 1 DIY Driftwood Paint Technique for Furniture
- 2 Faux Driftwood Stain: DIY Tutorial
- 3 Supply List: How to Create a Faux Driftwood Paint Finish
- 4
- 5 How to Apply a Faux Driftwood Stain With Paint
- 6 How to Make Wood Look Like Driftwood: Before and After
- 7 How To Faux Finish A Metal Door To Look Like Wood
- 8 How to Create a Driftwood Paint Finish – Related Posts:
- 9 Driftwood Paint Technique with Latex – FAQ’s:
- 10 Final Thoughts – How TO Make Wood Look Like Driftwood
- 11 How to Make Wood Look Like Driftwood Stain
How to Make Wood Look Like Driftwood Stain

Karin Peters is a DIY expert and the creator of Renovated Faith. She is a furniture painter, a home design consultant, and a tenacious problem solver determined to help you transform your house into a home. With 17 years of experience with DIY home improvement, she researches and analyses professional processes to adapt them to be easy and cost-effective for DIYers. She then tests every project and product before it appears on the site in a detailed, step-by-step format. After attending Texas A&M University, she received her Master of Divinity with Biblical Languages at Southwestern Baptist Theology Seminary. Her passions unite in Renovated Faith, which shows readers how to create a home that serves them so they can pursue their God-given purposes. About Renovated Faith | Editorial Policy | Facebook | Twitter | LinkedIn
Could I do this on brown paneling?
You sure could! You might get an old sample of paneling to practice on first just to make sure you like the look. But I think it would look great!
I’m thinking of painting my bedroom furniture this same color and doing the driftwood top. What color comforter/duvet color would you use with it? I was thinking blue but I’m not sure if it would be too much. What’s your opinion?
I think any color would work because the driftwood finish is almost a neutral. I think blue would look great Beverly!
Karin,
I am wanting to use this technique on floating shelves
I made. In the FAQ, you said that this can be done one new wood and that the primer step could be skipped. These shelves are pine and I am concerned that without a primer the wood will really soak up the paint and that the paint won’t adhere to the wood.
I look forward to your reply.
Thanks for such a great color and easy to follow tutorial.
Jocee
Great question. You can skip the primer step although it wouldn’t hurt anything. But I think for pine it is an unnessesary step since the base coat will adhere to the bare wood. Thanks Jocee!
in step 3 are you using the shiny clear mixing glaze that is usually used as a topcoat? Then mix with paint in a 1:1 ratio.
Hi Ilene, The mixing glaze is different than the top coat. It is specifically for making paints thinner and also more workable. I mix it 1:1 with the paint and then do the separate top coat on top when it is all dry. Please let me know if you have any more questions.
Hi Karin. I love your driftwood dresser. I need to refinish an entire dark cherry stained bedroom set and I’m considering the faux driftwood. Is there a reason you only applied the faux finish to the top of the dresser? My set includes a queen headboard/footboard, chest, dresser, armoire and 2 nightstands. I’ve been looking for months trying to find a look I like. Would the faux driftwood be too much if I did it on all surfaces on all of the pieces? Any suggestions would be greatly appreciated.
I think it would be find to do on all surfaces. I just did the top because that was the look I was going for. I’d love to see a picture when you are done Diane!
do you have any links for painting kitchen cabinets
No but I will have a FULL post on that in January or February because I will be painting my kitchen cabinets! Thanks Brook!
New to your site and love the driftwood look! It definitely matches the coastal style I’m trying to achieve in my remodel. Would this technique work on brand new metal light fixtures that are already painted to “look like” wood but the color is too light and I want to darken it up a bit? Would I still start with the “sand and prime” step since they are new fixtures and the paint on the metal already has a wood-grain appearance?
I think it would definitely work Kari. Instead of priming with the primer I recommend in this post, I would use a spray-on primer. Rustoleum spray paints are great. That would save you some time and the paint will adhere better. Let me know if you have any other questions and I can’t wait to see how they turned out!
You did such a beautiful job!! I want to try this so badly but I’m nervous because I’ve never painted or stained piece of furniture before. Is this beginner friendly?
Hey Krystle, Thank you so much for stopping by! Yes, it is absolutely beginner friendly. There is a video in the post to help. And let me know if you have ANY questions! Let me know how it goes.
After reading this, I’m ready to try the technique on my dining chairs. However, the are mission style, and I’m really worried about doing the separate spindle like pieces that make up the back of the chair, especially where it attaches to the seat. Any pointers?
I think it would work find on mission style chairs but if you want to send me a pic I could give you a better idea. My email is karin@renovatedfaith.com. Thanks so much!
I’m wanting to try this on some patio pieces. Any advice/suggestions to try and adapt this to use exterior paints?
Great question. I haven’t personally used this on exterior furniture but I would use an exterior clear coat to seal it. Let me know how it turns out!
This was my first time painting furniture and I am obsessed with the weathered driftwood look so I took the plunge… although it was intimidating at first… I got my supplies as listed (colors were PERFECT, although I initially thought they may produce a look that was darker than I was seeking), then took it step by step… I am so glad I did, it is beautiful and I cannot believe I did it!! Thanks so much
Awww, this makes my day! Feel free to send me a pic at karin@renovatedfaith.com. So glad it turned out like you wanted. I know it looks great! – Karin
Hello, I recently spilled fingernail polish remover on my wood kitchen table!! I want to get it refinished but I am really concerned that the finish won’t match! Do you think this driftwood finish would hold up to everyday use on a kitchen table and chairs? I also have 3 small kids! So they aren’t really easy on it either.
Thanks, Tina
The durability of the finish all depends on the top coat. I have tested different top coats and my favorite is Varathane’s Waterbased Clear Coat (https://amzn.to/2nVWmNp). I would do at least 3 coats after the driftwood finish. It will hold up!
I’m confused. You say in (step 2?) paint gray, then it goes on to describe painting white….? I’m assuming paint gray then do whitewash..? I just want to be certain I understand correctly. Thanks
Yes exactly. You paint on the Coastal Villa gray color, let it dry, then do the brown glaze coat, let it dry, then do the whitewash. Let me know if you have anymore questions.
Hi Karin,
Absolutely beautiful!! New to painting/redoing furniture and after a month or so of reading/watching your tutorials I am feeling confident to do!!
I am not the best color picker so can you please tell me what “white” you used.
Thank you so much;
Sandy
Hey Sandy, I am so glad you are getting some extra confidence. The more projects you do the easier you get, I promise! I remember my sewing machine was in a box in the top of our closet for over a year before I got up the confidence to use it. Now I realize how easy it is – I’m no expert seamstress but I know enough to hem curtains and throw pillows. ANYWAY, if you get your paint at Home Depot, I like their pure white. It is their standard white and use it for every white furniture piece so when I need to do a touch up, it’s easy to know what color to touch it up with. Hope this helps and thank you for your comment!
I have a dining table that i refinished just recently but it doesn’t match our new chairs. The dining table is top coated with wipe on poly which gave it a brownish/Amber color. My chairs have gray weathered wood look. Do you think I could do the white paint+glaze right on top of the poly or does it need to be painted with a base color first? I also have a gray gel stain by general finishes. Do you think this technique could work with that if I add glaze to it? Your advice is appreciated:) Wish I could attach some pics.
The only way you will know is by testing an area. Can you do some testing on an inconspicious part – possibly on the underneath of the chair?
What sheen of white paint do you use to get the white wash look?
I used satin but you could also use matte. I don’t think it matters a whole lot because the glaze is mixed in and then you also cover it with a clear coat. Thanks for stopping by Kim!
Thank you for this post! I just did this with an end table and I LOVE it! Your directions were so easy to follow. It’s the first piece of furniture I’ve painted so I was quite nervous. However, it ended up being much easier than I first anticipated.
SO glad to hear that Kristin and thank you for sharing!!!
Hi ,
Can I use a different color than the harvest brown? I’m trying to go for more of a dark gray color.
Is the harvest brown a latex paint?
You can absolutely do a different color. This process is easy to customize! And yes, the harvest brown is latex.
Hi. What is the blue color you used in this piece? I have a dresser and would love to replicate this.
It is Behr Sonata Blue! I love the color and have used it on several pieces. Hope you like it too!
Karin, what finish is the Behr Sonata Blue? I am attempting your technique on a coffee table however want to do the base in white and curious about what type finish the paint should be. So many whites to choose from as well and open to a suggestion on that. Our house is a cottage/beach type theme and we live on the west coast of Canada near the ocean. Hardware on the table wold be in black. Thank you in advance!
The Sonata Blue is in a satin finish. Don’t hesitate to touch base if you have more questions! Thanks!!!
Hi Karin, I love your driftwood technique but I need a lighter drifwood. Gray tones with some beige/sand and just a hint of dark browns. Any suggestions you might be able to give me would be appreciated.
You can do this one of two ways Jeanne. You can add an extra layer of whitewash which is really easy to do. OR you can do a lighter, grayer base coat. Either way will work well! Best of luck and thanks for your comment.
Hi there, what a gorgeous piece!
When you listed SW Coastal Villa, did you mean to say that is Valspar’s Coastal Villa? (SW doesn’t list this color anywhere) – the Coastal Villa would be the underlay hue of the gray in driftwood, right?
Also, when you describe the glaze, you left out the ratio color – is it 1 part Harvest Brown with 2 parts Clear Glaze?
Lastly, do you feel an off-white would do as well as a bright white? (for the whitewash effect). I’m guessing a brighter white would give a piece a more fresh, crisp look?
I ask these questions because I absolutely love the combination colors you did for the driftwood look (along with the glaze I suspect is really easy to achieve this and can be added or reduced to whatever one wants!). I’ve seen a ton of DIY ‘recipes’, but the brown, in my opinion, really brings out the driftwood (as opposed to a tan or beig-y effect). For a first-timer doing a driftwood effect for some smaller pieces in my home, this combination just….fits my style 🙂
Such great questions! And yes, you are exactly right. I is actually Valspar’s color Coastal Villa that I got in a Sherwin Williams paint sample. Also, the ratio of glaze to harvest brown is 1:1. Thank you so much and yes, I think off-white would have a nice look also. Thanks for stopping by and I’d love to see pictures when you are done.