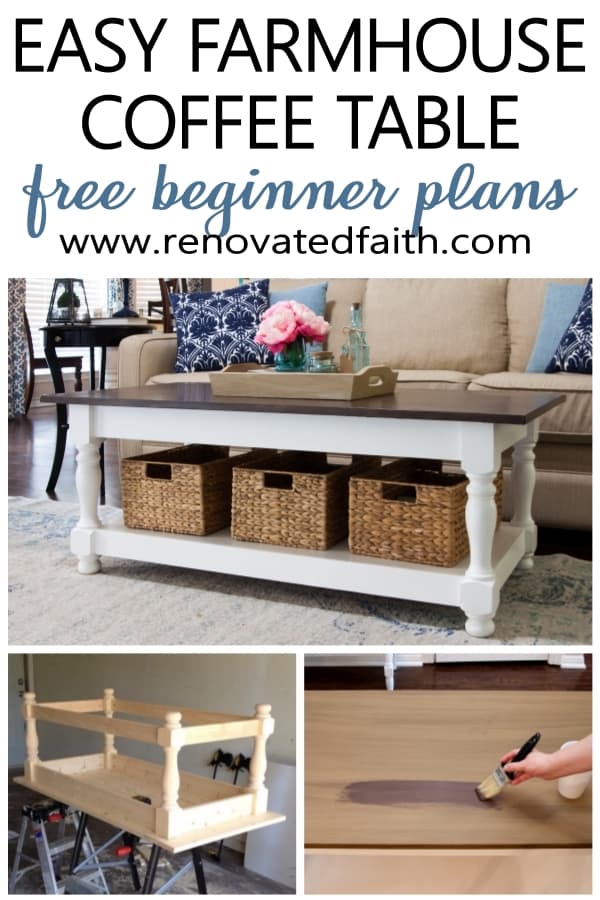
DIY Farmhouse Coffee Table with Turned Legs & Storage (Free Plans)
How to Build a Farmhouse Coffee Table with Storage
Quick Links to Information in this Post
- 1 How to Build a Farmhouse Coffee Table with Storage
- 2 How to Make an Easy DIY Coffee Table with Storage
- 3 RENOVATE YOUR FAITH: Comfort Through Trials
- 4
- 5 More Posts Related to DIY Farmhouse Coffee Table Plans:
- 6 DIY Farmhouse Coffee Table with Storage – Final Thoughts:
- 7 DIY Farmhouse Coffee Table Plans
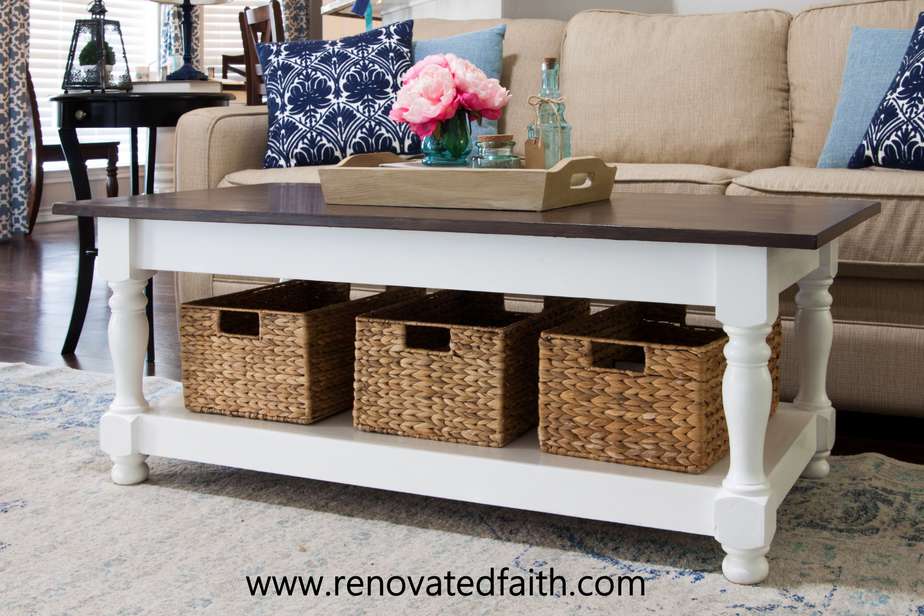
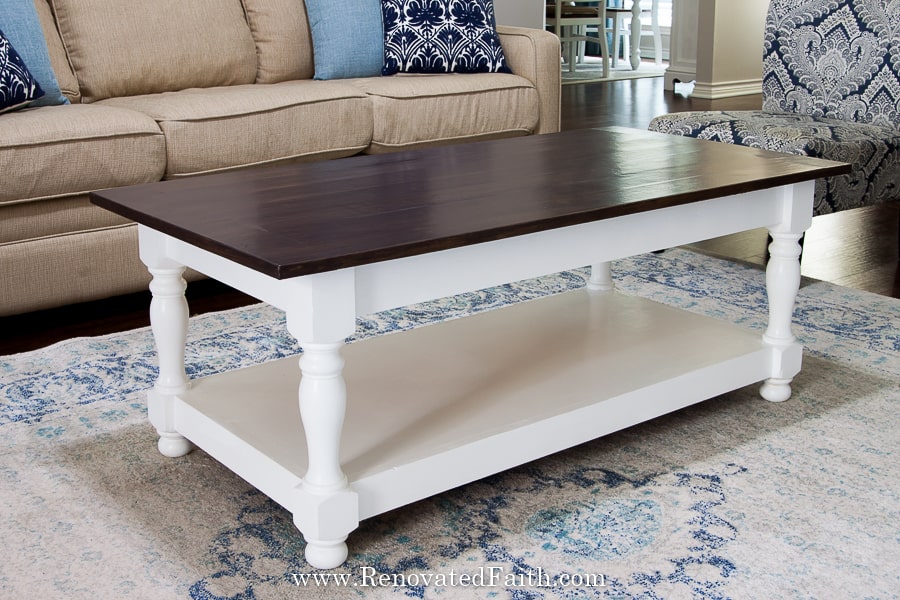
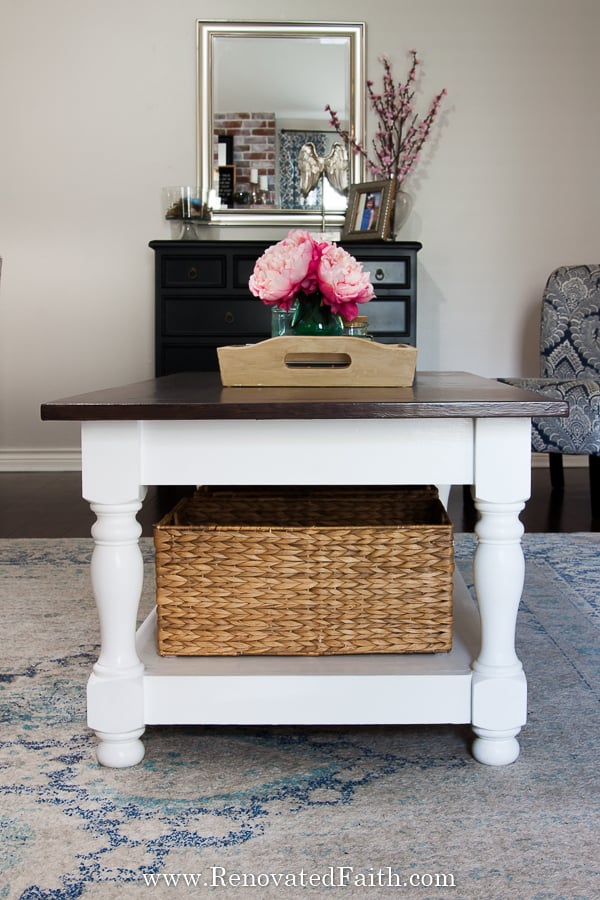
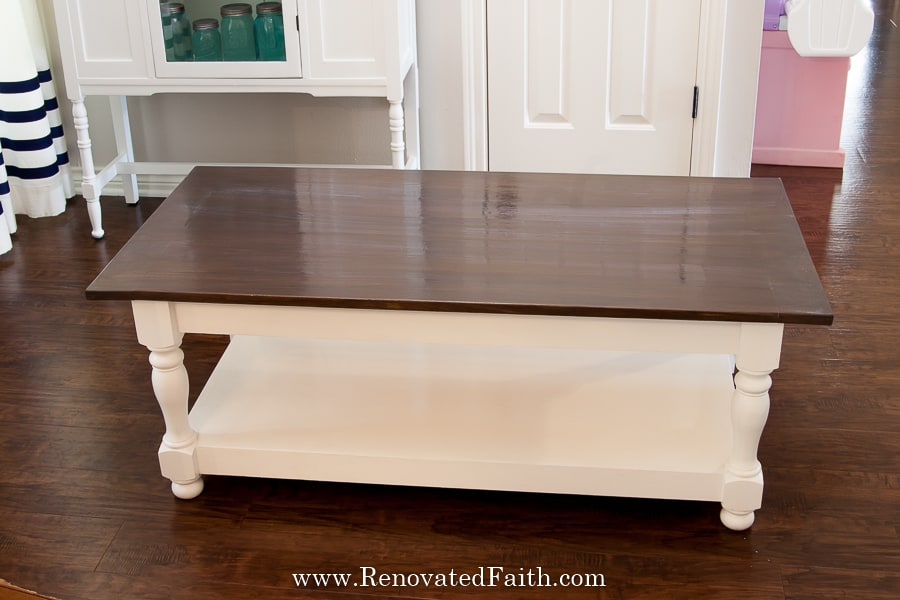
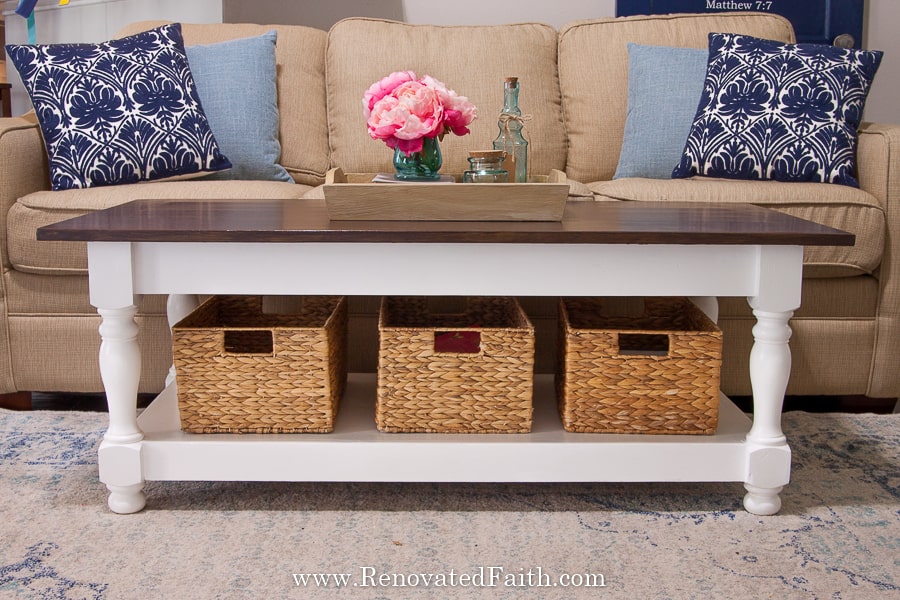
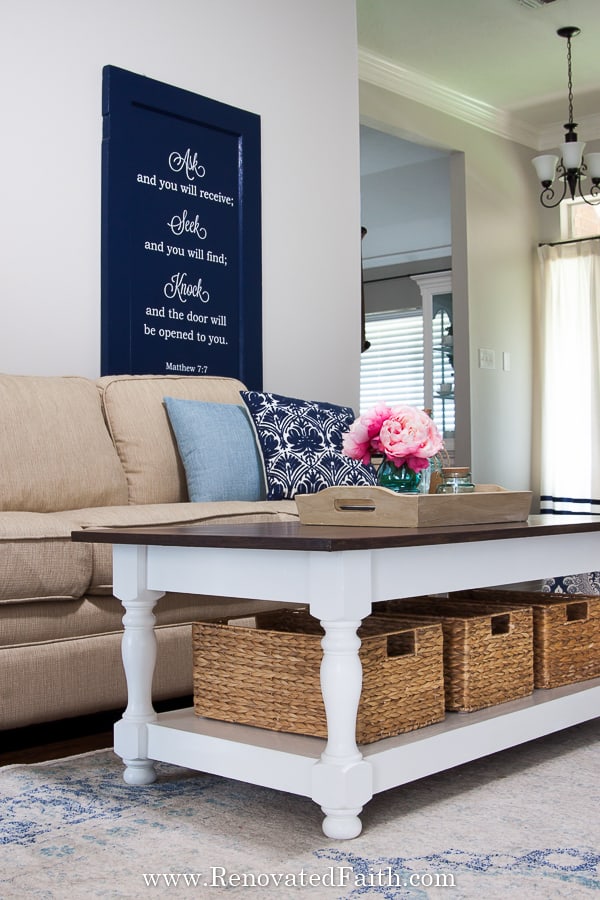
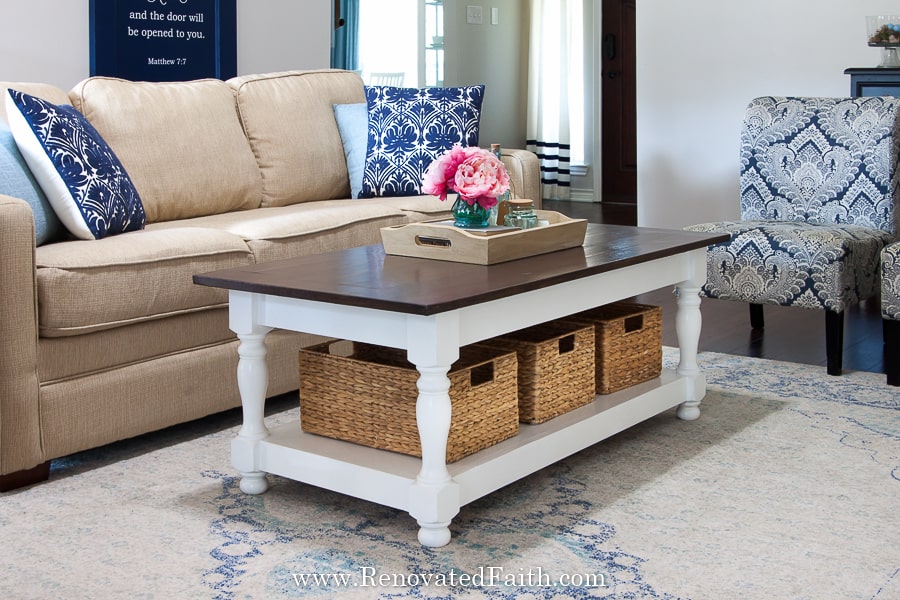
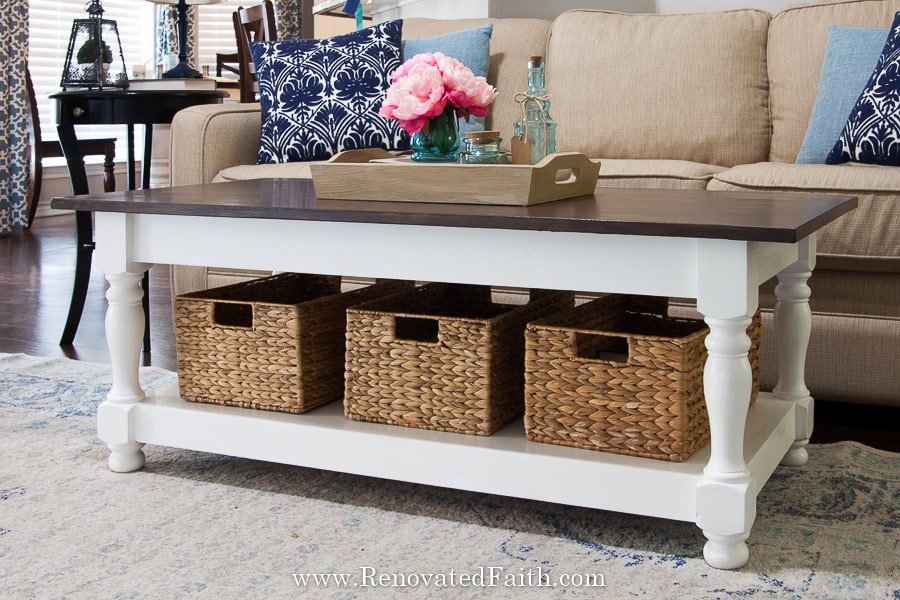
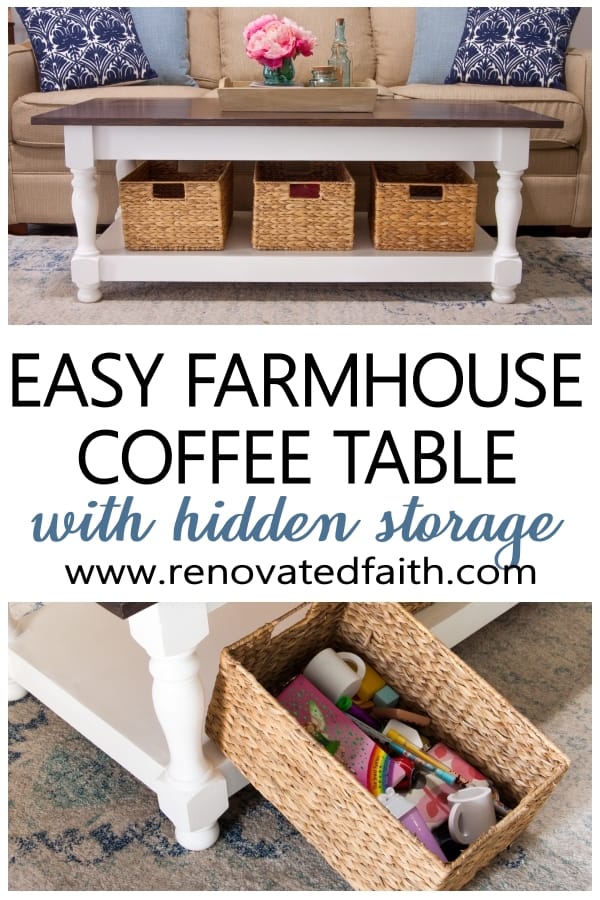
My DIY farmhouse coffee table with turned legs proves to be as easy-to-build as it is beautiful while its bottom shelf provides lots of hidden storage!
We built our coffee table several years ago and it has served us well ever since. I recently sold our old couch on Facebook Marketplace and was too lazy to move the coffee table to take the photo. It was when I got several offers for the coffee table that was not for sale, that I realized it might be worth doing a post on how we built it. One lady even offered me $500 for it!
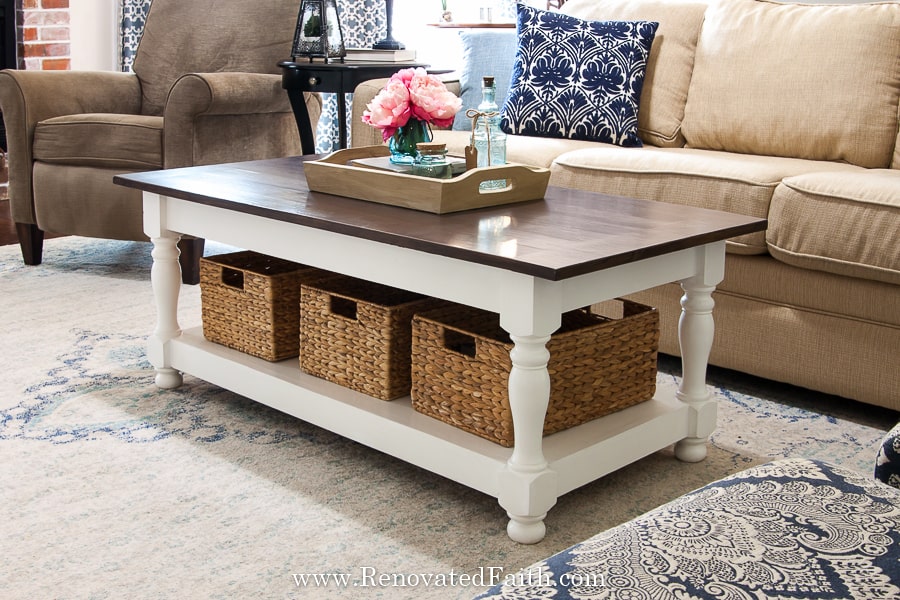
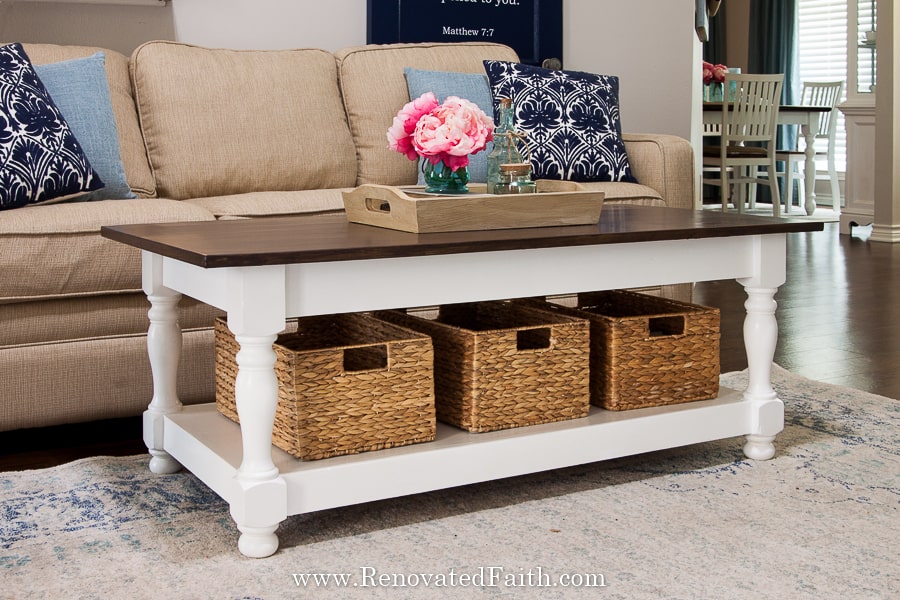
Combining form and function, this DIY farmhouse coffee table with turned legs is as functional as it is stylish. This table has served us well over the years and has even endured lots of abuse. Also, the bottom shelf provides lots of space for hiding toys or magazines in baskets underneath.
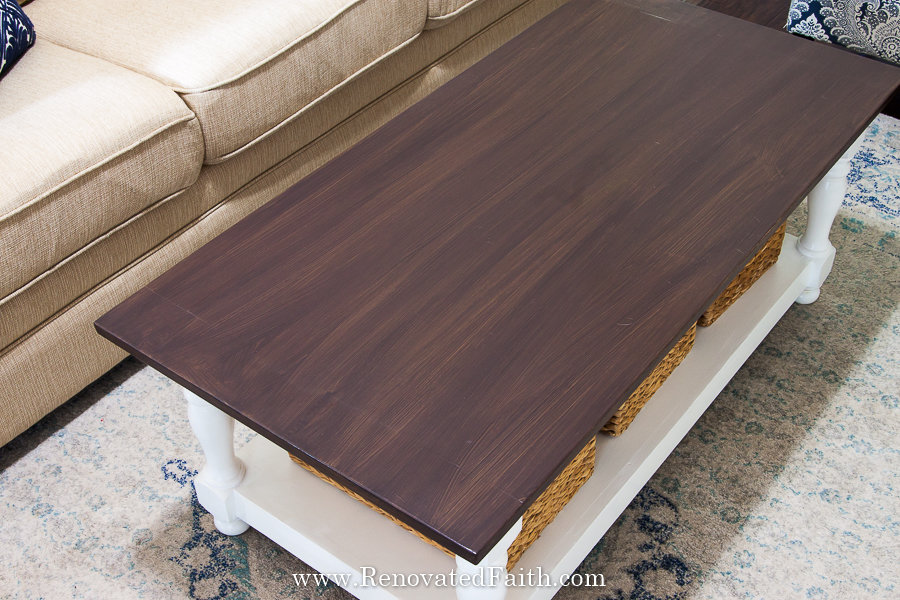
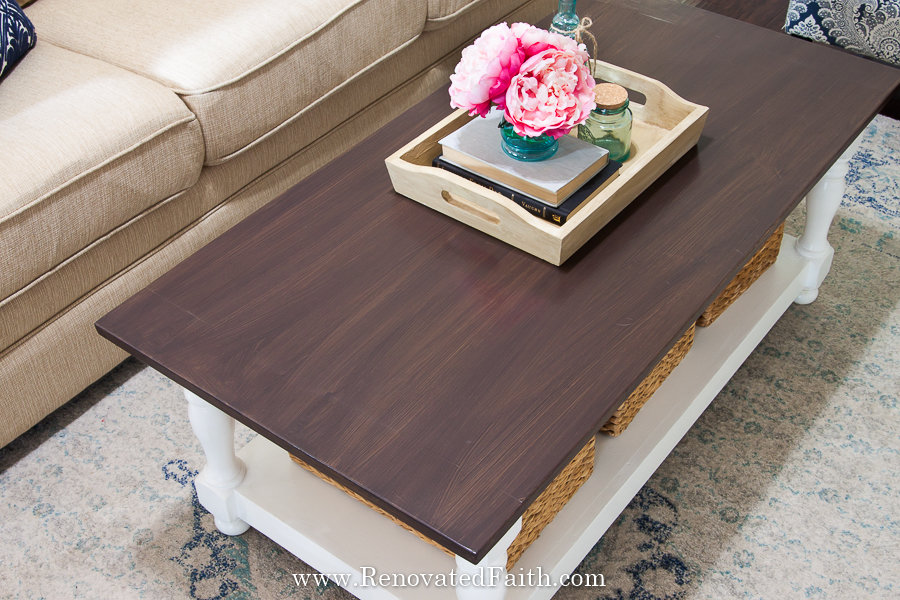
Not only was I able to save a ton of money by using lower grade pine, it’s also more durable than most hardwoods. I used a faux stain (How To Apply Paint That Looks Like Wood) on this coffee table which is more gorgeous than any traditional stain I’ve used. Also, there are never any irreversible surprises with faux stains!
Not only did I save a lot by building a coffee table instead of buying one but this farmhouse coffee table can easily be customized to your style. You can paint it in any color as well as use one of my faux stain techniques with latex paint.
A stunning coffee table can change the whole outlook of your living room and these plans will give you a solid furniture piece for a fraction of what you’d pay in a store.
These DIY Farmhouse Coffee Table Plans Will Give You A:
- Perfectly sized, beautiful coffee table that will be the centerpiece of your living room
- Large bottom shelf for hidden storage of toys, magazines, or blankets
- Quick and easy build process for beginning woodworkers
(As an Amazon affiliate I earn from qualifying purchases. Please see my full disclosure HERE).
PREPARATION FOR BUILDING YOUR DIY FARMHOUSE COFFEE TABLE
What Wood To Use For Coffee Tables
In most cases, you need to consider the type of wood because it has an effect on the look and stain of the final finish. Unfortunately, some hardwoods are significantly pricier than pine and the cost can add up fast when building a furniture piece.
However, I am using a faux finish with latex paint on my coffee table instead of a stain that penetrates the wood’s surface. That means I can use any type of wood as it will be completely covered and the cheapest is pine.
The faux finish I am creating with latex paint will look exactly like a stain on high-quality hardwood. Also, a traditional stain can be pretty unpredictable depending on the type and moisture level of your wood, but these faux finishes will give you the same great finish every single time.
How Much Does It Cost To Build a Coffee Table?
For our turned leg farmhouse coffee table with a planked top and lower shelf for storage, it cost us less than $130. You can find cheaper coffee tables at say Target but they won’t be solid wood and last you for nearly as long. Also, you’ll notice that comparable tables to this one are twice the cost of more: Homestead Coffee Table
DIY Farmhouse Coffee Table Dimensions
- Height – 18.75″
- Width – 24.75″
- Length – 50″
SHOPPING LIST: DIY Coffee Table with Turned Legs
4 – 2 3/4″ wide turned coffee table legs – I use these coffee table legs from Osborne Wood in pine.
6 – 1×4 @ 8 feet long*
2 – 1×3 @ 8 feet long
1/2 sheet of 3/4″ hardwood plywood
Storage Baskets – I got them here: Medium Hyacinth Storage Baskets
Paint to Faux Stain Your Coffee Table (CLICK HERE For My Easy Tutorial)
*HOW I SAVED A LOT ON LUMBER – Because I knew I was going to use a faux stain, I knew that I could save a lot of money by getting common boards instead of higher-end wood. With a traditional stain, any imperfections in the wood like knotholes would should through, but not with the faux stain I’m using.
Common Materials For Your DIY Coffee Table Plans:
1-1/4” Pocket Hole Screws (Click here for the current price)
Gorilla Wood Glue (Click here for the current price)
Elmer’s Wood Filler (Click here for the current price)
Coffee Table DIY Tutorial Cut List:
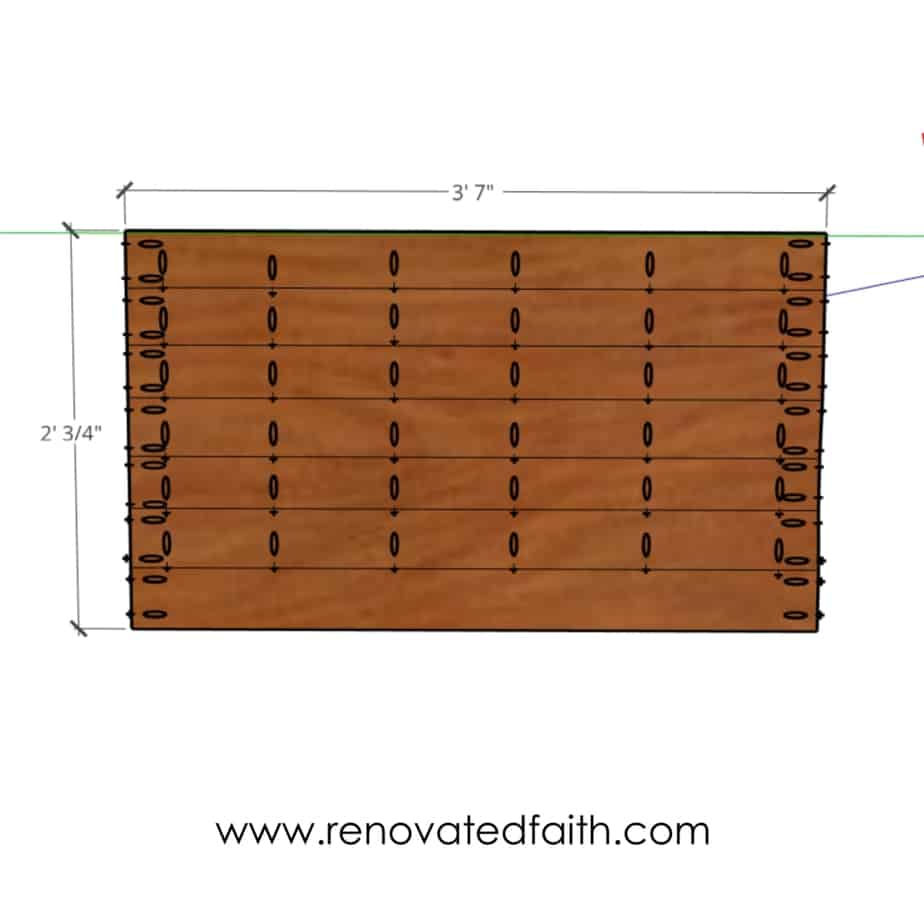
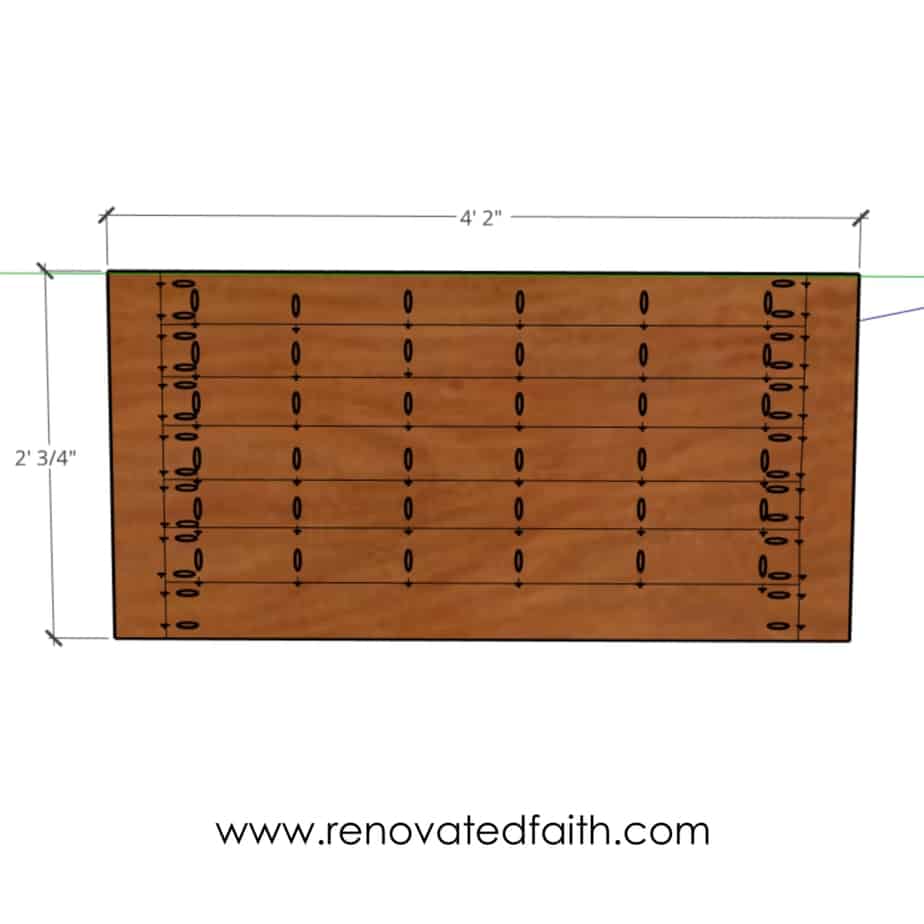
7 – 1×4 @ 45” (tabletop boards)
2 – 1×4 @24.5” (breadboard ends)
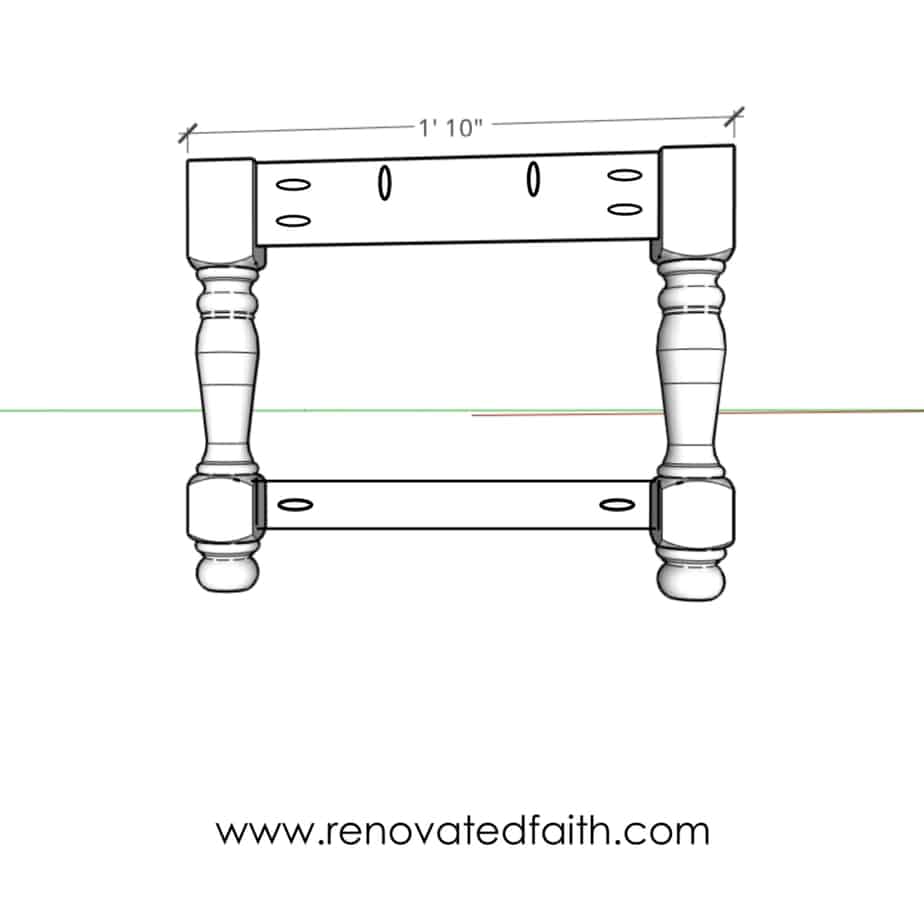
2 – 1×4 @ 16 ½” (top apron)
2 – 1×4 @ 41” (top apron)
2 – 1×3 @ 16 ½” (bottom apron)
2 – 1×3 @ 41” (bottom apron)
1 – ¾” plywood @ 41.25 x 18.75 (bottom shelf)
Tools to Build a DIY Farmhouse Coffee Table with Turned Legs
Tape Measure (Click here for the current prices)
Speed Square (Click here for the current price)
Pencil (Click here for the current prices)
Safety Glasses (Click here for the current price)
Ear Protection (Click here for the current prices)
Kreg Jig (Click here for the current price)
Kreg Jig Clamps – Optional (Click here for the current price)
Drill (Click here for the current prices)
Mouse Sander (see a very low-cost option here) or Sandpaper
My All-Best Tips for Painting Furniture – Download them here for free!
How to Make an Easy DIY Coffee Table with Storage
Please read through the full plan before beginning your project. Take all necessary precautions to build smartly and safely. Work on a level surface free of debris to get the best results possible. Always use straight boards and check for square after each step. Pre-drill holes before attaching screws.
You can also use wood glue between joints for a stronger hole. Be sure to wipe any excess glue off bare wood – especially for stained projects since the dried glue will not take stain. This is not really a concern if you are using the faux stain technique in this tutorial.
STEP 1 – How to Build a Coffee Table Top
Lay out your boards side-by-side. I like to alternate the cut of my boards so that the grain is going a different direction on the end of every board. This will help to ensure the coffee table top won’t warp later on.
Drill 3/4 pocket holes on all of the tabletop boards except for one. This is a good time to add in the pocket holes on each end also.
When you have all of your pocket holes in, you can join the boards together with your 1 1/4 pocket hole screws. (I like to use Kreg jig clamps to overlap the boards as I add the screws to ensure that the surface is as smooth as possible).
Are you new to pocket holes? Click here: How to Use a Kreg Jig
When we put our tabletop together the ends were a little uneven so we used our circular saw just to trim off the overlapping boards. You could also use a sander to sand them down a little There is absolutely no shame in this! If there are any boards slightly shorter, you can fill that gap with wood filler later on.
If you are using wood glue to strengthen your joints, be sure to wipe off any excess that drips.
Renovated Faith: What’s in a Name?
God never leaves a project half-done…He continually works on each one of us, as a lavish expression of His amazing love and grace. So many of my DIY projects remind me of how God renovates our hearts. If you are a work-in-progress, just like I am, check out the Renovate Your Faith Devotional at the bottom of this post. Click here to get a weekly reminder of new posts by email.
STEP 2 – Add Screws to Side Pocket Holes for Breadboard Ends
Now you can simply add the breadboard ends with 1 1/4 pocket screws using the existing holes. Use a clamp to hold the end in place as you add screws to the pocket holes.
Put two pocket holes per board on each side. The other day I walked into my living room to see my 9-year-old daughter standing on the edge of the breadboard end to clean the ceiling fan. At that point, I was happy I went to the trouble of adding all those pocket holes on the end!
DIY Farmhouse Coffee Table: Step By Step Table Top Video From Ana White
Below is a video from Ana White for a very similar coffee table. You can watch it to get an idea of how to build the tabletop.
STEP 3 – How to Build a Farmhouse Coffee Table with Breadboard Ends
The breadboard ends give the top a more finished look. Attach the ends to the top with the 1 1/4 inch pocket holes. When you’re done, take a second to admire your beautiful tabletop and set it aside.
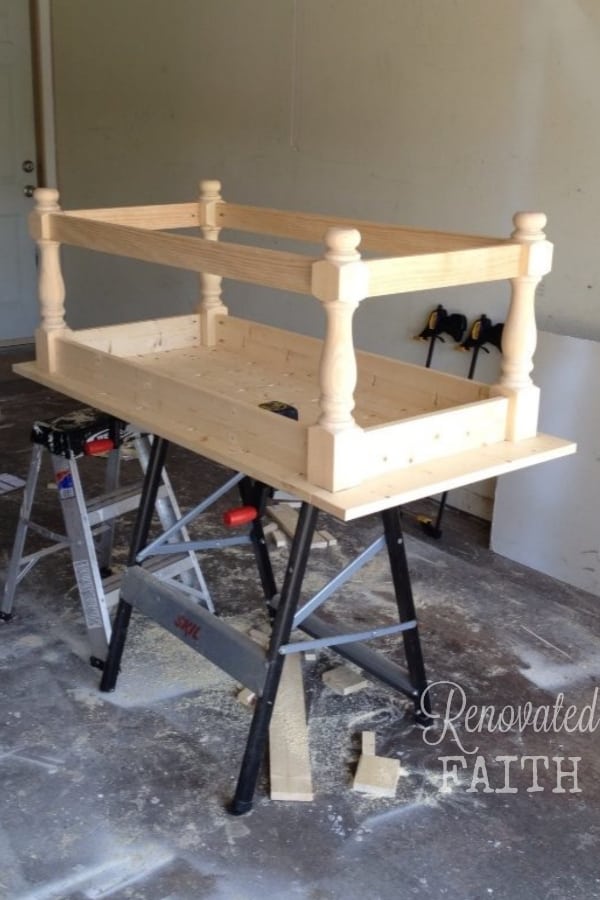
STEP 4: How Do You Make a Frame For a Table With a Storage Shelf?
Making a frame for a farmhouse table is similar no matter the size of the table. Adding the bottom shelf is easy and you won’t believe the final result!
Just make sure you have legs that are adapted to adding a bottom shelf like these coffee table legs from Osborne Wood.
Offsetting the apron back from the legs a little gives the table more of a dramatic look. You can use a piece of 1/2″ plywood as blocking to help you elevate the apron as you drill the screws in.
Start with one end of the coffee table attaching the top apron piece to two legs and then the bottom apron piece to the bottom of the legs. Make sure everything is square before moving to the next step.
Now that you have two legs attached with the top and bottom apron, add the long top and bottom aprons to one end. Check for square before adding the final leg and aprons.
Notice I added two pocket holes on the end top apron. This will be for attaching the top to the frame later on. For the longer aprons on the sides, I added 5 pocket holes evenly spaced.
Where to Find Legs for a Turned Leg Coffee Table
My favorite place to find table legs is Osborne Wood. Whether your style is farmhouse or more modern, they have a wide assortment of coffee table legs in various types of wood. You can see their full section here: Wooden Coffee Table Leg Designs from Osborne Wood
STEP 5 – How to Make the Bottom Shelf for Your Turned Leg Coffee Table
Cut your plywood to size and then using a jigsaw, cut 1.5 inch by 1.5 inch square notches out of every corner. If you aren’t sure about using a jigsaw, I show you how easy it is here: How to Use a Jigsaw: A Beginner’s Guide
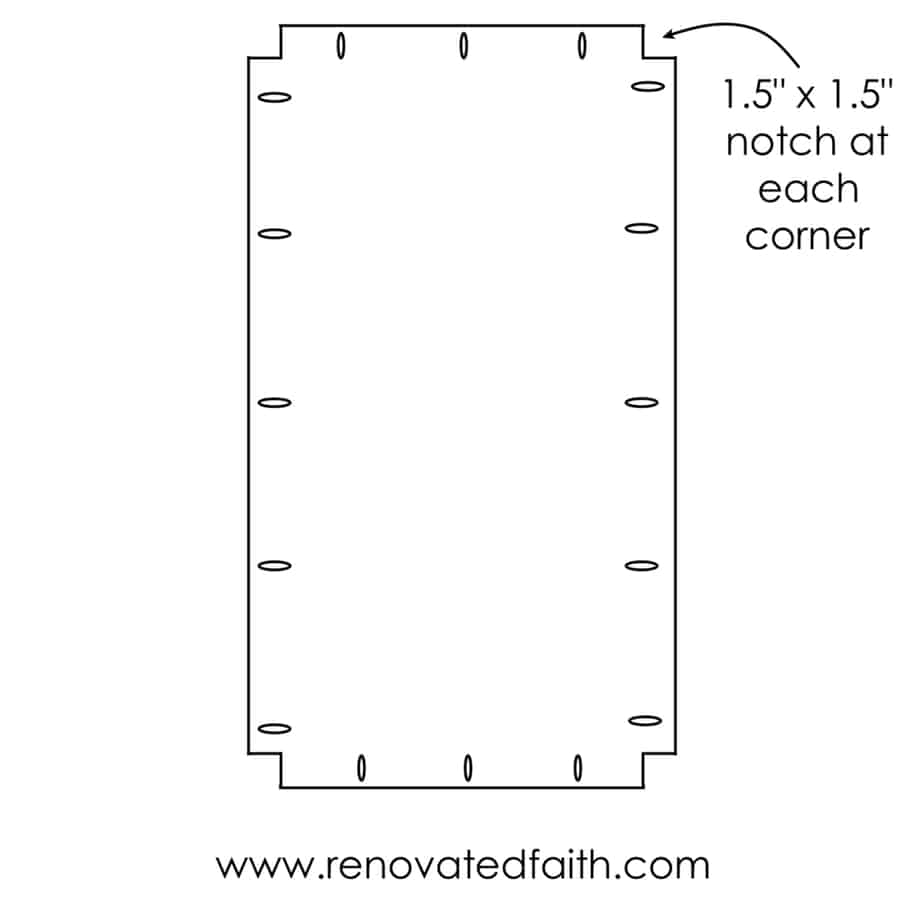
Once you have cut the square notches out of each corner, take this opportunity to add 3/4″ pocket holes as shown in the image below.
To attach the bottom shelf to the bottom apron, lay the table on its side and work your way around adding pocket hole screws. Make sure to keep the plywood level with the top of the boards.
Plans for a Coffee Table with Storage
What I love about this coffee table is the bottom shelf which allows lots of space for my daughter’s toys in baskets. Many coffee table plans have hinged tops for extra storage. But with this plan, the storage is more easily accessible since you don’t have to remove everything from the top of the table.
STEP 6 – Add The Top To Your DIY Modern Farmhouse Coffee Table
Now you can attach the top of your farmhouse coffee table to the frame using the pocket holes you already drilled on the top aprons. I love pocket holes because there are no nail holes in the top to fill!
STEP 7 – DIY Farmhouse Coffee Table: Paint With My Faux Stain Technique or Traditional Stain 3:40
How Do You Fill Gaps In A Farmhouse Table?
You’ll notice that there are some gaps on the bottom shelf where the inside notch meets the ledge. Use wood filler to fill in these areas. Let the wood filler dry overnight and sand them smooth until the wood filler looks like an extenuation than the shelf.
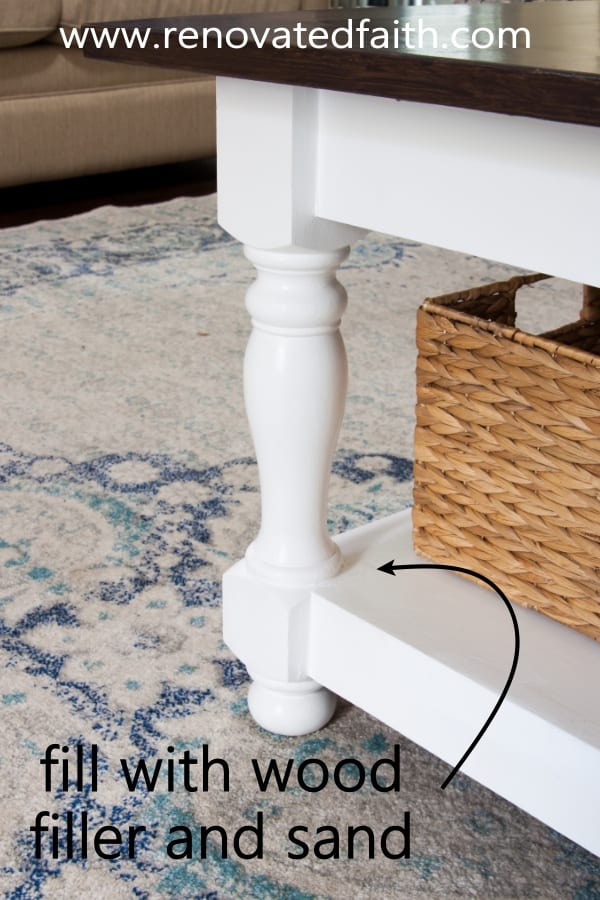
You can get detailed information on how to fix gaps with wood filler here: How to Repair Furniture with Wood Filler
When you are finished with your tabletop you might have some gaps where the boards are not completely level. If these are tiny gaps or points of unevenness, use a putty knife to smooth wood filler over the gap so it is higher than the highest level of the gap.
In other words, you want to put on enough wood filler so there is an excess on the top layer. Let it dry and lightly sand checking every few seconds with your hand to see if it is smooth. In this post, I share more posts on how to use wood filler: How to Repair Wood Furniture
How Do You Fill Wide Gaps In Wood?
If you have a very large gap in your wood or you are repairing structural damage in an old piece of furniture, the best bet is epoxy wood putty. Here is my favorite kind of wood putty: KwikWood Wood Putty Epoxy
What is the Difference Between Wood Putty and Wood Filler?
Epoxy wood putty and wood filler will give you the same product in terms of appearance as they are both easy to work with and are sandable. Epoxy wood putty is a better fit for doing repairs that need to give structural strength and support. You can see how I fix large chips in furniture here: The Best Way to Repair Wood Furniture
How do I Make My Table Top Smooth?
When you are done using your wood filler or epoxy, let them dry overnight to ensure they are completely cured. Then, go over them with fine sandpaper or a mouse sander. My electric mouse sander is my favorite furniture refinishing tool and you can see why here: How to Sand Furniture in Less Than 5 Minutes When you are done sanding the piece, be sure to wipe off any sanding dust with a damp rag.
Refinishing a Coffee Table
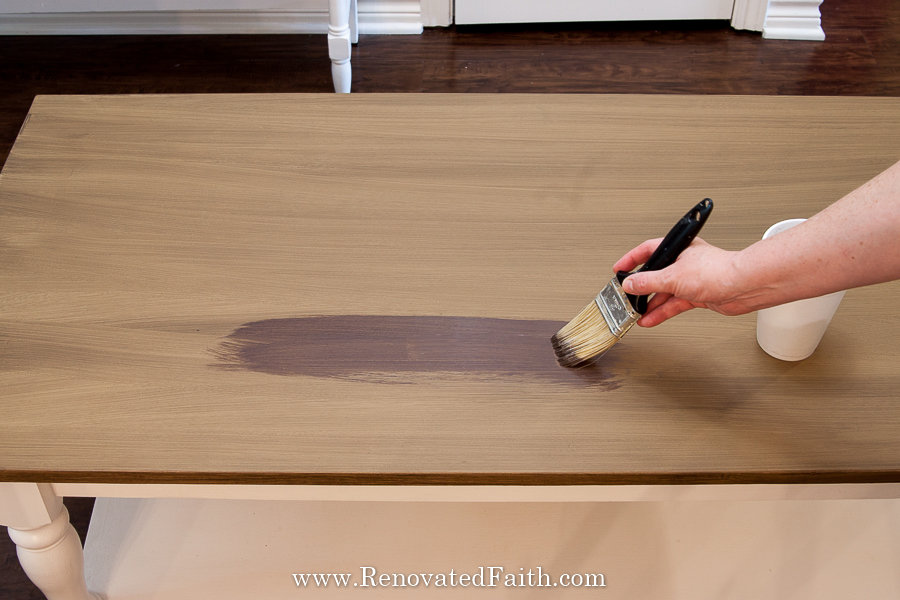
Now that your table is smooth, you can decide on how you want to refinish your coffee table. If you use a traditional stain, know that you can’t always be certain of how it will turn out and the only way to turn back is to completely sand off the stained surface.
But with a faux stain, you can be confident of the fabulous finish you will get. Also, you don’t have to worry about unsightly knot holes showing through since the faux stain isn’t translucent like a traditional stain. Here are all the details on how to do your own faux stain with 6 shades to choose from: How To Apply Paint That Looks Like Stain
How Do You Seal a Farmhouse Table?
Because tables get so much daily abuse, I highly recommend using a clear coat on your farmhouse coffee table. Clear coats can vary and some will even yellow your furniture finish over time but I’ve done all the testing for you here: The Best Clear Coat for Furniture.
My favorite furniture clear coat is Varathane’s Waterbased Polyurethane. It is extremely durable and holds up well over time. In the post above, I show how it holds up best in the “water ring test.” The Varathane Waterbased Poly comes in a satin finish which I use most of the time but if you want something flatter for a very matte finish, you can read the post above for another option that is also very durable.
Follow the directions on the can for your project. Most will take a few coats of clear coat but fortunately, they dry quickly. I let each coat dry two hours and don’t sand in between coats of clear coat. Just be sure to brush in the direction of the grain. The clear coat will look kind of hazy and blue but it will dry clear…I promise!
RENOVATE YOUR FAITH: Comfort Through Trials
As I mentioned, this coffee table has been around for years – 10 to be exact. But seeing as it is the focal point of our high traffic living room, it was time to refinish the top, which is what spurred on this post. My coffee table had its fair share of scratches, chips, and dings in the last decade.
It wasn’t that the tabletop wasn’t durable – I initially put 5 coats of polyurethane on it to make sure of that! But over time, it suffered some natural wear and tear.
The same applies to life’s trials. Eventually, no matter how strong you are, how much you read your Bible or attend church on Sundays, you are going to experience hardship. Trials are an inevitable consequence of living in a broken world.
I’ve gone through a personal trial in the last several months and there were many times I wondered what I had done to deserve it. Yes, I knew better. I knew God loved me deeply and wanted me to give my burdens to Him, but I almost felt angry that God had allowed the circumstance in the first place.
But as I have come through this trial and it can now be seen in the rearview mirror of my mind, I have realized I am so much stronger because of it. It was through this season of suffering that God was able to get my attention enough that I’d finally give the reigns to Him.
As I regain my bearings, I now understand that I am much better off having gone through the trial.
Often, it is only in the desert of suffering that we can hear and receive the comfort and encouragement that He has to pour out onto us. In The God of Comfort, by Hannah Whitall Smith, she writes, “And God knows that it is infinitely better and happier for us to need His comforts and receive them, than ever it could be not to need them and so be without them.”
The earthly things that seem to bring us peace and joy are often the very things that make us numb to the true comfort that only God can give. That’s not to say that I’m against a warm bath, a hot cup of coffee or a couple of Reese’s cups after dinner.
But sometimes to gain TRUE comfort, the kind that comes from our Heavenly Father, we have to be willing to substitute some of life’s earthly comforts for a time. But their substitutes are heavenly comforts – the unspeakable joys of a deeper relationship with Him.
So if you find yourself in a whole heap of suffering at the moment or maybe you are just out of your comfort zone, know that there is no earthly comfort that is not surpassed by the ultimate comfort of knowing Him better. He deeply desires for you to come to Him so He can pour out His comfort on you.
No matter what you are going through and what you have given up, know that the God of All Creation longs to comfort you and give you peace and strength that will never fade, wear out or crumble away. He wants to replace your temporal consolations of this world with true, lasting comfort that can only come from Him.
He knows what He is doing. Know that He is at work. Trust Him to pull you through this trial stronger and more joyous than ever before.
“Come to me, all you who are weary and burdened, and I will give you rest. Take my yoke upon you and learn from me, for I am gentle and humble in heart, and you will find rest for your souls. For my yoke is easy and my burden is light.” Matthew 11:28-30
For more spiritual encouragement, click here for the rest of my project posts that also include Renovate Your Faith devotionals.
☑️ My All-Time Best Furniture Painting Tips & Tricks (FREE PRINTABLE)
Don’t forget to download the FREE step-by-step printable checklist that shows you the entire process I’ve used on dozens of furniture pieces while saving you time and money!
DON’T FORGET TO TAKE A PICTURE!
Now that you are done, I’d love to see how it turned out! ❤️ Post your before and after photos here!
Farmhouse Coffee Table Decor Ideas
There are several cute ways to decorate your farming table! To add baskets like mine for extra storage, you can get them here: Hyacinth Medium Baskets
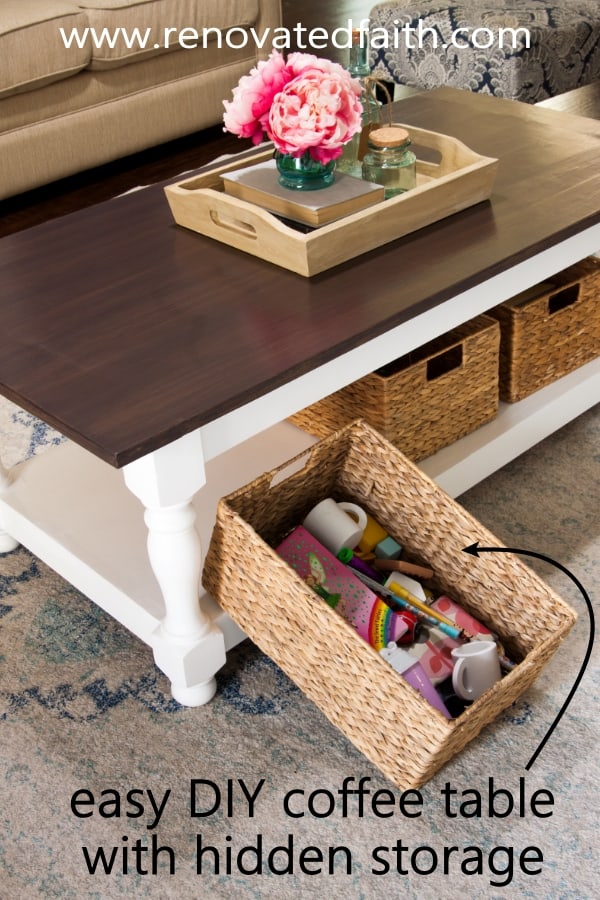
I use the baskets to hold my daughter’s toys but you can also use them to hide magazines, blankets, books, etc.
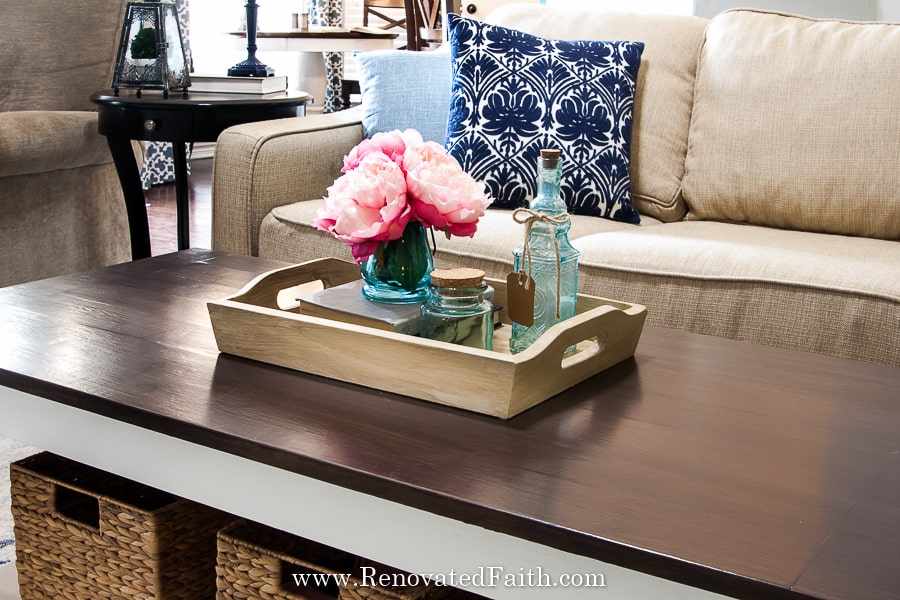
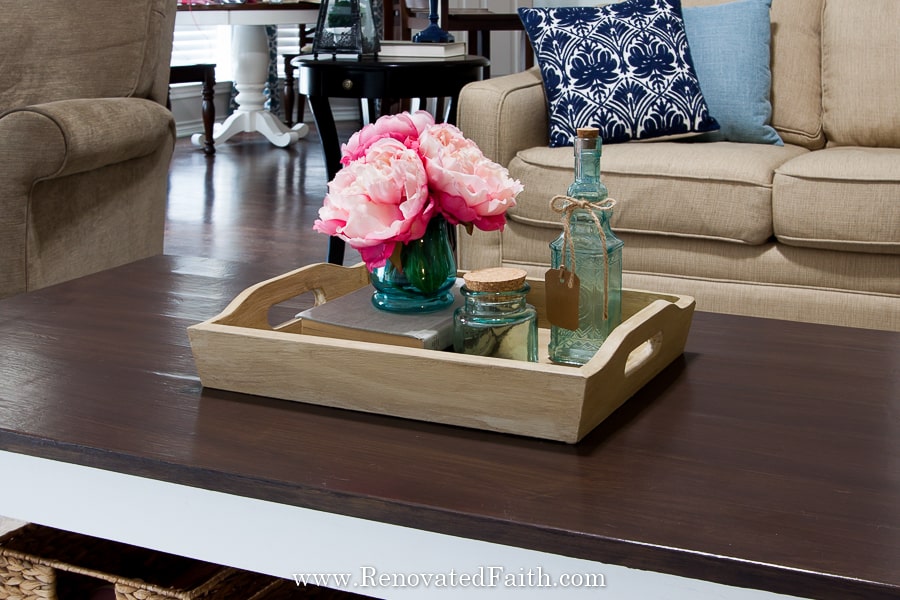
Coffee Table Tray in Raw Wood Faux Finish
The coffee table tray is one I have had for years. It was originally spray-painted cranberry red and then I painted it white a few years ago. I was trying out my new raw wood faux finish on it a week ago and decided it would look cute on the coffee table. My faux stain in raw wood will be coming up soon! Subscribe here to get an email update.
To see more options for coffee table trays, check here: Farmhouse Coffee Table Trays
Coffee Table Runners
In the link above are some cute coffee table runners with options for a farmhouse look or even more modern decor.
Coffee Table Books
Another easy and interesting way to decorate your coffee table is with coffee table books. Be sure to pick a book in the link above that represents the interests of your family and also your color scheme.
So How Do You Decorate a Farmhouse Table?
So you have some different decor items but maybe our sure how to arrange them on the table. You can get some fabulous ideas to decorate your coffee table here: Best Tips for Decorating Your Coffee Table
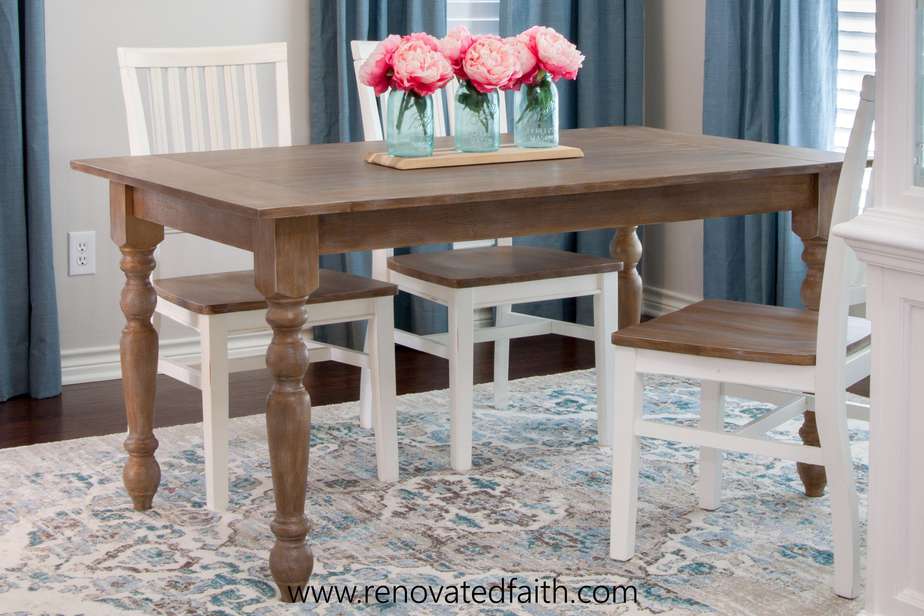
How To Build a Farmhouse Table (A Beginner’s Guide)
Having you always wanted that perfect farmhouse table in your dining room but didn’t want to spend a fortune on one? Here are free plans to build your own farmhouse dining table. You will pay less than 1/3 of the cost of one online and can customize the size and faux finish to your liking. Click here get the free plans and see a step-by-step video: How To Build a Farmhouse Table with Pocket Holes
Best Power Tools for DIYers
Wondering what other tools you might need? Here is a list of the 7 Best Power Tools for DIYers and beginning woodworkers. This guide will give you low-cost options on quality tools that will grow with you as your skills advance: Essential Tools for Beginners (A Non-Intimidating Guide to Power Tools)
More Posts Related to DIY Farmhouse Coffee Table Plans:
A Beginner’s Guide to Furniture Painting (Vintage Vanity Makeover)
Must-Have Painting Tips for Furniture (Free Cheat Sheet)
The Easy Way to Whitewash a Brick Fireplace
The Best Wood for a Farmhouse Table Top
DIY Farmhouse Coffee Table with Storage – Final Thoughts:
Don’t forget to download my Free Furniture Painting Cheat Sheet. To get your printable, sign up for my weekly newsletter which also grants you free access to my resource library full of wall art printables, checklists, and project plans!
Although this coffee table was built several years ago, it still serves as the focal point of our living room. I love that it is just as useful and durable as it is beautiful. I can’t count the number of times that we threw toys in the baskets to get them out of sight right before someone came over. Hopefully, this post will give you a little inspiration for your own coffee table. Before you know it, you’ll have random strangers offering money for yours too!
I love to hear your thoughts and questions! Scroll down to leave a comment and I WILL reply! ❤️
Blessings,

Be sure to follow the fun here!
Email Subscription | Instagram | Pinterest | Facebook | Twitter

DIY Farmhouse Coffee Table Plans

Karin Peters is a DIY expert and the creator of Renovated Faith. She is a furniture painter, a home design consultant, and a tenacious problem solver determined to help you transform your house into a home. With 17 years of experience with DIY home improvement, she researches and analyses professional processes to adapt them to be easy and cost-effective for DIYers. She then tests every project and product before it appears on the site in a detailed, step-by-step format. After attending Texas A&M University, she received her Master of Divinity with Biblical Languages at Southwestern Baptist Theology Seminary. Her passions unite in Renovated Faith, which shows readers how to create a home that serves them so they can pursue their God-given purposes. About Renovated Faith | Editorial Policy | Facebook | Twitter | LinkedIn
I would like to do a faux wood finish with paint and gel stain on dining table. The look I am looking for is acacia wood or slightly exotic look and the base of my table would be black withblack legs (like industrial look) Any idea of what color of paint I should use for the base and what color of gel stain. Any idea. Love your work. Bless you.
Danielle
Hey Danielle, Gel stain can be kind of limiting. Check out this post to see if any of these options are what you are looking for: https://renovatedfaith.com/how-to-paint-furniture-to-look-like-wood/
I receive your emails, and just watched your video about Agreeable Gray paint – I just painted my living room, dining room and kitchen Agreeable Gray :). But I have a question that is unrelated. Where did you find your TV stand! I have been searching EVERYWHERE for a tall, white TV stand – buffet, sideboard, console table, etc. with no luck. I finally started searching for a dresser and semi-coordinating bookshelves with cabinets below, and I LOVE YOURS! If you don’t mind, would you please let me know 🙂
Thank you!
Hey Rachel! So glad to hear you like Agreeable Gray in your home. Here is the post all about the media center. I actually got the dresser at a furniture store. It was on clearance bc it was missing a knob but I list similar ones in the post here: https://renovatedfaith.com/diy-entertainment-center-with-bookshelves/ Thanks and have a great day! – Karin