Easiest DIY Topiary Trees For Front Porch Decor (Brilliant Hack!)
How to Make a Topiary That Looks Like The Real Thing
DIY topiary trees were the perfect addition to our front porch because they are versatile for any season. Here is a step-by-step tutorial to make your own and topiary decorating ideas!
Similar boxwood topiary trees sell online for a small fortune, but I learned how to make my own faux boxwood topiaries that are more durable, just as life-like, and a fraction of the cost.
If you like the look of DIY Outdoor Topiary Trees without the high price tag, here I show you how to make topiary trees out of boxwood balls.
This is a great tutorial for you if you:
- Like the look of front porch topiary trees but not the high-cost
- Need some front door decor that is versatile for any season
- Want to make a topiary centerpiece or small indoor topiaries
- Are interested in making DIY topiary trees for every season!
How Do You Make a Homemade Topiary Plant for Front Porch Decor?
What is it about spring that makes everything seem right in the world? Dull hues of winter are quickly replaced by bright blooms and new green growth. No matter the length of my to-do list, this season always gives me a sense of refreshment and renewal.
Whether it is the sight of beautiful flowers, the sound of baby birds, or the cool breeze, I have decided that spring is without a doubt my favorite season. I love to reflect the season in our home to bring inside the same fresh feeling of newness and restoration.
How to Make Front Door Topiary Trees
One of my favorite ways to decorate for Spring is with boxwood balls and topiaries. Boxwood is one of my favorites. The bright green gives such a crisp contrast against spring flowers and even Christmas decor. Boxwood is perfect to use throughout the year as it complements every season’s décor.

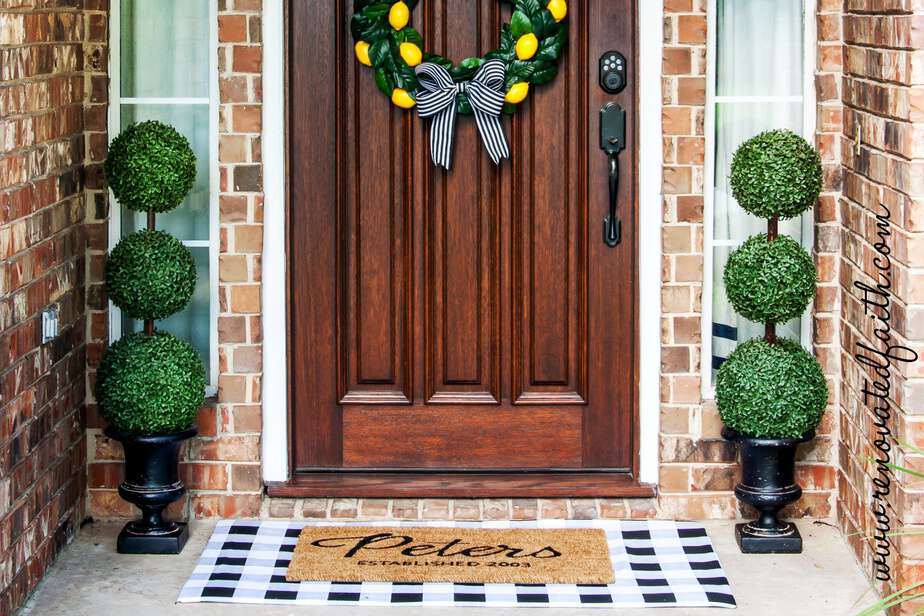
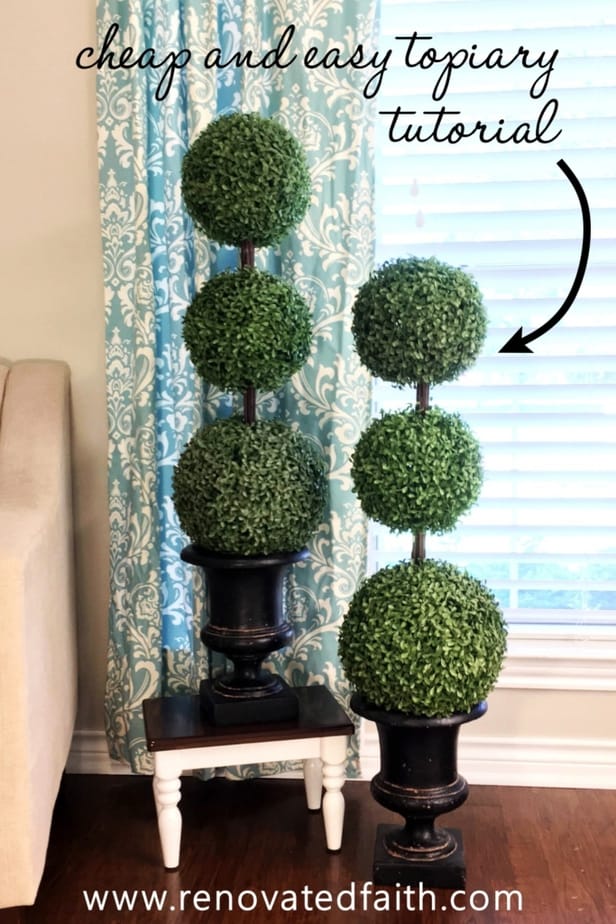
But my favorite boxwood décor would have to be the two DIY topiary trees on my front porch. These easy DIY topiaries were such a fun project and they make such an inviting statement without looking artificial.
I made them at a fraction of the cost of those sold in stores and was able to make them exactly the size I wanted. I have gotten many compliments on these topiaries and they have held up well over the past two years, even in the hot Texas sun.
How to Make a Topiary Tree – Supplies Needed:
- Faux Greenery Balls or Boxwood balls – I used one 10″ and two 9″ and got them from JoAnn’s.
- Long Branches – I got mine from my backyard. – If you don’t have access to long branches, use a few skinny dow rods. Don’t use one fat one – use three or 4 little ones and it will look more realistic! 🙂
- ¾ inch dowel rod
- Brown Pieces of Florist Wire
- Stain – I used a sample-sized can of Behr’s semi-transparent deck stain from Home Depot.
- 2 Decorative Pots or Urns – You can use plastic pots that look real or terra cotta pots. Putting some real dirt in the top of your clay pots is an extra step to make your topiary trees look real.
- Metal Craft Bucket – Small enough to fit in the pot/urn upside down. I got mine at Hobby Lobby but you can also find them at the dollar store or your local craft store.
- Hammer and large nail
- Gorilla Glue or Hot Glue Gun
- Scissors
- 1″ Paint Brush
How to Make DIY Topiary Trees for Front Porch Decor – The Process
Step 1: How to Make a DIY Large Outdoor Topiary
The first step is to prep the boxwood balls. For this tutorial we are making pre-made topiary balls because they are easier and really realistic looking. Also, by the time you got the supplies to make three large boxwood balls, you would pay more than just buying them pre-made.
Topiary Proportions: What size topiary balls are best?
Find the right size of boxwood balls. I used one 10″ and two 9″ but the beauty of this project is that you can make your topiary tree as large or small as you want. The dried boxwood is very expensive and not the best option for outside – it also smells funny! You can find several faux options online that look very realistic.

Step 2: Pick a Base for your DIY Topiary TREES
Pick out a decorative pot or urn for the base of your plant. Ideally, you will want one that is heavy so that it is not easily blown over. However, plastic urns are cheaper but you can always put a little sand in the bottom to make it heavier. Terracotta clay pots are also a great option.
Step 3: Use Real Sticks for your DIY Outdoor Topiary
My first thought was to use dow rods for the stems but this was too much of a faux topiary look. So, adding the real sticks was a great addition to making the individual stems look like the real thing.
Boxwood topiary trees don’t have one long trunk but several smaller stems together. Combined, the dowel rod and sticks look just like a real boxwood stem.
Find some very long straight branches and a ¾” dowel rod
If you can’t find branches, you can also use ¼ inch dowel rods at found at Home Depot. I used branch trimmers to cut the larger dowel rod to about 48 inches. You can cut your branches about 8 inches shorter than the dowel rod. You don’t want the individual stems to extend down into the metal pot, just the main dowel rod.

I then fastened several branches to the dowel rod with brown floral wire to make a large “stem”. This is way more realistic looking than using one big dowel rod. I tied wire around the stem branches underneath where each ball would go so the wire won’t be visible when it is all together. The picture below is a side-view of the stained stem.

Step 4: Stain the Stem of Your DIY Topiary
Once you have your dowel rods or branches tied together, it is now time to stain. I used a sample can of Behr Semi-Transparent Deck Stain for about $3. You could really use any stain or gel stain. Ideally, you want to paint the stain on and let it be kind of streaky. I let that dry for a couple of days.

Step 5: How to Make a Topiary Tree Frame
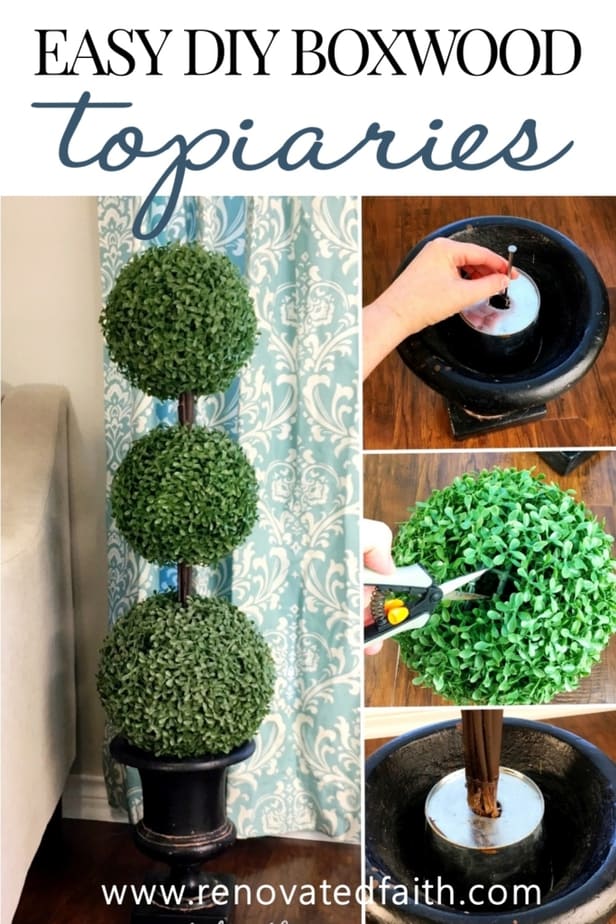
In the meantime, take your aluminum bucket and put it upside down in your decorative pot. Use gorilla glue to glue the edges in the pot and let it dry 24 hours. The glue will expand around the edges of the pot and that’s normal. You won’t be able to see that anyway.

Step 6: Add a Hole for the Trunk of your DIY Topiary Trees
After the stain has dried, it’s time to make a hole for the trunk of the topiary. I used a large nail and hammer and kept hammering holes until I had one big hole just the size of the set of sticks. You want it to be a tight fit so the stem/trunk stays straight.

Step 7: Glue the Topiary Trunk to the Base
When the hole is the right size, squeeze some gorilla glue into the hole so it goes to the bottom of your pot or urn. Stick in the trunk and make sure it is straight. Let that dry 24 hours. The gorilla glue expands and will hold everything in place.

Step 8: Cutting Holes in the Faux Greenery Balls to Make a DIY Topiary Tree
Take your boxwood balls and cut some of the plastic net-like interior, just enough so the balls can fit tightly over the top of the sticks.

One of my topiary balls was sliding down the stick a little bit too much, so I wired some of that interior netting to the sticks. (You’ll find most of these faux boxwood balls are hollow with an interior plastic netting that all the leaves attach to.)

Push down the entire ball onto the wood piece. Once you have all the faux greenery balls on the topiary, you are done!
DON’T FORGET TO TAKE A PICTURE!
Now that you are done, I’d love to see how it turned out! ❤️ Post your DIY topiary tree pic here!


Seasonal Topiary Ideas
DIY Christmas Topiary Ideas
As I mentioned, boxwood topiaries are great to have around the house because they work for all seasons. I love that they are the one decoration in the house I never have to change out. This Christmas I plan on adding some little LED lights to mine! To see the full post go to: Christmas Front Porch Ideas on a Budget

Don’t forget to check out my most popular Christmas Post: The Ultimate Guide to Adding Ribbon To A Tree (The EASY Way!) or My Best Hacks for Decorating a Christmas Tree
DIY Easter Topiary Tree
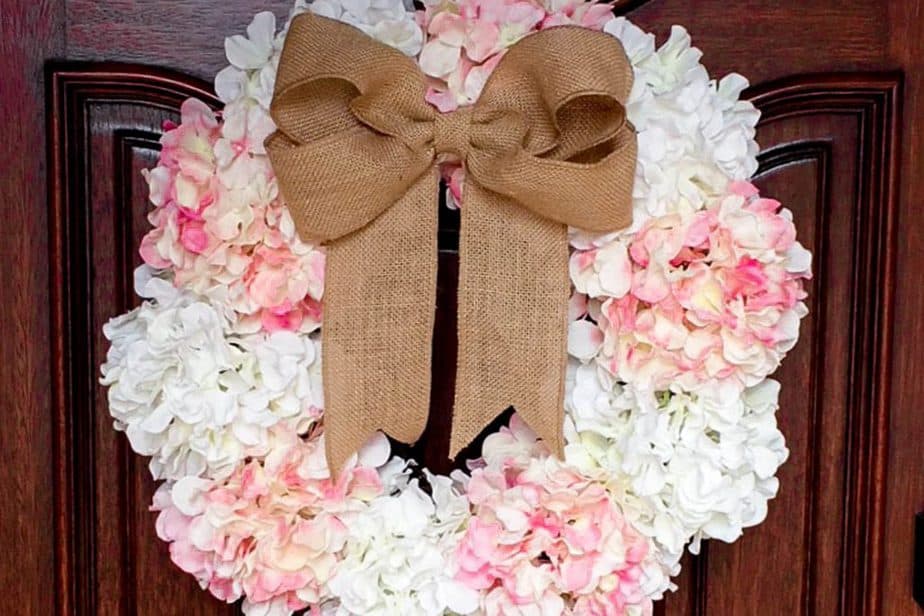
The fresh look of boxwood leaves lends well to Spring too! The topiaries can easily be paired with a beautiful hydrangea wreath and floral layered doormat.
Renovate Your Faith: A New Season Is Ahead
Any change of season reminds me of God’s consistency. God tells us in Revelation 21:5 that He will make all things new one day. Until then, we have spring’s reminder of the renewal and restoration that comes from only Him.

As God’s all about making things new, He offers us rejuvenation from life’s hardships and worries today. Just as God cares for the birds of the air and the flowers of the field, He personally cares about your every care and concern.
No matter what hardships come our way, we can count on one thing. God is there to give us life, hope and peace no matter the circumstance. His love and care for you is eternally evergreen.
“Cast all your anxiety on Him, for He cares for you.” – 1 Peter 5:7
Although seasons of life change and our lives never seem to calm down, His love never changes. He is our true constant, the one thing we can cling to as a calm in the midst of a storm. Just as spring comes every year so do consistently have his peace and comfort.
What do you feel is weighing you down? Where are you in need of renewal and a fresh start? Know that He cares for you more than you can possibly fathom and He waits for you to bear all your worries and fears. All you have to do is begin with a prayer to hand these burdens over to him.
Wondering how to give God your burdens? Check out this post on Why You Struggle To Rest (And How To Hand Your Problems to Him)
Every DIY or Home Decor post with spiritual encouragement has a Renovated Thinking section. You can see more of those posts by clicking here and can subscribe to the weekly newsletter by clicking here.

Want to see more outdoor decor ideas from Renovated Faith? CLICK HERE.
You might also like my DIY Windmill Wall Decor here.

DIY Topiary Trees for Front Porch Decor – Related Posts:
How to Landscape Your Front Porch on a Budget
How to Make Layered Doormats
Easy Peasy Lemon Wreath
Spring Hydrangea Wreath Tutorial
More DecoR For Your Home’s Entrance
Speaking of versatile decor, you can also download my free doormat stencils. They allow you to make your own coir mat with any personalized saying or you can use any of the premade stencils available for download.
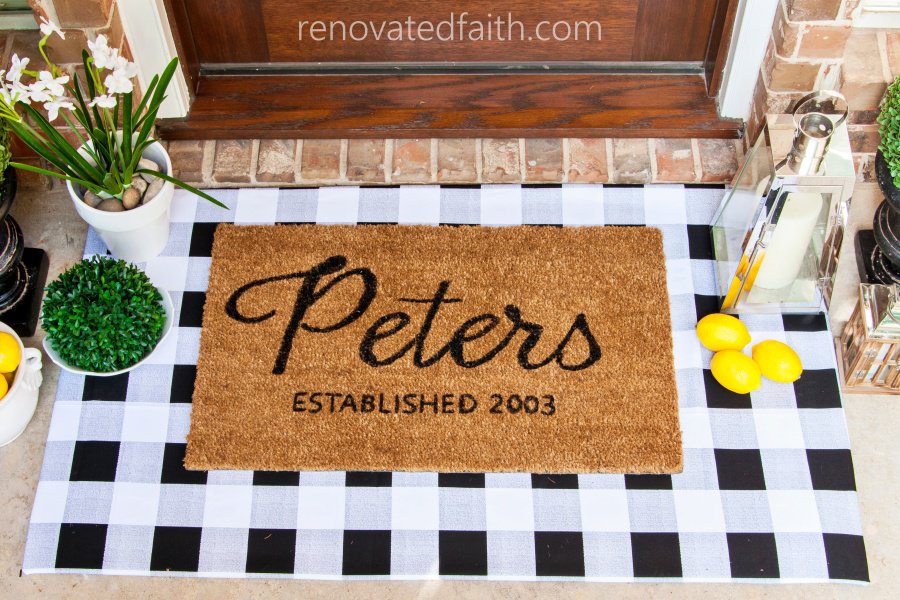
The tutorial also includes how to make a fabric rug so you can layer your doormats. The rug has an interchangeable cover that you can easily swap out for any season. This is so much more cost-effective than getting separate sets of rugs for each season or holiday. You can see the tutorial and download the templates here:
DIY Doormat Tutorial: Layered Doormats for Any Season
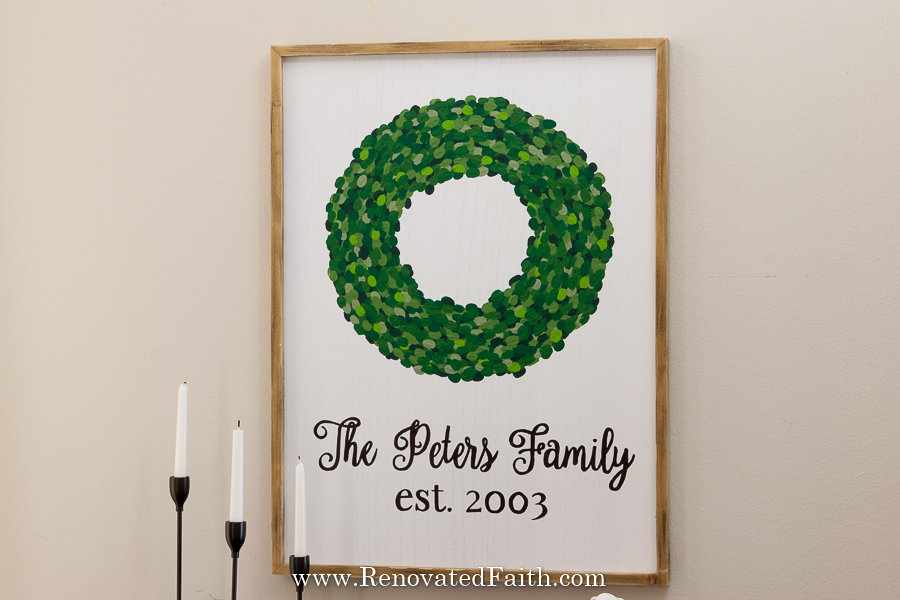
If you like the look of boxwood, check out my fingerprint wreath wall art – it’s so easy and such a fun family activity! Click here – Easy Fingerprint Wreath Wall Art
Topiary Ideas – FAQ’s:
Can I Make DIY Topiary Trees for Weddings?
This tutorial is an excellent option for wedding decor. They look great along the aisle or at a venue entrance near the sign-in table. These trees would also make a great reception centerpiece if they were made on a smaller scale.
Can I Make a DIY Topiary Centerpiece with this tutorial?
You can easily make your own DIY topiary centerpiece or home decor by using these instructions. Just down-size all the supplies. You can get smaller topiary balls in the craft supplies section at local stores like Hobby Lobby, Michael’s, and also Target.
How Does a DIY Porch Topiary Hold Up to Weather?
I have had my topiaries on my front porch for three years! They have held up really well to the hot Texas sun and regular showers. About once a year I set them in the grass and hose them off. That’s really the only thing I’ve done to clean them up and they still look great and SO much less effort than the real deal!
Benefits of Using Artificial Topiaries Vs. Real Topiaries
After having poor luck with live plants on my porch, I finally decided to go with artificial plants on my front porch. I haven’t regretted it one bit and the leaves on the faux plants look just like the glossy leaves of real boxwood. Maintaining live plants on your front porch can be hard if you don’t get full sun. Also, our weather gets really hot here in Central Texas and by late spring or early summer, the leaves start to dry up because I can’t keep up with watering them every day. The fake plants have allowed me to have the look of perfect plants all year long and the only thing I need to do is spray them with the hose when they get dusty. If you want to look into real topiaries, there are several container plant ideas at the bottom of this post.
How do you make a topiary shape? What are the simple topiary shapes?
There are unlimited options of decorative shapes for topiaries. This can be achieved with chicken wire, a wire frame, or styrofoam to make the desired shape. Then, boxwood sprays or other pieces of greenery are inserted. The best option for a perfect ball is to use styrofoam balls as they come in a variety of sizes. You can use a tomato cage if you want a cone shape. The best option for a spiral is actually a pool noodle. Put a coat hanger through the middle of the pool noodle and just bend the wire form into a spiral topiary
Using a coat hanger is an option for more complex shapes but for simple shapes, go with premade options. After you determine the size of the topiary, you can begin to make your topiary forms in a variety of sizes. The coat hanger will be the main frame of the wire topiary and use the chicken wire to make a wire topiary in whatever ornamental shape you desire. Use wire cutters to cut the chicken wire and floral wire to fasten the loose ends.
How Do You Trim A Bush Into a Topiary?
When you have a real plant that you want to trim into a topiary, use a topiary form and allow the plant to grow an inch or two past the form, and then trim it. Eventually, your plant will take on the shape of the topiary frame. Be sure to use evergreen or perennial plants for your topiaries.
How do you make mini topiaries?
Topiaries can be made in different sizes of decorative shapes but did you know you can make mini topiaries? Smaller topiaries can be made using the same method above but an easier way to make a smaller version of topiary frames is with green moss. It is easy to work with and comes as lumpy moss matts or moss balls. You can use any extra moss or sphagnum moss to put in the top of your pot with a dab of hot glue or you can use real dirt. If you can’t find premade moss balls, buy small styrofoam balls and attach the moss with hot glue.
For the mini topiary stems, you can use bamboo stakes, balloon sticks, or small individual vines. Join the group of a few sticks together with a bit of hot glue.
How do you start a topiary bush? Can the topiary be planted outside?
If you love the look of faux topiaries for your interior décor, a topiary bush can be a great first impression to your yard’s curb appeal and it’s a great way to add a focal point
Topiaries are a staple of formal gardens but you don’t have to be a topiary artist to create visual interest in your yard. Use the exact instructions above to make a topiary form and set the topiary frame over a small bush. Boxwood and Dwarf yaupon make great bushes for topiaries. As the shrub topiary grows just outside the topiary form, trim it with pruners. Eventually, the bush will grow through the topiary frame, and with the bushier growth, you will have your own topiary.
What Plants are Best for Topiary Plants for Front Porch Decor? What Plants are Good for Topiary Trees?
If you want to go with real topiary plants, there are several great front-door plants that aren’t high maintenance and don’t take a lot of time to care for.
Be sure to pick the right plants for your front porch in terms of lighting. The biggest aspect of having a green thumb is knowing the right type of plant for the right place.
For partial shade/partial sun locations, vining plants are the best plants because they are low maintenance and make great topiary plants. A few options are star jasmine which has amazingly fragrant blooms and also English ivy.
There are several other types of plants you can find at your local garden center. One option is fresh herbs for an herb topiary or they make great container plants like rosemary plants or plants in the mint family. Some young plants work well but need to be moved to another location once they are mature plants because they will eventually outgrow your porch. A few of these are small evergreen trees, lemon trees, olive trees, and also hedera helix
Many great topiary plants for front porch décor are perennial plants that will die back in the winter months. But don’t let this discourage you from using real plants. In those winter months, cut back the dead growth and fill the planter container with pine cones or ornaments to give your porch a pop of color.
No matter what plant you use, make sure that the root ball has plenty of room to grow in the pot. There should be holes in the bottom of the pot or window box to ensure good drainage. Moisture Control by Miracle Grow is one of my favorite potting soil for all kinds of plants to ensure you have well-drained soil in the bottom of the bucket or pot.
Can you make a topiary tree out of artificial flowers?
If you want a pop of color you can add artificial flowers instead of greenery stems to your topiary. Just use floral foam or floral tape to attach them to the topiary form and you have a beautiful centerpiece for special occasions or just for a Tuesday. The best part is that they will stay beautiful and you don’t have the additional cost of fresh flowers.

Related Posts to DIY TopIAry Trees:
Why I Don’t Use Chalk Paint on Furniture
My Better Alternative to Chalk Paint
Benjamin Moore Hale Navy (Why It’s The Perfect Navy Paint Color!)
Easy Front Porch Christmas Decor On A Budget
How to Make Your Home Smell Like Christmas (Easiest Simmer Pot Recipe)
How To Make An Exterior Door Look Like Stained Hardwood
The Easiest Way to Decorate a Console Table
The Best Greige Living Room Color for Real-Life Homes
DIY Topiary Trees for Front Porch Decor – Final Thoughts:
I’ve gotten SO many compliments on my topiary trees. Boxwood is such a classic and timeless look. I love that I didn’t have to spend a fortune on these and they look so much more realistic than many of the ones I see online. Boxwood topiaries are great because they work for year-round, Spring, and Christmas decor. The versatility makes them a super-easy staple in my front door decor!
Be sure to save this pin so you can comment on it later with your before and after pics! Pin it here:
What are your thoughts, my friend? Do you think the makeover was worth it? I love to hear your thoughts and questions! Scroll down to leave a comment and I WILL reply! ❤️
Blessings,

Be sure to follow the fun here!
Email Subscription | Instagram | Pinterest | Facebook | Twitter
Youtube: How to Make a Topiary
Quick Links to Information in this Post
- 1 How to Make a Topiary That Looks Like The Real Thing
- 2 How to Make Front Door Topiary Trees
- 3
- 4 How to Make a Topiary Tree – Supplies Needed:
- 5
- 6 How to Make DIY Topiary Trees for Front Porch Decor – The Process
- 7
- 8 Seasonal Topiary Ideas
- 9 Renovate Your Faith: A New Season Is Ahead
- 10
- 11 DIY Topiary Trees for Front Porch Decor – Related Posts:
- 12 Topiary Ideas – FAQ’s:
- 13 Related Posts to DIY TopIAry Trees:
- 14 DIY Topiary Trees for Front Porch Decor – Final Thoughts:
- 15 DIY Topiary Trees for Front Porch Decor


DIY Topiary Trees for Front Porch Decor

Karin Peters is a DIY expert and the creator of Renovated Faith. She is a furniture painter, a home design consultant, and a tenacious problem solver determined to help you transform your house into a home. With 17 years of experience with DIY home improvement, she researches and analyses professional processes to adapt them to be easy and cost-effective for DIYers. She then tests every project and product before it appears on the site in a detailed, step-by-step format. After attending Texas A&M University, she received her Master of Divinity with Biblical Languages at Southwestern Baptist Theology Seminary. Her passions unite in Renovated Faith, which shows readers how to create a home that serves them so they can pursue their God-given purposes. About Renovated Faith | Editorial Policy | Facebook | Twitter | LinkedIn
Thank you for your scripture today. I hope & pray you receive this. My husband was diagnosed last week with a tumor in his lymph nodes in his back by the spine. He has never been sick, & this was such a shock. He had the biopsy last Friday & are waiting for the results, which we will get this Friday Sept 8th. Then they will know what type of treatment to do. He has been sleeping a lot, which I know he needs, but I feel so alone. We don’t have any family to help, so here I am. Asking for you to pray the Lord will have a healing for him. And if you could put him on your prayer chain, I would so much appreciate that.
Thanks for your blog & all your creative ideas.
Hey Deb, I am so very sorry to hear this. I’m praying for God to give you an amazing peace and comfort. There were two weeks when we were waiting to hear about whether my daughter had leukemia and she didn’t but those two weeks I felt a spotlight of God’s love on me wherever I went. I am praying that same spotlight of His love and comfort will be on you too Deborah. Any time you need to talk, let me know. Please keep me updated – Karin@renovatedfaith.com
Please recommend me which one would be better for out door.
Hey Hope, all the options I mention are great for outdoors! Hope this helps.
Super Hit. Amazing ideas.You shared exactly the decors which I am looking for .
Loved DIY Windmill Wall Decor the most! Keep up the good job!
Hey! I love the topiary project!! I saw this months ago and had to order the boxwood balls from amazon because Joanne’s didn’t have them in stock anymore. They took forever getting to me because of Covid but I have them now. They were not packaged in a box and didn’t come put together, so needless to say, the boxwood balls are half spheres that are smooshed a little. Any suggestions on how to make them stay round? I will use green floral wire to put them together to make a whole sphere, but I am going to have to play with them to make them fully round. I’m kind of disappointed in the product delivery, but I am so excited to have these on my front porch once I put them together! Thank you so much for the tutorial!
So sorry to hear they were in halves and squished. Could you put something in the middle to try to fill in the empty space, like maybe try to stuff newspaper as tightly as possible and leave it for a while. Let me know how it turns out!
Hello Karin, I want to make a topiary for my wife’s birthday, I hope I succeed, the manual is very detailed, thanks!
I’m sure it will look great! Let me know if you have any questions.
Hello Karin, I read your post about making a Boxwood Ball TOPIARY, and I loved it. I’d like to know whether or not I can use the TOPIARY Trees both for interior decoration?
Thank you so much for taking the time to read my post Matt. Yes, you can absolutely use them indoors. Just follow the same instructions or scale down the supplies for smaller topiaries. Thanks again!
Karin, This is my 1st time commenting on a tutorial from pinterest,however with that being said Your gift of craftiness,and easy to follow description of your creations is like I said “A GIFT! ” I need some professional craftiness input! I have a 5 ft 4 in. 3 ball boxwood on my front porch next to my door. The birds have plucked her bald! Not a leaf,or stem left! The balls are made of looks like small twigs in a round shape. There’s no styrofoam. How do I fix my tree?! LOL!
Hi ! loved your tutorial I’m definitely going to make this! I’m having some trouble picking out the right size for the pot and I was wondering how many inches is the one that you used for yours??
Hey there! Do you happen to have a tutorial for the wreath on your front door with this picture? Love it!
I don’t but I should! All I did was take an 18″ grapevine wreath and hot glue Hydrangea flowers to it. I got them at Michaels and cut the stems to a few inches with a wire cutter. Thanks for stopping by and let me know if you have any questions!
Karin!!! I love your site, and of course I love this project! This looks so simple, right up my lane. Making my own at a lower cost, rather than buying is ALWAYS my preference. Your encouragement along with your DIY is brilliant! I just love it all!
I can’t thank you enough for your kind words Jen! I have so much fun figuring out how to make my own low-cost version of home decor items – maybe a little too much fun! My mission for the blog is that someone is drawn to the blog by a fun project but hopefully goes away with some encouragement in their relationship with the Lord! Thank you again!
Karin, I love boxwood, and your DIY topiaries are amazing! Thank you for another great project and an encouraging word to go with it! Can’t wait to find out about your giveaway!! <3 Misty
Thank you Misty! I love boxwood too as you can tell. I’m excited about the giveaway myself! I got three of the tiered trays on clearance – I’m not really sure why. So, I thought a giveaway would be a fun way to share the other two I am not using! Thanks again Misty!!!
Karin, So fun about your giveaway! I decorated my front door with boxwood after my trip to Magnolia Market. I wanted something classy and easy that I could have up all through the year. You can see what I did here. https://mistyphillip.com/2017/03/13/magnolia-market-easter-inspiration/
<3 Blessings, Misty
Hey Misty! I loved seeing your visit to Magnolia! I’m realizing the key to visiting Magnolia is not to go on a weekend. I love your front porch and your blog is gorgeous. Keep up the good work!
Thanks!! ❤️
Hi there !
I just want you to know how BLESSED I am to read your blog and learn new things ! God has truly blessed you with talent and insight !! I can feel your relationship is sweet with6our wonderful Saviour ! It makes it even more meaningful to me because I went to High School with your father-in-law, Jerry and of course your Uncle Terry in Dallas….your great Aunt Bev Schrag-Robinson was ahead of me. Derrill has been a dear friend of ours for 40+ years……it’s a small world, eh??
I pray God will richly reward you as you serve Him and continue to bless us with your deep insight! I’m a big follower of the teachings of Nancy Lee DeMoss Wohlgemuth, Beth Moore and Alicia Morgan….you are right up there among godley women to be admired and admonished to stay the course….you’ll be in my prayers and I’ll look forward to each new entry !! I’m going to try the topiary and the bird’s nest under glass !! I LOVE to decorate with branches, birds and nests
God Bless you.
Say Hi to your Dad for me….he would remember me as Dolly Classen back then ?
________________________________
Hi Dolly! I can’t thank you enough for your words of encouragement! It IS such a small world! I am so thankful for your prayers. My heartbeat for this blog is that women will be drawn to a fun project and come away with encouragement in their walk with the Lord. Again, I’m really humbled and encouraged by your sweet words and they came at a time I really needed them. Can’t thank you enough Dolly! How can I pray for you?
Very cute. Its also nice that you dont have to water them.
Isn’t that the truth!?! Thanks Mihaela!